6.10.2. How to integrate landed costs in the cost of the product?

  • Overview

Landed costs include all charges associated to a good transfer.

Landed cost includes = Cost of product + Shipping + Customs + Risk

All of these components might not be applicable in every shipment, but relevant components must be considered as a part of the landed cost. We have to identify landed cost to decide sale price of product because it will impact on company profits.

  • Configuration
  • Go to Inventory ‣ Configuration ‣ Setting. Check accounting option Include landed costs in product costing computation & Perpetual inventory valuation, then click on Apply to save changes.

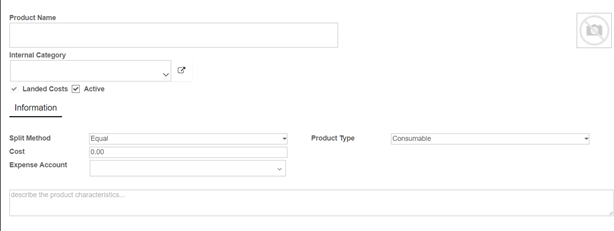
Landed Cost Types: Start by creating specific products to indicate your various Landed Costs, such as freight, insurance or customs duties. Go to Inventory ‣ Configuration ‣ Landed Cost types.

  • Then go to the Purchase ‣ Configuration ‣ Setting. Choose costing method Use a ‘Fixed’, ‘Real’ or ‘Average’ price costing method, then click on Apply to save changes.

Note: Landed costs are only possible for product configured in real time valuation with real price costing method. The costing method is configured on the product category

  • Link landed costs to a transfer

To calculate landed costs, go to Inventory ‣ Inventory Control ‣ Landed Costs.

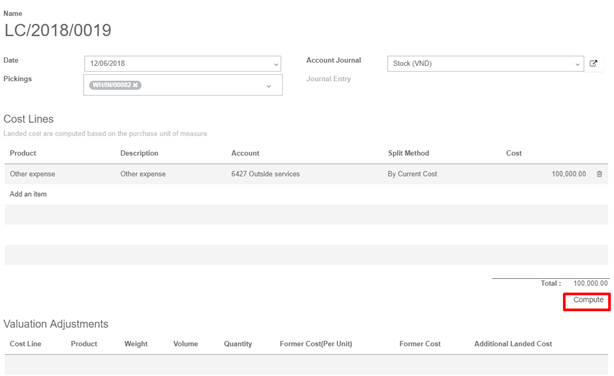
Click on the Create button and select the picking  you want to attribute landed costs. Select the account journal in which to post the landed costs. We recommend you to create a specific journal for landed costs. Therefore it will be easier to keep track of your postings.

Click the Compute button to see how the landed cost will be split across the picking lines. To confirm the landed cost attribution, click on the Validate button

6.10.1. How to process Raw Material to Manufacture

For a product, you can only choose Inventory Valuation Method between Perpetual (automated) or Periodic (manual)

If you want journal entries posted automatically, you should set Raw Material category as Perpetual (automated). You can also replace Stock Output Account by account Cost of Goods Sold if you want to skip allocation step.

Then the process in the system will be as follows:

  1. Create a BoM (Bill of Material): Manufacturing ‣ Master Data ‣ Bill of Material ‣ Create BoM

Coffee bean, Sugar and Milk are Stockable Products and belong to Raw Material category.

Milked coffee are Consumable Product and belong to Finished Product category.

  1. Purchase 3 raw materials that have been listed above (e.g: 10kg coffee bean, 10kg sugar, 10L milk)

Once you receive goods, the journal entries will be generated automatically.

  1. Sell 1 cup of Milked Coffee on POS ‣ Validate the payment ‣ The journal entries will be generated automatically after payment (If you set Stock Output as Cost of Goods Sold, the entries will be generated accordingly)

Inventory Valuation Report will be updated automatically according to BoM

4. When you close the session, the journal entries will be generated automatically as following:

  1. At the end of the month, you can check the Inventory Valuation in your warehouse and update the actual quantities if the theory data is different from the incurred data.

There are 2 ways to update it. One is manually updating one by one product. Second is using Import File.

Make sure that your products have been set Cost price already. (Cost price is set on your product form)
‣ See How to update Cost price of Product by import in 1.2.5. How to adapt an import template & How to import data into Kiu BMP

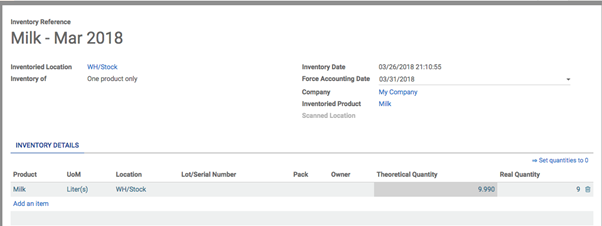
Go to Inventory Module ‣ Inventory Control ‣ Inventory Adjustment ‣ Create ‣ Choose to adjust all products/ product categories/ one product… ‣ Start Inventory

In this example, I choose one product “Milk” as below

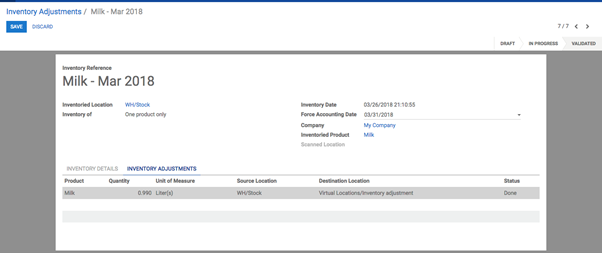
Then Validate Inventory Adjustment form:

The journal entry will be generated as follows: (If you set Stock Output of Milk product as Cost of Goods Sold, the entries will be generated accordingly)

→ How to update cost price of product by import?

You can download and have a look at Update cost price template file here.

From Inventory Module ‣ Inventory Control ‣ Product ‣ Choose view type as List at the right top screen ‣ Choose products to export ‣ Action ‣ Export ‣ Choose excel format ‣ Choose these following fields: Name, Cost Price ‣ Save to file

Update cost price in the exported file ‣ Import the file into the system ‣ Choose “Don’t Import” column Name of product

Then Validate ‣ Import

→  How to import Inventory Adjustment?

Please download Inventory Adjustment Import Template here.

Step 1: Export Products. Fields are needed to export: Name, Internal Reference, Unit

Step 2: Fill data from exported file into Sheet named Product in Import Template

Step 3: Inventory Module ‣ Configuration ‣ Locations ‣ Export Location list to get Location ID

Step 4: Fill data from exported file into Sheet named Location in Import Template

Step 5: Fill data into Green column into Sheet named Inventory Adjustment in Import template.

The ID column in the sheet can be any value but you need to make sure that it’s unique for Inventory Adjustment. Or the data you input will be merged with other Inventory Adjustment.

After finishing, Delete the 1st Row in that sheet. Your file is ready to import now.

Step 6: Inventory Module ‣ Inventory Control ‣ Inventory Adjustments ‣ Import ‣ Load File ‣ Validate ‣ Import ‣ Start Inventory ‣ Validate Inventory

6.9.7. What is a removal strategy (FIFO, LIFO, and FEFO)?

  • Overview

Removal strategies are usually in picking operations to select the best products in order to optimize the distance for the worker, for quality control purposes or due to reason of product expiration.

When a product movement needs to be done, the system will find available products that can be assigned to shipping. The way Kiu BMP assign these products depend on the removal strategy that is defined on the product category or on the location.

  • Configuration

Go to Inventory -> Configuration -> Settings. Check Track lots or serial numbers, Manage several warehouses, each one composed by several by stock locations and Advanced routing of products using rules, then click on Apply.

Then, open Configuration ‣ Locations and open the location on which you want to apply a removal strategy

  • Types of removal strategy

  • First In First Out (FIFO)

A First In First Out strategy implies that the products that were stocked first will move out first. Companies should use FIFO method if they are selling perishable goods. Companies selling products with relatively short demand cycles, such as clothes, also may have to pick FIFO to ensure they are not stuck with outdated styles in inventory.

Go to Inventory ‣ Configuration ‣ Locations, open the stock location and set FIFO removal strategy.

Let’s take one example of FIFO removal strategy.

In your warehouse stock (WH/Stock) location, there are 2 lots of Jelly fruits availableYou can find details of available inventory in inventory valuation report.

Create one sale order 1100 unit of Jelly fruit and confirm it. You can see in the outgoing shipment product that the Jelly fruit are assigned with the oldest lots, using the FIFO removal strategy.

  • First Expiry First Out (FEFO)

In FEFO warehouse management, the products are dispatched from the warehouse according to their expiration date.

Go to Inventory ‣ Configuration ‣ Setting. Check the option Define Expiration date on serial numbers. Then click on Apply to save changes.

This will allow you to set four expiration fields for each lot or serial number: best before date, end of life date, alert date and removal date. These dates can be set from Inventory Control ‣ Lots/ Serial Numbers.

  • Best Before Date: This is the date on which the goods with this serial/lot number start deteriorating, without being dangerous yet.
  • End of Life Date: This is the date on which the goods with this serial/lot number may become dangerous and must not be consumed.
  • Removal Date: This is the date on which the goods with this serial/lot number should be removed from the stock. Using the FEFO removal strategy, goods are picked for delivery orders using this date.
  • Alert Date: This is the date on which an alert should be sent about the goods with this serial/lot number.

Lots will be picked based on their removal date, from earliest to latest. Lots without a removal date defined will be picked after lots with removal dates.

All dates except removal date are for informational and reporting purposes only. Lots that are past any or all of the above expiration dates may still be picked for delivery orders, and no alerts will be sent when lots pass their alert date.

Expiration dates on lots can also be set automatically when goods are received into stock. After enabling expiration dates on serial numbers, four new fields will become available in the inventory tab of the product form: product life time, product using time, product removal time, and product alert time. When an integer is entered into one of these fields, the expiration date of a lot/serial of the product in question will be set to the creation date of the lot/serial number plus the number of days entered in the time increment field. If the time increment field is set to zero, then the expiration date of a lot/serial must be defined manually after the lot has been created.

Each of these time increment fields is used to generate one of the lot expiration date fields as follows:

Product Use Time –> Best Before Date

Product Removal Time –> Removal Date

Product Life Time –> End of Life Date

Product Alert Time –> Alert Date

To set the removal strategy on location, go to Configuration ‣ Locations and choose FEFO

6.9.6. What is a putaway strategy?

  • Overview

A good warehouse implementation takes care that products automatically move to their appropriate destination location. Putaway is the process of taking products off the receiving shipment and putting them into the most appropriate location.

If for instance a warehouse contains volatile substances, it is important to make sure that certain products are not stored close to each other because of a potential chemical reaction.

A putaway strategy follows the same principle as removal strategies but affects the destination location. Putaway strategies are defined at the location level (unlike removal strategies which are defined at the product level).

  • Configuration

Go to Inventory ‣ Configuration ‣ Settings and check option Manage several warehouses, each one composed by several stock locations & Advance routing of products using rules, then click on Apply.

  • Setting up a strategy

Let’s take as an example a retail shop where we store vegetables and fruits. We have to store this type of product in different locations to maintain product quality. Suppose there is one warehouse location WH/Stock and there is sub location WH/Stock/Vegetables & WH/Stock/Fruits.

You can create a putaway strategy from Inventory ‣ Configuration ‣ Locations. Open any location where you want to set a putaway strategy, click on Edit and locate the option Put Away Strategy.

Open the roll-down menu and click on Create and Edit. This will open a form view of put away strategy on which you have to set a name for the strategy, and set the method and fixed location for each category.

When you have entered all the necessary information, click on Save. Now, when you purchase products with those categories, they will automatically be transferred to the correct location. To check current inventory, Go to Inventory ‣ Report ‣ Inventory valuation. There you can see current inventory by location.

6.9.5. How to do inter-warehouses transfers?

If you own different warehouses you might want to transfer goods from one warehouse to the other. This is very easy thanks to the inventory module in Kiu BMP 

  • Configuration

First of all you have to select the multi locations option. Go to Inventory -> Configuration -> Settings. Then tick the Manage several warehouses, each one composed by several stock locations option. Please don’t forget to apply your changes.

  • Creating a new warehouse

The next step is to create your new warehouse. Go to Inventory -> Configuration -> Warehouse Management -> Warehouses. You are now able to create your warehouse by clicking on Create.

Fill in a Warehouse Name and a Short Name. The short name is 5 characters maximum

Note: Short name is very important as it will appear on your transfer order and other warehouse documents. It might be smart to use an understandable one

If you go back to your dashboard, new operations will automatically have been generated for your new warehouse.

  • Create an internal transfer

The final step is to create your internal transfer. If you want to transfer 2 units of a product from your first warehouse to another one in Ha Noi, proceed as follows:

From your dashboard, select an internal movement of one of the two warehouses. To do so, click on More ‣ Transfer

A new window will open where you will be able to select the source location zone (in this case our “old warehouse”) and the destination location zone (in this case our “new” warehouse located in Ha Noi).

Add the products you want to transfer by clicking on Add an Item and don’t forget to Validate or Mark as TODO once you are done.

If you select Validate, the system will process all quantities to transfer.

If you select Mark as TODO, the system will put the transfer in Waiting Availability status. Click on Reserve to reserve the amount of products in your source warehouse. Then click on Validate to complete internal transfer

6.9.4. What is a push rule?

  • Overview: 

The push system of inventory control involves forecasting inventory needs to meet customer demand. Companies must predict which products customers will purchase along with determining what quantity of goods will be purchased. The company will in turn produce enough product to meet the forecast demand and sell, or push, the goods to the consumer. Disadvantages of the push inventory control system are that forecasts are often inaccurate as sales can be unpredictable and vary from one year to the next. Another problem with push inventory control systems is that if too much product is left in inventory. This increases the company’s costs for storing these goods. An advantage to the push system is that the company is fairly assured it will have enough product on hand to complete customer orders, preventing the inability to meet customer demand for the product.

A push flow indicates how locations are chained with the other ones. As soon as a given quantity of products is moved in the source location, a chained move is automatically foreseen according to the parameters set on the flow specification (destination location, delay, type of move, journal). It can be triggered automatically or manually.

  • Configuration:

Push rules are part of the routes. Go to Inventory ‣ Configuration ‣ Settings and tick Advance routing of products using rules.

  • Push rules settings

The push rules are set on the routes. Go to Inventory -> Configuration -> Routes.

In the push rule section, click on Add an item.

Here you can set the conditions of your rule. 

Note: Some warehouse configuration creates rules with push rules already defined

  • Stock transfers

The push rule will trigger stock transfer. According to the rule set on your route, you will see that some transfers might be ready and other are waiting

6.9.3. What is a procurement rule?

  • Overview:

The procurement inventory control system begins with a customer’s order. With this strategy, companies only make enough product to fulfill customer’s orders. One advantage to the system is that there will be no excess of inventory that needs to be stored, thus reducing inventory levels and the cost of carrying and storing goods. However, one major disadvantage to the pull system is that it is highly possible to run into ordering dilemmas, such as a supplier not being able to get a shipment out on time. This leaves the company unable to fulfill the order and contributes to customer dissatisfaction.

An example of a pull inventory control system is the make-to-order. The goal is to keep inventory levels to a minimum by only having enough inventory, not more or less, to meet customer demand. The MTO system eliminates waste by reducing the amount of storage space needed for inventory and the costs of storing goods.

  • Configuration:

Procurement rules are part of the routes. Go to the Inventory -> Configuration ->Settings and tick “Advance routing of products using rules“.

  • Procurement rules settings:

The procurement rules are set on the routes. Go to Inventory -> Configuration -> Routes. In the Procurement rules section, click on Add an item.

Here you can set the conditions of your rule. There are 3 types of action possibles :

  • Move from another location rules
  • Manufacturing rules that will trigger the creation of manufacturing orders.
  • Buy rules that will trigger the creation of purchase orders.

Note: Some warehouse configuration creates routes with procurement rules already defined

6.9.2. Make-to-Order Route

If you work with no stock, or with minimum stock rules, it is better to use the Make To Order route. Combine it with the route Buy or Manufacture and it will trigger automatically the purchase order or the Manufacturing Order when your products are out-of-stock.

6.9.1. How to use routes?

A route is a collection of procurement rules and push rules. Kiu BMP can manage advanced push/pull routes configuration, for example:

  • Manage product manufacturing chains
  • Manage default locations per product
  • Define routes within your warehouse according to business needs, such as quality control, after sales services or supplier returns
  • Help rental management, by generating automated return moves for rented products

Configuration

Procurement rules are part of the routes. Go to Inventory -> Configuration ->Settings and tick Advance routing of products using rules.

Pre-configured routes

Kiu BMP  has some pre-configured routes for your warehouses. Go to  Inventory -> Configuration ‣ Warehouses. In the Warehouse Configuration tab, Incoming Shipments and Outgoing Shippings options set some routes according to your choices.

Custom Routes

Go to Inventory -> Configuration ‣ Routes.

First, you have to select the places where this route can be selected. You can combine several choices.

Routes applied on warehouses

If you tick Warehouses, you have to choose on which warehouse it will be applied. The route will be set for all transfer in that warehouse that would meet the conditions of the procurement and push rules.

Routes applied on products

If you tick Products, you have to manually set on which product it will be applied.

Open the product on which you want to apply the routes (Inventory ‣ Control ‣ Products). In the Inventory Tab, select the route(s):

Routes applied on Product Category

If you tick Product Categories, you have to manually set on which categories it will be applied.

Open the product on which you want to apply the routes (Configuration ‣ Product Categories). Select the route(s) under the Logistics section :

Routes applied on Sales Order lines

If you tick Sales order lines, you have to manually set the route every time you make a sale order.

In order to make it work, you also have to activate the use of the routes on the sales order.

Go to Sales -> Configuration ->Settings and tick Choose specific routes on sales order lines (advanced).

You can now choose the routes for each lines of your sales orders:

6.8.2. How to invoice the shipping cost to the customer?

  • Configuration: 

To configure the price of your delivery methods, go to the Inventory app, click on Configuration ‣ Delivery ‣ Delivery Methods. You can manually set a price for the shipping: It can be fixed or based on rules.

  • Invoice the price set on the sale order

On your sale order, choose the carrier that will be used. Click on Delivery Method to choose the right one.

The price is computed when you save the sale order or when you click on Set price.

To invoice the price of the delivery charge on the sale order, click on Set price, it will add a line with the name of the delivery method as a product. It may vary from the real price.

When you create the invoice, it will take the price set on the sale order.