→ Configuration
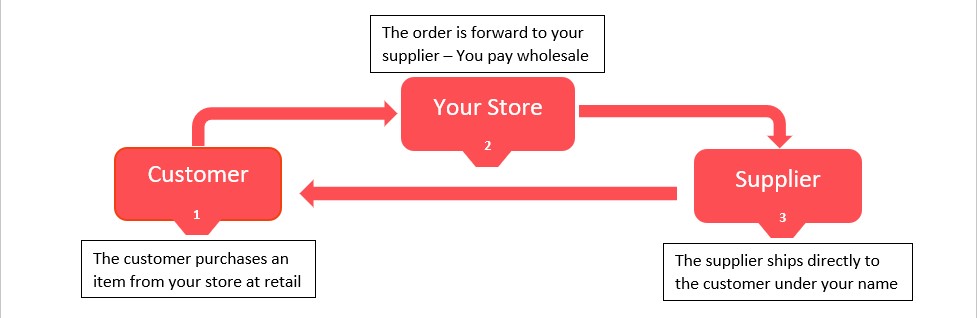
Drop-shipping on KIU BMP is a method allowing user to transport ordered parcel directly from supplier to customer. The model is illustrated as below:
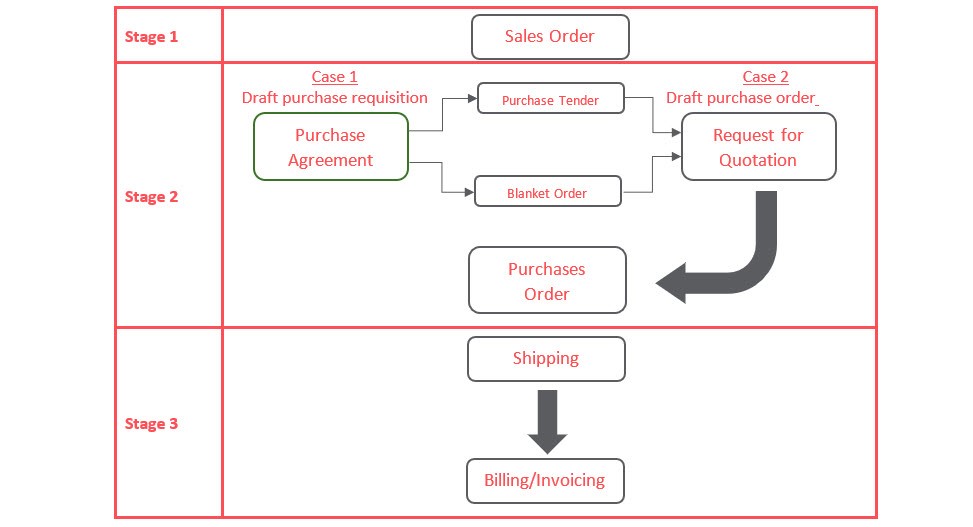
Reflecting the drop-shipping model, the workflow in KIU BMP is demonstrated as below:
To successfully record all your document in accordance with system workflow, please go over the following configuration first:
a. Inventory module
- General settings
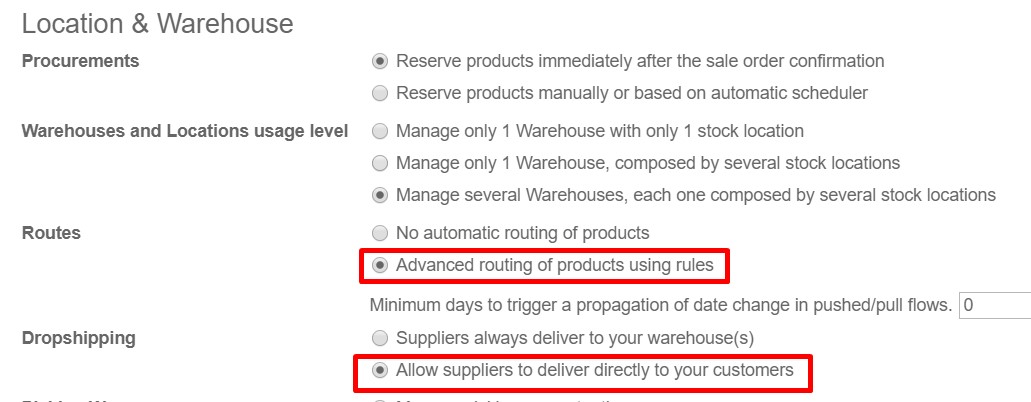
Going to Inventory -> Configuration -> Settings. Check “Advanced routing of products using rules” in the Routes section and “Allow suppliers to deliver directly to your customers” in the Drop Shipping section.
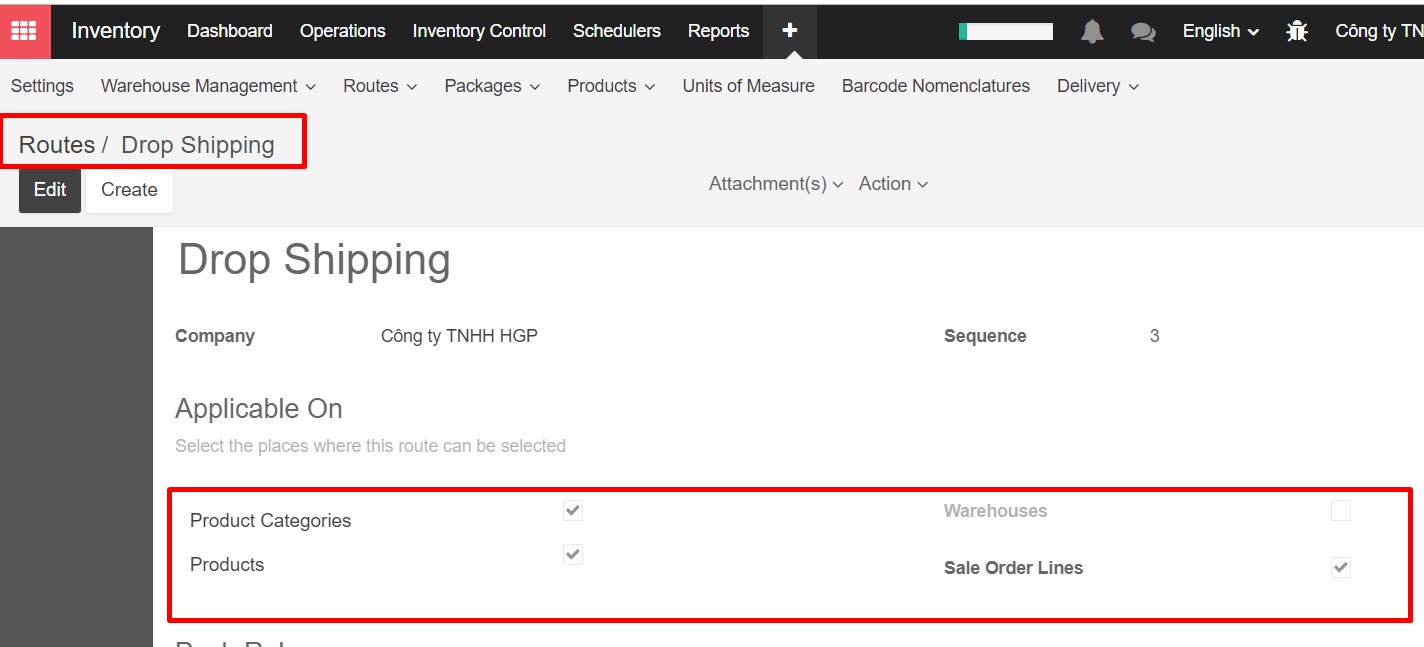
- Drop Shipping Route
Going to Inventory ->Configuration ->Routes -> Drop shipping
Open to view the establishment of Drop Shipping’s module on : Product Categories, Products, Sales Order Lines
b. Purchase module
The purchase process is divided into 2 cases:
Case 1: Draft Purchase Agreement
The purchase requisition is set up as Purchase Agreement that have two types: (1) Purchase Tender and (2) Blanket Order.
The former allows user to create as many Requests for Quotation as possible and send to different suppliers to select the best price (A vendor provides the best price will win the deal). While the latter is used to negotiate a discounted price over a period of time with one vendor (It is able to take multiple smaller deliveries during the settled period).
| PURCHASE TENDER | BLANKET ORDER |
|
|
Technically, Purchase Tenders is for the purpose of having better prices through competing suppliers, whereas Blanket Order is for the purpose of managing delivery dates with a supplier.
To enable the Purchase Agreement feature in KIU BMP, user must active the option by going to Purchase -> Configuration -> Settings -> Calls for Tenders
- Allow using call for tenders to get quotes from multiple suppliers (advanced)
And going to Purchase -> Configuration -> Settings ->Location & Warehouse
- Allow suppliers to deliver directly to your customers


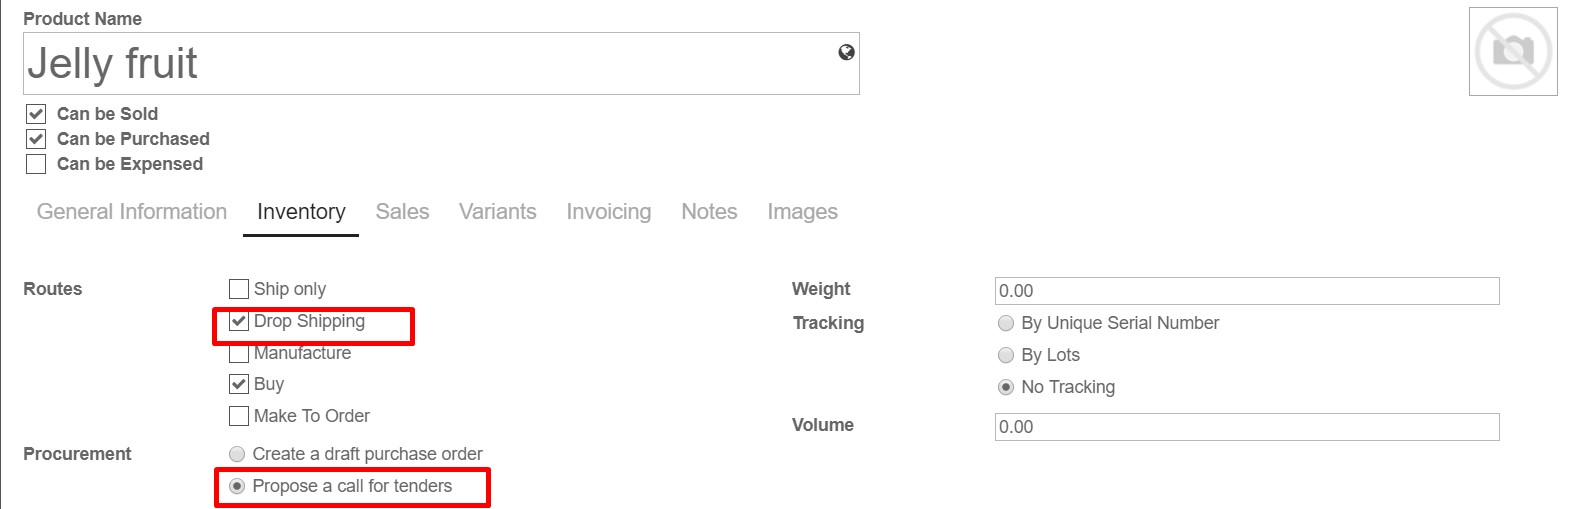
In accordance with purchase configuration, all items bought or sold in drop-shipping flow must be set up as below.
Going to Purchases ->Purchase -> Product Variants and search for the product. Click on the product to open its configuration form.
Case 2: Draft Purchase Order
Enable function “Draft Purchase Order” to partner one indicated supplier. This type allows user to draw up an initial Request for Quotation to the identified vendor offering the most acceptable price, which is based on the list of vendor’s price set up in the product configuration.
Going to Purchase>Configuration>Settings>Calls for Tenders
- Purchase propositions trigger draft purchase orders to a single supplier
Going to Purchase>Configuration>Settings>Location & Warehouse
- Allow suppliers to deliver directly to your customers


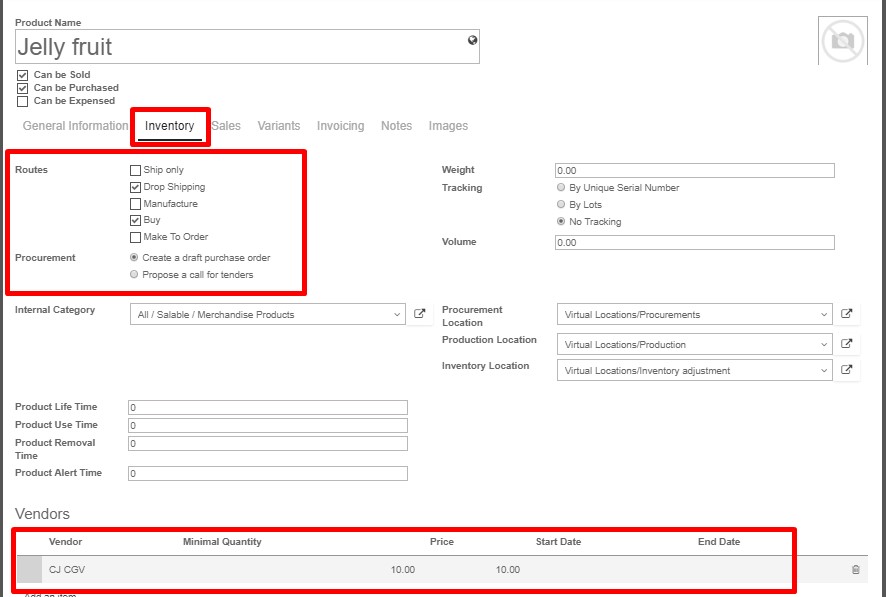
In accordance with purchase configuration, all items bought or sold in drop-shipping flow must be set up as below.
Going to Purchases ->Purchase ->Product Variants and search for the product. Click on the product to open its configuration form.
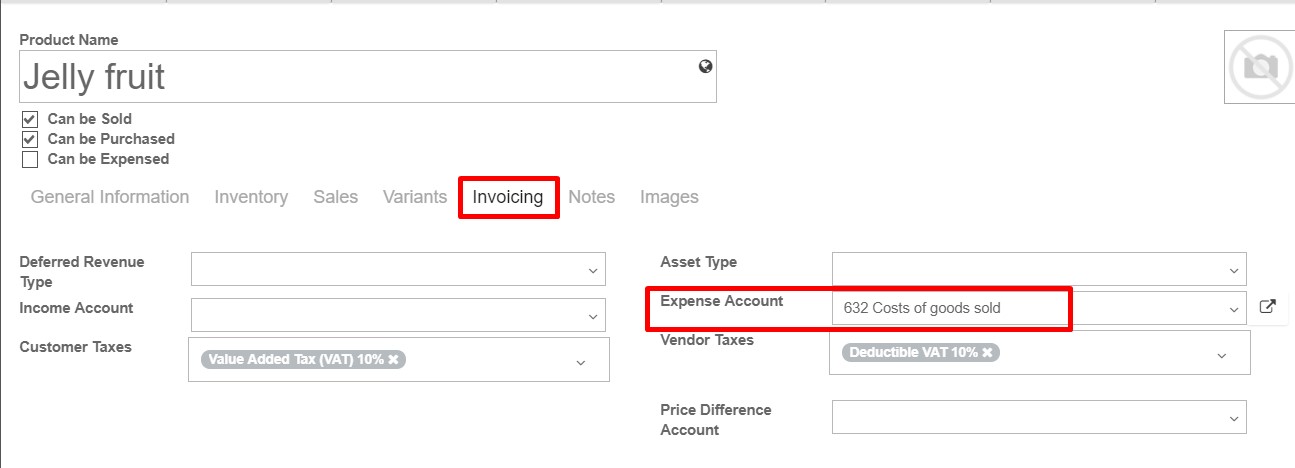
On tab Invoicing -> Expense account
c. Sale module
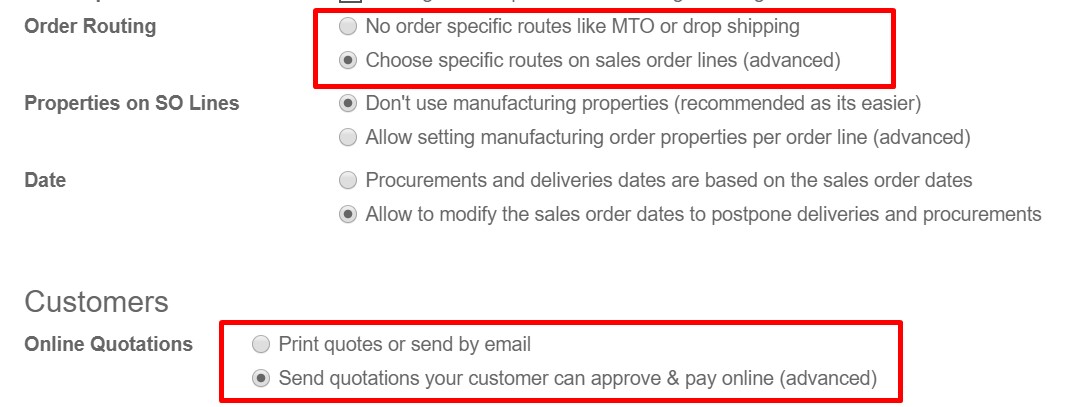
Going to Sales ->Configuration ->Settings ->Quotation & Sales ->Order Routing. Choose specific routes on sales order lines (advanced)
When all the mentioned items are properly checked, start recording all the document for this business practice.
→ Working practices
Stage 1: Receive quotation from Customer
Going to Sales ->Sales ->Quotations, click “Create” to draw up a quotation.
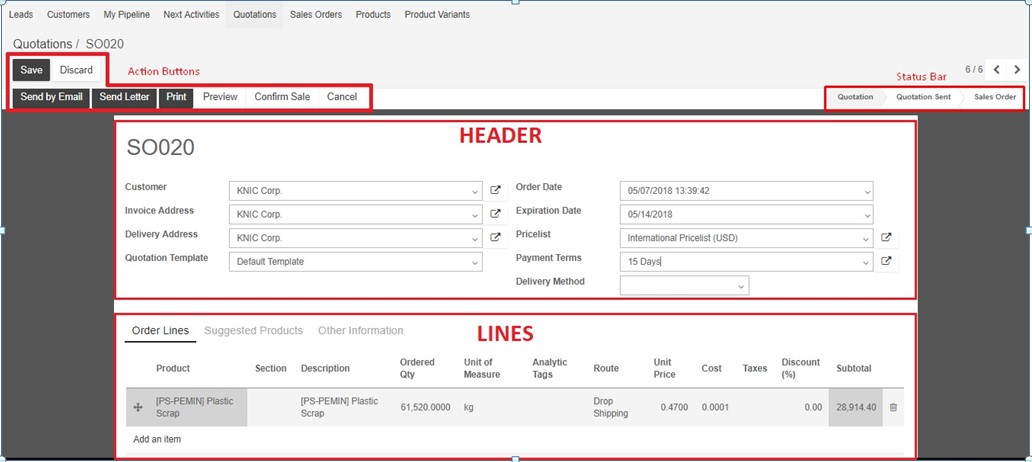
Step 1: Record Quotation/Sales order from Customer
– Fill the general information on the Header of the document, other details of the quotation can be added on the Lines. Once the draft quotation is saved, it is labelled with an auto-generated reference (E.g. SO020)
| No | Name | Description |
| Header | General Information | |
| 1. | Customer | Name of the individual/organization orders your product |
| 2. | Invoice Address | The address displayed on invoice issued to your customer |
| 3. | Delivery Address | The address to which goods are delivered |
| 4. | Order Date | The date on which the order is recorded from customer |
| 5. | Expiration Date | The date on which your quotation becomes invalid |
| 6. | Price list |
The pricing strategy applying to customer This can be created if going to Sales->Configuration ->Price list |
| 7. | Payment Terms | The terms specify the period allowed to a customer to pay off the amount due when your company completes a sale |
| 8. | Delivery Method | Fill this field if you plan to invoice the shipping based on picking |
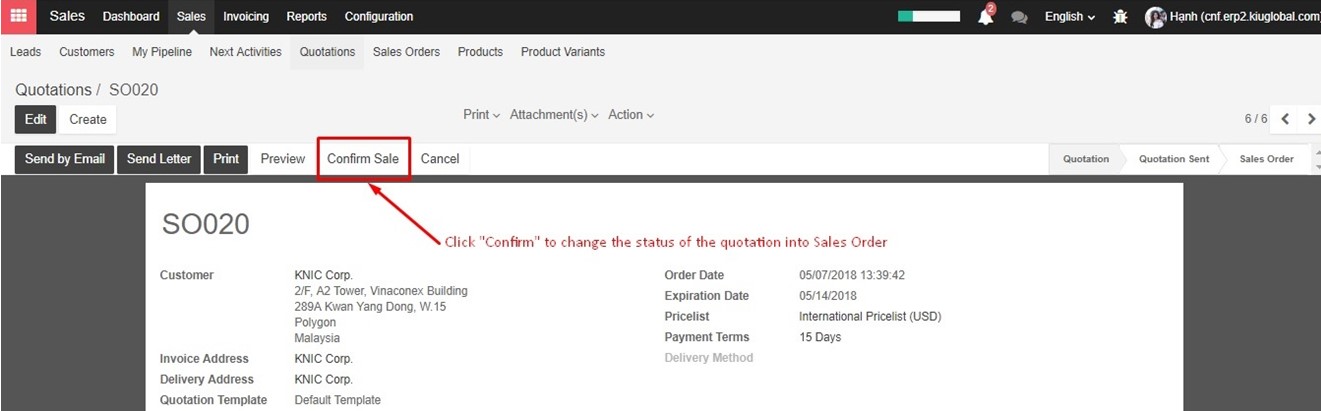
Step 2: Confirm Order with Suppliers
– Click “Confirm” to close the deal with customer. The quotation becomes Sales Order.
Stage 2 – Case 1: Draft Purchase Requisition
Looking for the draft Purchase Requisition by going to Purchases ->Purchase ->Purchase Agreement

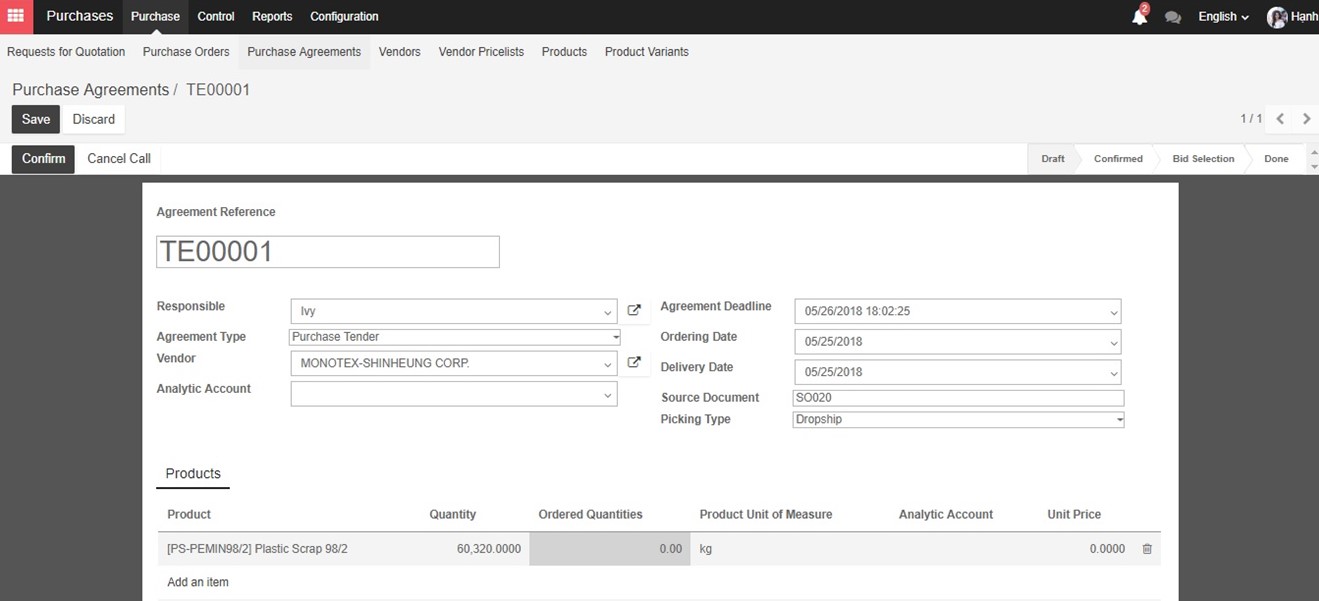
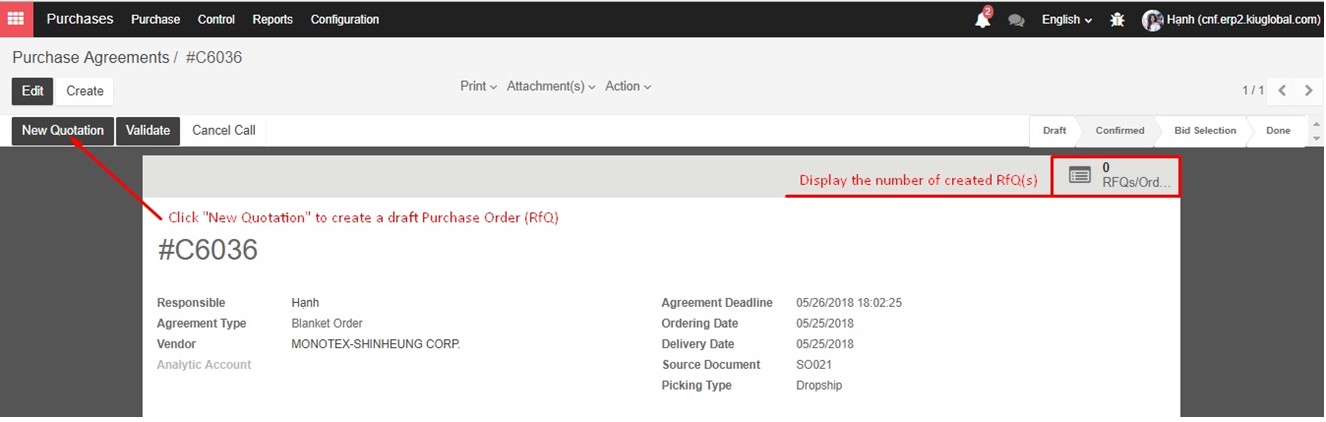
Step 1: Review and Confirm a Purchase Agreement
– The purchase requisition is drawn up as a Purchase Agreement and recognized with a reference (E.g. TE00001) that can be changed. Click on the document to review its details and make any changes if necessary.
| No | Name | Description | |
| 1. | Agreement Reference | The reference to identify a Purchase Agreement. Automatically generate by KIU BMP but changable | |
| 2. | Responsible | Purchaser in charge of requesting the order | |
| 3. | Agreement Type | Purchase Tender | Blanket Order |
| 4. | Ordering Date | The date when a purchase order to a chosen vendor is submitted | The starting date of the contract |
| 5. | Delivery Date | The date when the products have to be delivered | Do not have to fill because each release has different dates |
| 6. | Vendor | Do not have to fill because the vendor is defined after bidding | Choose the vendor with whom the contract is signed |
| 7. | Agreement Deadline | The date informing vendors when to have their offer submitted | |
| 8. | Source Document | Related document to this purchase requisition | |
| 9. | Picking Type | Dropship | |
- To verify the Purchase Agreement, click “Confirm”.
Step 2: Create and Confirm a RfQ
- KIU BMP displays button “New Quotation” after confirmation. Click this button to form a draft Purchase Order (or so-called Request for Quotation).
- A RfQ is created with the products listed on the Purchase Agreement. The next practice applied to different types of Purchase Agreement varies as shown in table.
| Agreement Type | Purchase Tender | Blanket Order |
| Quantity on RfQ | Quantity on RfQ is set percisely as entered on Purchase Agreement. | By default, the RFQ quantity is set to 0. Individual deliveries should be smaller. |
| Operation | Choose a vendor and send the RfQ. | Enter the quantity and date for each delivery. Send the RfQ to the vendor. |
| Repeat this operation for each vendor. | Repeat this operation for each release. | |
| Validation | Validate the Purchase Agreement once all the RfQ(s) are sent. | Validate the Purchase Agreement when all releases (Purchase Order) have been delivered and paid. |
| Mark as Done | When a RfQ related to this requisition is confirm (a vendor offering the best price is selected) | When all releases are fully paid. |
| A finished (Status: Done) Purchase Agreement can not be added to any RfQ. | ||
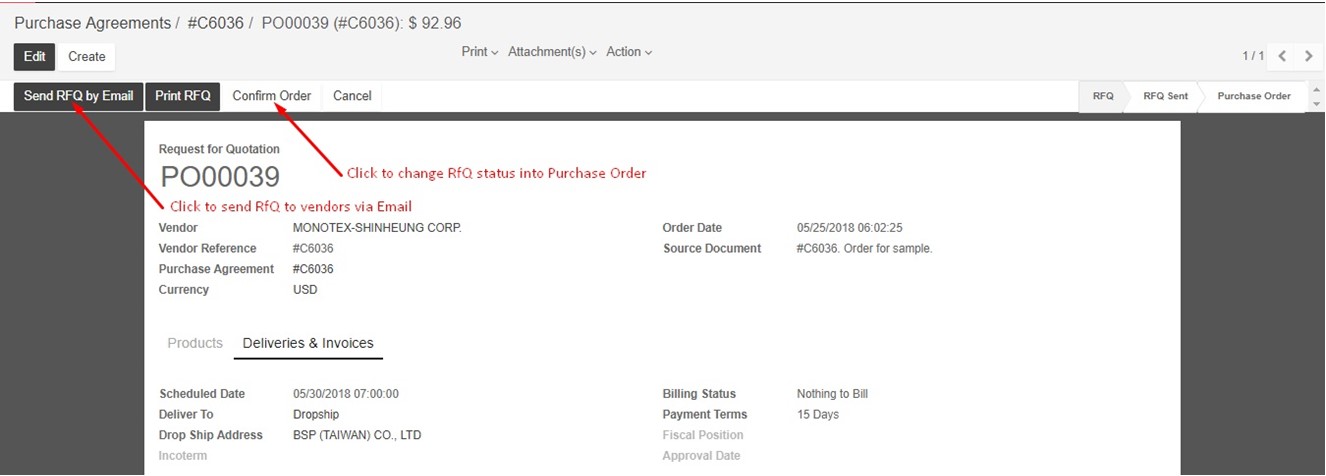
- Fill the Dropship Address with the customer’s address. Send the RfQ to vendors and Confirm the RfQ of the chosen supplier.
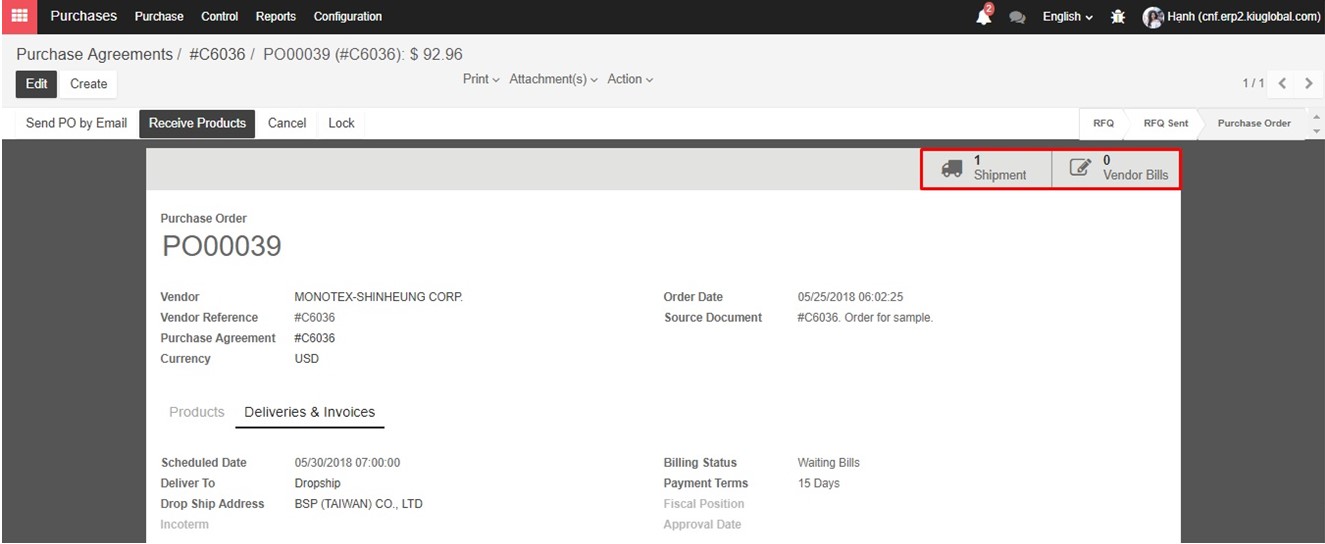
- After confirmation, 2 buttons linking to Shipment and Vendor Bill is displayed
Stage 2 – Case 2: Draft Purchase Order (RfQ)
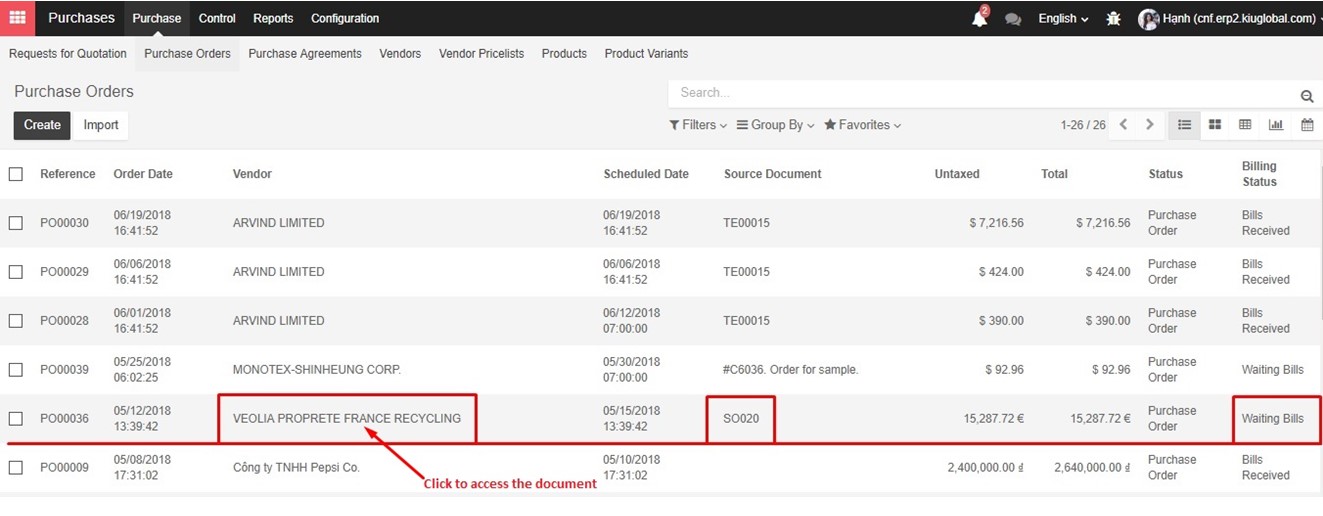
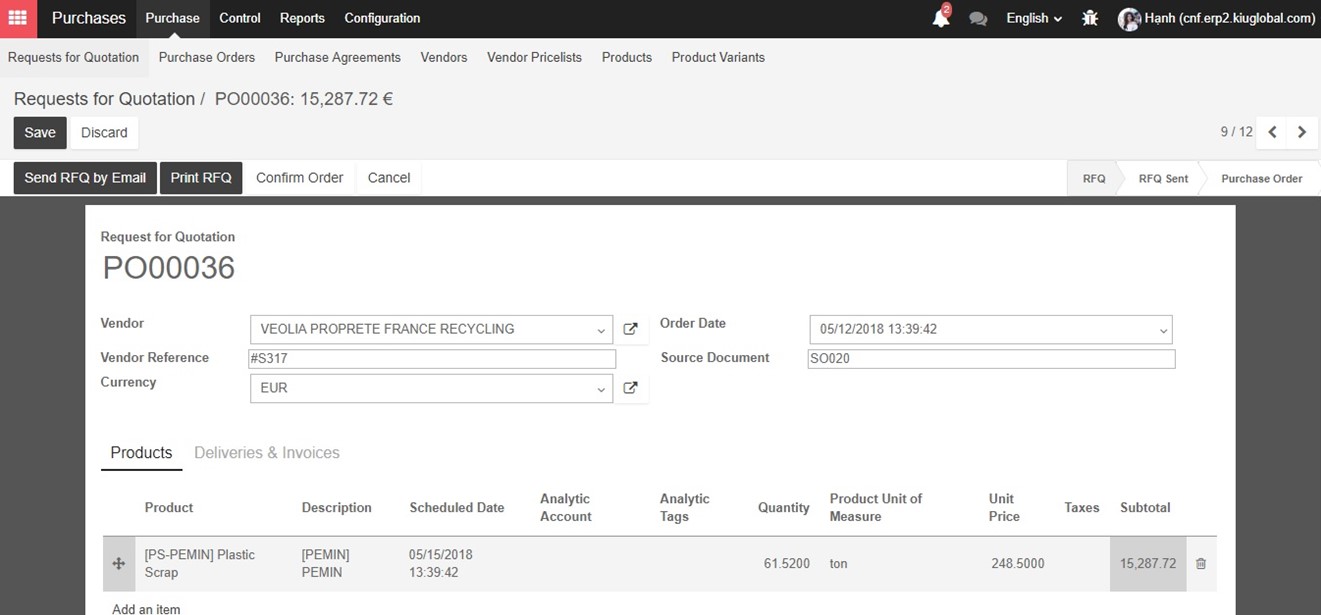
Looking for the auto generated Request for Quotation based on customer’s order by going to Purchases ->Purchase ->Requests for Quotation
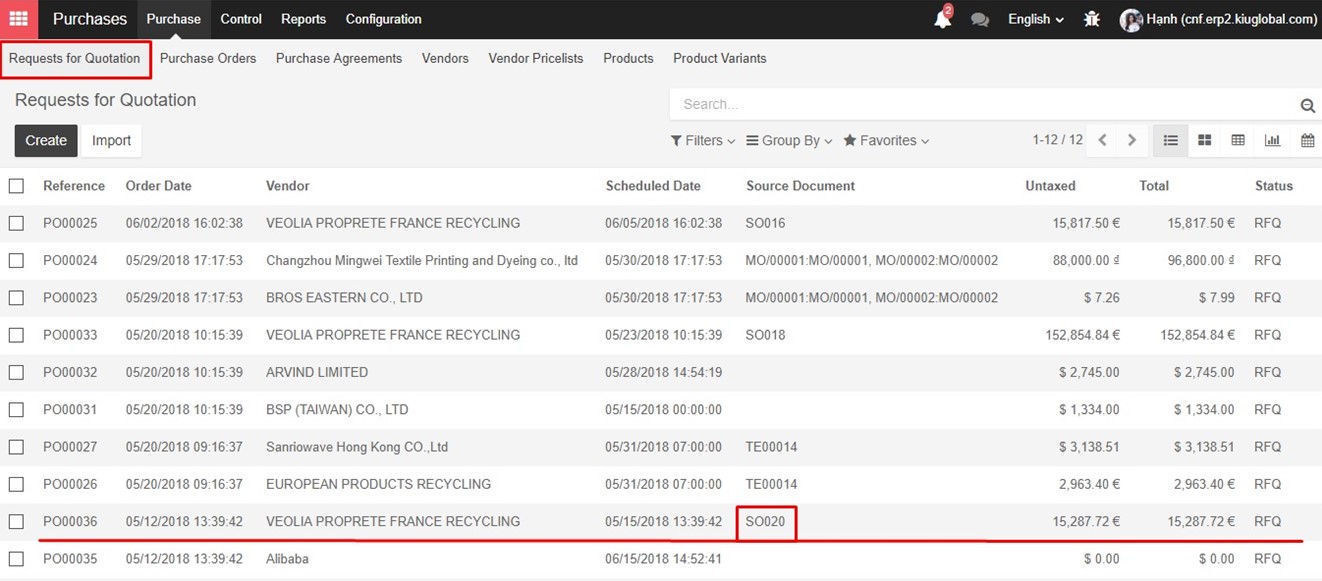
Step 1: Review a RfQ
- As the Request for Quotation is already prepared by KIU BMP, it is labelled with a reference (E.g. PO00036). Click on the document to review its Header and Lines to make any change (if necessary).
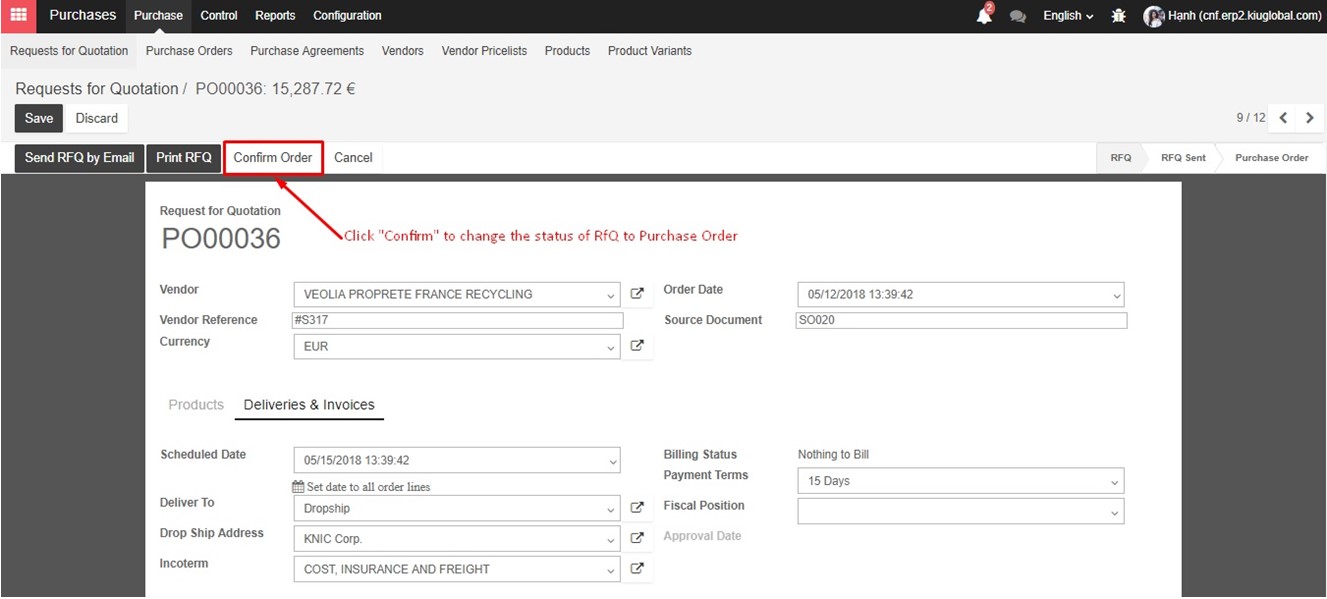
Step 2: Confirm a RfQ
- Finalizing the Request for Quotation by clicking button “Confirm” to change its status into Purchase Order.
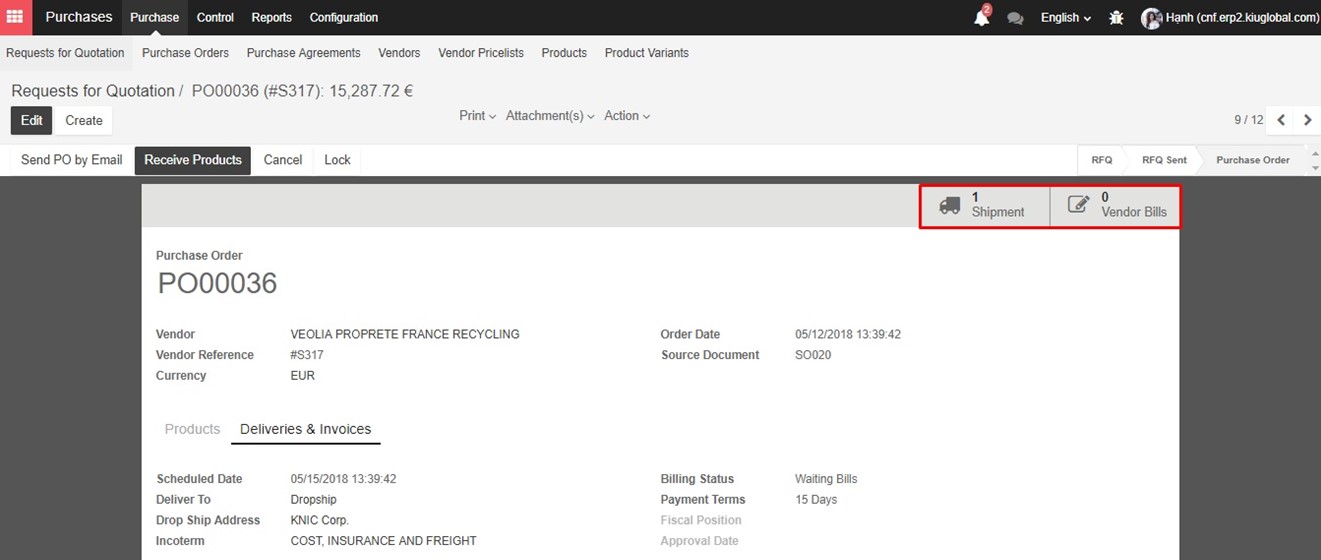
- After confirmation, 2 buttons linking to Shipment and Vendor Bill is displayed.
Stage 3: Delivery to Customer
- As shipment delivering goods from Vendor to Customer is auto generated, it is vital to review this and enter the date on which goods are expectedly delivered to customer (the information is taken from Packing List and Bill of Lading).
Noted that Force Accounting Date is related to the date recognized in accounting journal entry.
- Validate the shipment to mark as done once the goods are delivered to customers.