7.4.9. How to automate Customer follow-up

With the KIU Accounting module, you get a dynamic aged receivable report, customer statements and you can easily send them to customers.

If you want to go further in the automation of the credit collection process, you can use follow-up plans. They will help you automate all the steps to get paid, by triggering them at the right time: send customer statements by emails, send regular letter (through the Docsaway integration), create a task to manually call the customer, etc…

Here is an example of a plan:

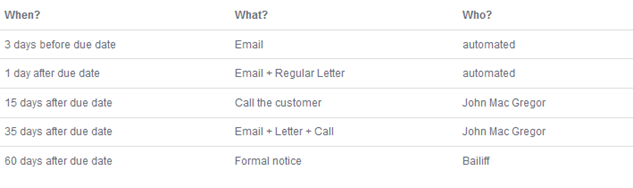
→ Install Reminder Module

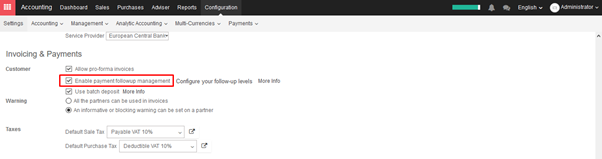
You must start by activating the feature, using the menu Configuration ‣ Settings of the Accounting module. From the settings screen, activate the feature Enable payment follow-up management.

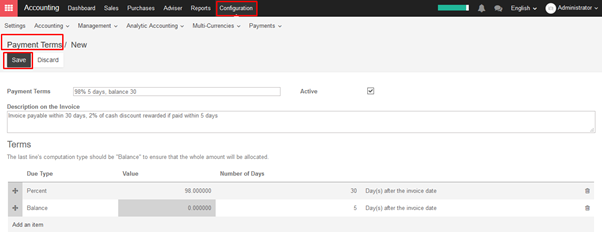
→ Define Payment Follow-ups Levels

To automate customer follow ups, you must configure your follow–up levels using the menu Accounting ‣ Configuration ‣ Payment Follow-ups. You should define one and only one follow-up plan per company.

The levels of follow-up are relative to the due date; when no payment term is specified, the invoice date will be considered as the due date.

For each level, you should define the number of days and create a note which will automatically be added into the reminder letter.

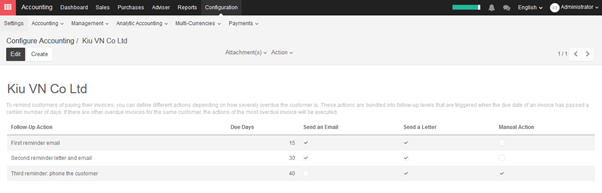
KIU defines several actions for every reminder:

  • Manual Action: assign a responsible that will have to call the customer
  • Send an Email: send an email to customer using the provided text
  • Send a Letter: send a letter by regular mail, using the provided note

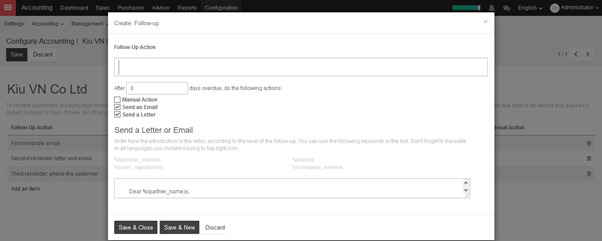
Note: As you need to provide a number of days relative to the due date, you can use a negative number. As an example, if an invoice is issued the January 1st but the due date is January 20, if you set a reminder 3 days before the due date, the customer may receive an email in January 17.

→ Doing your weekly follow-ups

Once everything is setup, Kiu will prepare follow-up letters and emails automatically for you. All you have to do is to the menu Sales ‣ Customers Statement in the accounting module.

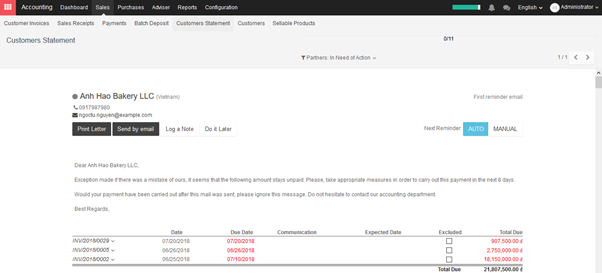
KIU will automatically propose you actions based on the follow-up plan you defined, invoices to pay and payment received.

You can use this menu every day, once a week or once a month. You do not risk to send two times the same reminder to your customer. Kiu only proposes you the action you have to do. If you do it every day, you will have a few calls to do per day. If you do it once a month, you will have much more work once you do it.

It’s up to you to organize the way you want to work. But it’s a good practice to reconcile your bank statements before launching the follow-ups. That way, all paid invoices will be reconciled and you will not send a follow-up letter to a customer that already paid his invoice.

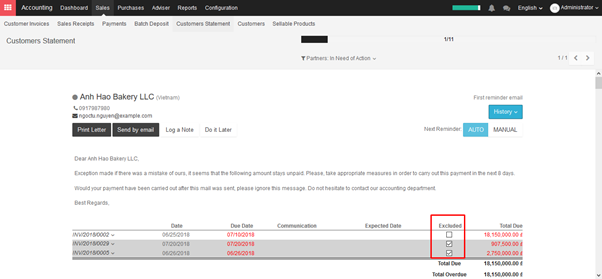
From a customer follow-up proposition, you can:

  • Get the customer information to contact him
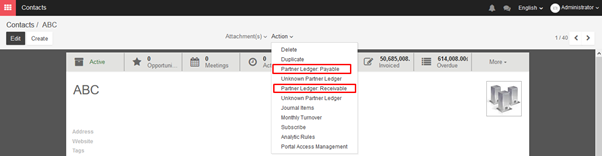
  • Drill down to the customer information form by clicking on its name
  • Change the text (or the email or letter) and adapt to the customer
  • Change the colored dot to mark the customer as being a good, normal or bad debtor
  • Log a note is you called the customer
  • Exclude some invoices from the statement table (litigation)
  • Send an email with the statement
  • Print a letter, or send a regular mail 
  • Plan the next reminder (but it’s better to keep in automatic mode so that Kiu will stick to the follow-up plan of the company)
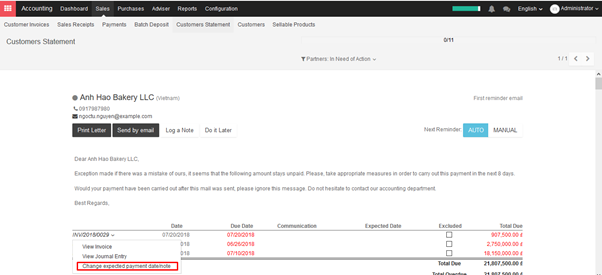
  • Drill down to an invoice
  • Change the expected payment date of an invoice (thus, impacting the next time KIU will propose you to send a reminder)

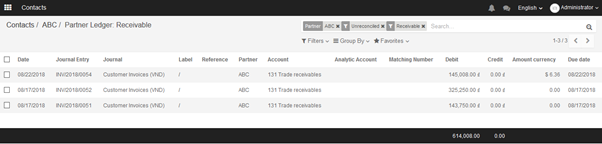
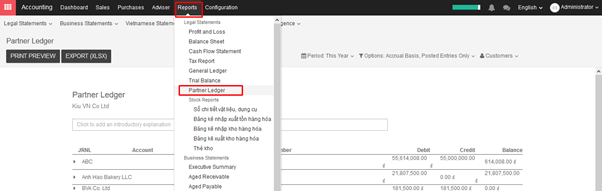
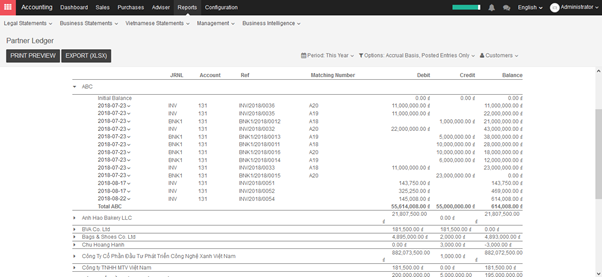
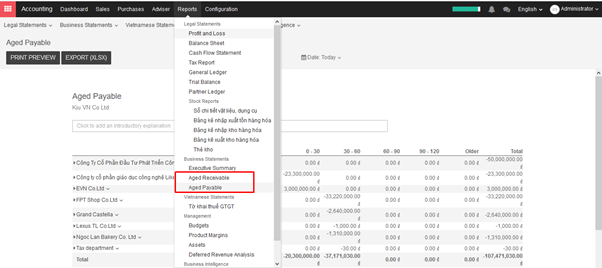
Note: You can force a customer statement, even if KIU do not proposes you to do it, because it’s not the right date yet. To do this, you should go to the Aged Receivable report (in the report menu of the Accounting module). From this report, you can click on a customer to get to his customer statement.

→ How to exclude an invoice from auto follow up?

  • Exclude a specific invoice for a specific date

KIU can exclude an invoice from follow-ups actions for specific date by clicking on Log a Note, then choose one of the ready options (one week, two weeks, one month, two months), So KIU will calculate the required date according to the current date.

Another way to achieve it is the following: click on the required invoice, then choose Change expected payment date/note, then enter a new payment date and note.

2. Exclude a specific invoice forever

KIU can exclude an invoice for a specific customer by clicking on the checkbox Excluded

7.4.8. Where to check Receivable Ledger

→  Receivable Ledger for a particular partner

You can refer to the instruction for a particular partner here

→ Receivable Ledger for all partners

You can refer to the instruction for all partners here.

→ Aged Receivable Report

You can refer to the instruction for Aged payable report here.

7.4.7. How to edit or refund an invoice

In KIU, it’s not possible to modify an invoice that has been validated and sent to the customer. If a mistake was made on a validated invoice, the legal way to handle that is to refund the invoice, reconcile it with the original invoice to close them and create a new invoice.

→  Modifying a validated invoice

If you need to modify an existing invoice, use the Refund Invoice button on the invoice. In the refund method field, select “Modify: create a refund, reconcile, and create a new draft invoice”.

KIU will automatically:

  • Create a refund for your invoice
  • Reconcile the refund invoice with the original invoice (marking both as Paid)
  • Create a new draft invoice you can modify

Then, you can modify the draft invoice and validate it once it’s correct.

→  Cancelling an invoice

If you need to cancel an existing invoice, use the Refund Invoice button on the invoice. In the refund method field, select “Cancel: create a refund and reconcile”.

KIU will automatically:

  • Create a refund for your invoice
  • Reconcile the refund invoice with the original invoice (marking both as Paid)

Nothing else needs to be done. You can send the refund by regular mail or email to your customer, if you already sent the original invoice.

→  Refunding part of an invoice

If you need to refund an existing invoice partially, use the Refund Invoice button on the invoice. In the refund method field, select “Create a draft refund”.

KIU will automatically create a draft refund. You may modify the refund (example: remove the lines you do not want to refund) and validate it. Then, send the refund by regular mail or email to your customer.

Note: Refunding an invoice is different from refunding a payment. Usually, a refund invoice is sent before the customer has done a payment. If the customer has already paid, they should be reimbursed by doing a customer payment refund.

7.4.6. How to modify a validated invoice

If your invoice is still in draft, you can modify it the way you want. However, if your invoice is validated, you can not change it anymore. If you need to modify it, the right operations to do are:

  • Refund the original invoice;
  • Reconcile the original invoice with the refund to void them;
  • Create a new draft invoice, a copy of the original;
  • Validate the new invoice.

All those steps are automated by KIU. All you have to do is to click on the Refund button on an invoice.

In the refund dialog, select the option “Modify: create a refund, reconcile and create a draft invoice”. Once you click on the “Create Refund” button, KIU will void your existing invoice and create a new draft invoice that is a duplicate of the original one.

Edit this new draft invoice and validate it when it’s correct.

7.4.5. How to setup discount for early payment

Cash discounts are an incentive (usually a small percentage) that you offer to customers in return for paying a bill owed before the scheduled due date. If used properly, cash discounts improve the Days Sales Outstanding aspect of a business’s cash conversion cycle.


For example, a typical cash discount would be: you offer a 2% discount on an invoice due in 30 days if the customer were to pay within the first 5 days of receiving the invoice.

→ Payment terms

In order to manage cash discounts, we will use the payment terms concept of Kiu (From the Accounting module, go to Configuration ‣ Management ‣ Payment terms ‣ Create).

Let’s start with the above example: a 2% discount on an invoice due in 30 days if the customer were to pay within the first 5 days.

A typical payment term of 30 days would have only one installment: balance in 30 days. But, in order to configure the cash discount, you can configure the payment term with two installments:

  • 98% within 5 days
  • balance within 30 days

To make it clear that it’s not a payment term but a cash discount, don’t forget to set a clear description that will appear on the invoice: Invoice is due within 30 days, but you can benefit from a 2% cash discount if you pay within 5 days.

→ Bank reconciliation model

In order to speed up the bank reconciliation process, we can create a model of entry for all cash discounts. To do that, from the Accounting module dashboard, click on the “More” link on the bank and choose the option “Reconciliation Models”.

Create a new model for cash discounts as follow:

  • Button Label: Cash Discount
  • Account: Cash Discount (according to your country)
  • Amount Type: Percentage
  • Amount: 100%
  • Taxes: depending on your country, you may put a tax on the cash discount if taxes have to be deduced

Even if it’s a 2% cash discount, set a 100% amount on the reconciliation model as it means 100% of the remaining balance (the 2%). You can use the same reconciliation model for all your cash discount. No need to create a model per payment term.

→ Creating an invoice with a cash discount

When you create a customer invoice, set the right payment term “30 days, 2% cash discount” right after having selected the customer.

Once the invoice is validated, Kiu will automatically split the account receivable part of the journal entry with two installments having a different due date: 98% within 5 days, 2% within 30 days.

→ Paying the invoice with a cash discount

If the customer pays with a cash discount, when processing the bank statement, you will match the payment (98%) with the related line in the journal entry.

As you can see in the above screenshot, when selecting the customer, you also see the 2% remaining of 3,630 VND. If you want to accept the cash discount (if the customer paid within the 5 days), you can click on this line with 2%, click on “Open Balance”, and select your “Cash Discount” reconciliation model. That way, the invoice is marked as fully paid.

→ Paying the invoice in full

If the customer pays the invoice fully, without benefiting from the cash discount, you will reconcile the payment (in full) with the two lines from the invoice (98% and 2%). Just click on the two lines to match them with the payment.

7.4.3. How to register payment for Customer Invoice

→ How to register a payment for a Customer Invoice

You can refer to the instruction for Vendor Bills here.

→ How to register batch payments for Invoices from a Customer

You can refer to the instruction for Vendor Bills here.

→ How to register batch payments for Invoices from different Customers

You can refer to the instruction for Vendor Bills here.

7.4.2. How to invoice a shipping cost to the customer

There are two ways to invoice the shipping costs:

  1. Agree with the customer over a cost and seal it down in the sale order
  2. Invoice the real cost of the shipping.

→ Invoice the price set on sale order

In Sales Module ‣ Sales order 

On your sale order, choose the carrier that will be used. Click on Delivery Method to choose the right one.

The price is computed when you save the sales order or when you click on Set price.

To invoice the price of the delivery charge on the sale order, click on Set price, it will add a line with the name of the delivery method as a product. It may vary from the real price.

When you create the invoice, it will take the price set on the sales order.

→ Invoice the real shipping costs

On your sale order, choose the carrier that will be used. Click on Delivery Method to choose the right one.

Edit the cost set automatically by KIU to real cost ‣ Save

Go back to the sale order, the real cost is now added to the sale order.

7.4.1. How to issue a Customer Invoice

Draft invoices can be manually generated from other documents such as Sales Orders, Purchase Orders,etc. Although you can create a draft invoice directly if you would like.

An invoice must be provided to the customer with the necessary information in order for them to pay for the goods and services ordered and delivered. It must also include other information needed to pay the invoice in a timely and precise manner.

To create invoice directly, open Accounting module ‣ Sales ‣ Customer invoices ‣ Create

The document is composed of three parts:

  • the top of the invoice, with customer information,
  • the main body of the invoice, with detailed invoice lines,
  • the bottom of the page, with detail about the taxes, and the totals.

7.3.4. Where to check Payable Ledger

→  Payable Ledger for a particular partner

Open Contact module ‣ Choose a particular partner ‣ Action ‣ Click on type of partner ledger: payable/receivable

→  Payable Ledger for all partners

Go to Accounting module ‣ Reports ‣ Partner ledger, you can see all transactions relating to partners.

→  Aged payable report

Go to Accounting module ‣ Reports ‣ Aged Payable 

The accounts payable aging report categorizes payables to suppliers based on time buckets. The report is typically set up with 30-day time buckets, so that each successive column in the report lists supplier invoices that are:

  • 0 to 30 days old
  • 31 to 60 days old
  • 61 to 90 days old
  • 91 to 120 days old
  • Older than 120 days

The intent of the report is to give the user a visual aid in determining which invoices are overdue for payment.