→ How to create a new tax
Open the menu Configuration ‣ Tax, the click on the Create button.
When you create a new tax, you can set the following information:
Scope: Sales, Purchases or None (e.g. depLabel on Invoices:recated tax)
Tax Account: is the account where the tax journal item will be posted. This field is optional, if you keep it empty, KIU posts the tax journal item in the income account. a short text on how you want this tax to be printed on invoice line. For example, a tax namely “21% on Services” can have the following label on invoice “21%”.
Tax Group: defines where this tax is summed in the invoice footer. All the tax belonging to the same tax group will be grouped on the invoice footer. Examples of tax group: VAT, Retention.
Include in Analytic Cost: the tax is counted as a cost and, thus, generate an analytic entry if your invoice uses analytic accounts.
Tags: are used for custom reports. (usually, you can keep this field empty)
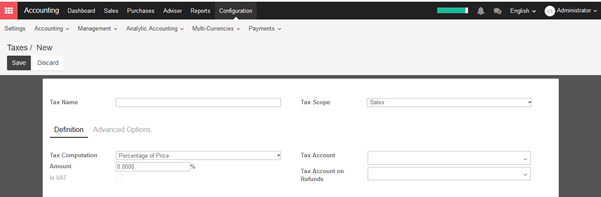
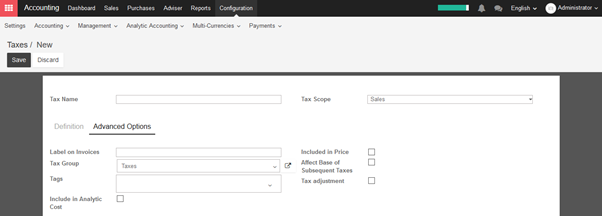
Tax Computation: Select type of tax computation
- Group of taxes: groups of more than 01 taxes.
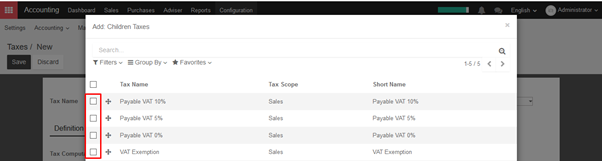
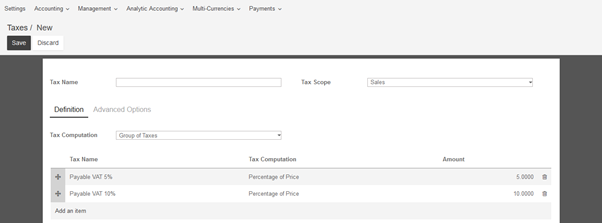
The group of taxes helps us to apply the multiple taxes under the same name, sometimes it also known as a composite tax.
For example, the composite tax 15% ( 10%+ 5%), it will compute two different taxes 10% and 5% separately on the invoice.
- Fixed: Fix amount of tax
- Percentage of price: Percentage of tax based on product price
- Percentage of price tax included: Price is net amount after tax. Normally, it will be applied for withholding tax of employee wages.
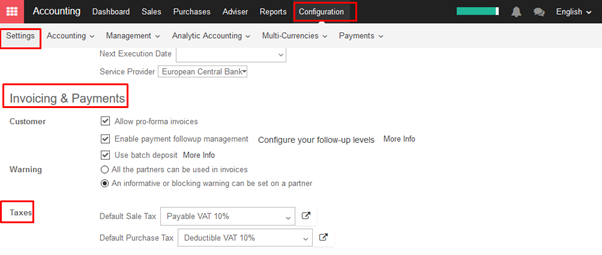
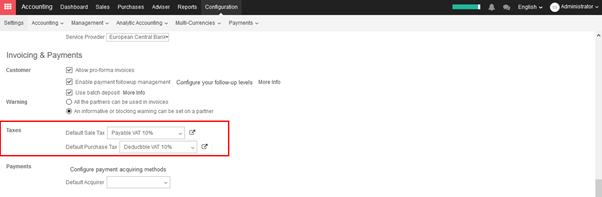
→ How to set default tax
Open the menu Configuration ‣ Invoicing & Payments ‣ Taxes, choose taxes which you would like to set defaults.
Once taxes are set by default, when you create a new product, KIU will propose you the right taxes by default on the product form.
Note
Setting the default taxes impact the creation of product, but not sales order or invoices. The tax used on sales order or invoices is defined by the product on the sale order line.
→ How to adapt taxes to your customer status or localization
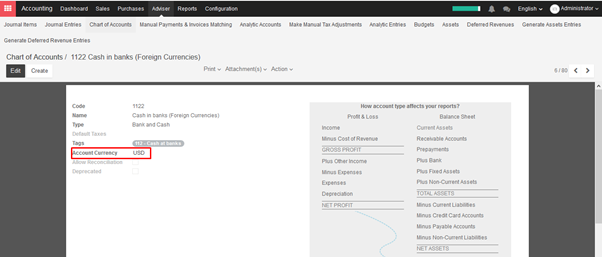
In KIU, the default tax to apply on a product/service is set on the product form. But, some customers may have specific tax rates because of their status (in some countries, construction companies are VAT exempt) or their location (customers in a different country, state and/or city may be subjected to another tax rate).
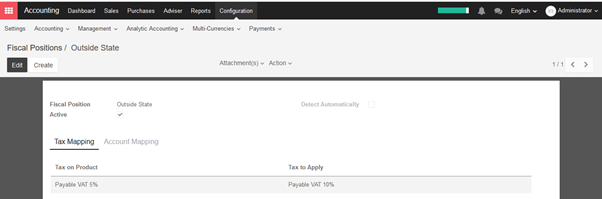
In order to select the right tax to apply according to the customer or product, KIU uses the concept of fiscal positions. If a customer has a specific fiscal position, the default tax may be replaced by another one. (as an example, construction companies have 0% instead of 21% in Belgium for construction related work).
As an example, in Belgium, for the VAT tax, there are 3 fiscal positions depended on the country of the customer and some companies (like construction companies) benefit from a specific fiscal treatments:
- Belgian companies: with 21% VAT (default, on product form)
- European companies: with 0% VAT (intra-EU)
- Other countries: 0% (but a different tax since it uses different accounts)
- Construction companies: with 0% VAT, only for construction companies in Belgium
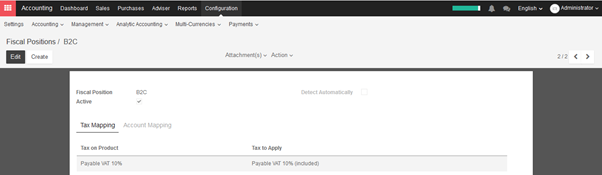
To set up Fiscal Position, go to Configuration ‣ Fiscal Position under the Accounting module. Create a new position and set the name, and then set TAX MAPPING. For example, replace 5% with the 10%. Check the following screenshot:
→ How to set tax- included prices/ How to manage prices for B2B (tax excluded) and B2C (tax included)
When working with consumers, prices are usually expressed with taxes included in the price (e.g., in most eCommerce). But, when you work in a B2B environment, companies usually negotiate prices with taxes excluded.
KIU manages both use cases easily, as long as you register your prices on the product with taxes excluded or included, but not both together. If you manage all your prices with tax included (or excluded) only, you can still easily do sales order with a price having taxes excluded (or included).
This documentation is only for the specific case where you need to have two references for the price (tax included or excluded), for the same product. The reason of the complexity is that there is not a symmetrical relationship with prices included and prices excluded, as shown in this use case, in Vietnam with a tax of 10%:
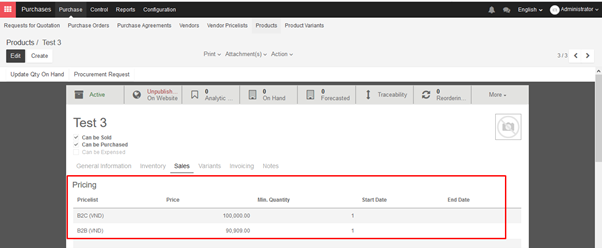
- Your eCommerce has a product at 100,000VND (taxes included)
- This would do 90,909 VND (taxes excluded) and a tax of 91 VND
But for the same case, if you register the price without taxes on the product form (90,909 VND), you get a price with tax included at 99,999 VND, because:
- 90,909VND * 1.1 = 99,999 VND
So, depending on how you register your prices on the product form, you will have different results for the price including taxes and the price excluding taxes:
- Taxes Excluded: 90,909VND & 100,000VND
- Taxes Included: 90,909VND & 99,999VND
Note:
If you buy 100 pieces at 100,000VND taxes included, it gets even more tricky. You will get: 10,000,000 VND (taxes included) = 9,090,909VND (price) + 909,091VND (taxes) Which is very different from a price per piece at 90,909VND tax excluded.
This documentation explains how to handle the very specific case where you need to handle the two prices (tax excluded and included) on the product form within the same company.
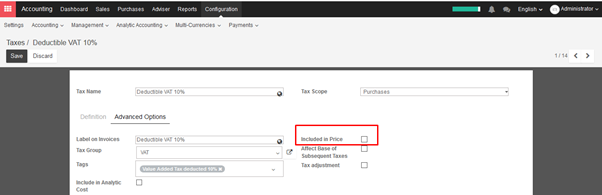
If you negotiate some prices with tax excluded and, for other customers, others prices with tax included, you must:
- Always store the default price TAX EXCLUDED on the product form, and apply a tax (price included on the product form)
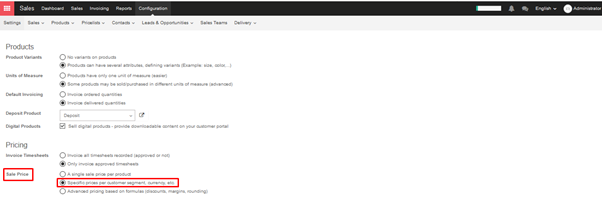
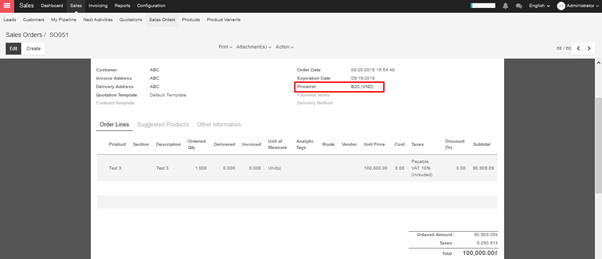
2. Create a price list with prices in TAX INCLUDED, for specific customer
You can activate the pricelist feature per customer from the menu: Configuration ‣ Settings of the Sale module. Choose the option different prices per customer segment.
Then set the price list in product form.
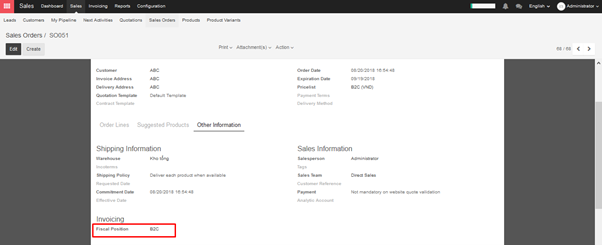
3. Create a fiscal position that switches the tax excluded to a tax included
In Accounting module, open the menu Configuration ‣ Fiscal Positions ‣ Create
4. Assign both the pricelist and the fiscal position to customers who want to benefit to this pricelist and fiscal position
→ How to manage withholding taxes
A withholding tax, is also called a retention tax, is a government requirement for the payer of a customer invoice to withhold or deduct tax from the payment, and pay that tax to the government. In most jurisdictions, withholding tax applies to employment income.
With normal taxes, the tax is added to the subtotal to give you the total to pay. As opposed to normal taxes, withholding taxes are deducted from the amount to pay, as the tax will be paid by the customer.
For example, in Colombia you may have the following invoice:

In this example, the company who sent the invoice owes $20 of taxes to the government and the customer owes $10 of taxes to the government.
To configure withholding tax, go to Accounting module ‣ Taxes ‣ Create
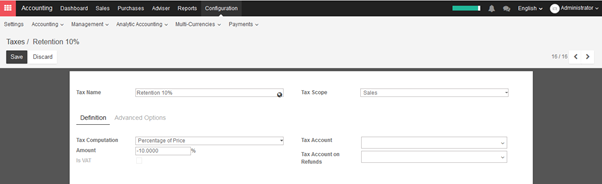
In order to make it appear as a retention on the invoice, you should set a specific tax group Retention on your tax, in the Advanced Options tab.
Once the tax is defined, you can use it in your products, sales orders or invoices.