6.2.2. Using product variants

Product variants are used to manage products having different variations, like size, color, etc. It allows managing the product at the template level (for all variations) and at the variant level (specific attributes).

As an example, a company selling T-Shirts may have the following product:

  • KIU T-Shirt: 
  • Size: S, M, L, XL
  • Color: Black, Red, White

In this example, KIU T-Shirt is called the product template and KIU T-Shirt, S, Red is a variant. Sizes and color are attributes.

The above example has a total of 12 different products (4 sizes x 3 colors). Each one of these products has its own inventory, sales, etc.

→ Impact of variants

  • Barcode: the code and barcode is associated to a variant, not the template. Every variant may have its own barcode.
  • Price: every product variant has its own public price that is computed based on the template price (VND 100,000) with an optional extra for every variant (+VND 20,000 for color red). However, you can define pricelist rules that apply on the template or the variant.
  • Inventory: the inventory is managed by product variant. You don’t own t-shirts, you only own “T-shirts, S, Red”, or “T-Shirts, M, Black”. On the product template form, you get the inventory that is the sum of every variant.
  • Picture: the picture is related to the variant, every variation of a product may have its own primary picture.
  • Other fields: most of the other fields belong to the product template. If you update them, it updates automatically all the variants. (example: Income Account, Taxes)

→ When should you use variants?

Using variants has the following impacts:

  • eCommerce: in your online shop, the customer will only see product templates in the catalog page. Once the visitor click on such a product, he will have options to choose amongst the variants (colors, sizes, …)
  • Manufacturing: Using variants allows to define only one bill of material for a product template and slight variations for some of the variants. Example: instead of creating a Bill of Material for “T-shirt, Red, S”, you create a bill of material for “T-shirt” and add some lines that are specific to the dimension S, and other lines specific to the color Red.
  • Pricing: The default price of a product is computed using the price of the product template and add the optional extra price on each dimension of the variant. This way, variant prices are easier to maintain since you don’t have to set the price for every variant. However, it’s possible to create pricelist rules to fix price per variants too.

→  When should you avoid using variants?

Using variants may add a level of complexity on the way you use Kiu BMP . You should consider using variants only if you need it to reduce the complexity of managing lots of products that are similar.

As an example, importing your initial product catalog is more complex if you use variants. You can’t just import a list of products, you must import product templates and all their related variations.

In addition to that, you should also carefully select the dimensions that you manage as separate product templates and those as variants. As an example, a company having these products:

  • Quality: T-Shirts, Polos, Shirts
  • Color: Red, Black, White
  • Size: S, M, L, XL

In such a use case, you could create 1 template with three dimensions of variants ( T-Shirts, Polos, Shirts). But, it’s recommended to create two different product templates as T-shirts may highly differ from polos or shirts and customer expects to see these as two different products in the e-Commerce:

  • Product Template: T-shirt
    • Color: Red, Black, White
    • Size: S, M, L, XL
  • Product Template: Polos
    • Color: Red, Black, White
    • Size: S, M, L, XL

→ Configuration: 

  • Activate the variant feature: Before you can use product variants, you must first activate the product variants in the settings. To do so, you must go to the Sales app. In the menu Configuration ‣ Settings, locate the Products Variants line, and tick the option Products can have several attributes, defining variants (Example: size, color, …”, then click on Apply

  • Create product with variant: Once you have activated the variant option, you can add variants to your products. To do so, go to the Sales module, Sales ‣ Products. It is also accessible from the Purchase and inventory modules.

Now, click on the product you wish to add variants to.

  • In the product page, a new tab called Variants has appeared. The number written on top is the number of variants this product currently has. To add new variants, click on the tile. In the new window, click on Create.
  • In Attributes, click on the roll down menu and select the type of variance you wish to add. If the variant does not yet exist, you can create it on the fly by clicking on Create and edit…

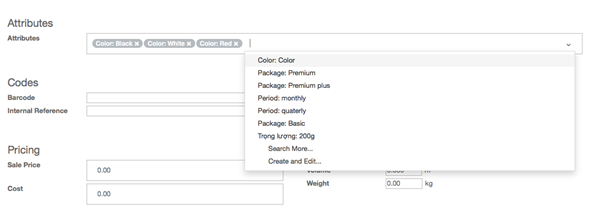
In the Attributes window, the Value field is the description of the attribute such as Black, White or Red . The Attribute field is the type of variant such as Color.

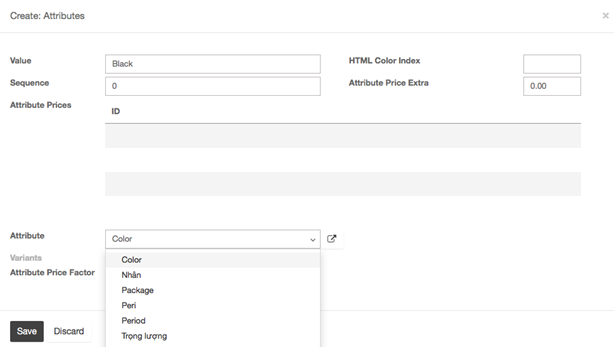
  • You can add a cost for the variant on the fly by adding it in the Attribute Price Extra field, or choose to modify it later. Click on Save.

You can also add a different barcode and internal reference to the variant.

When you have entered all the specifications of the variant, click on Save.

→ Managing product variants: 

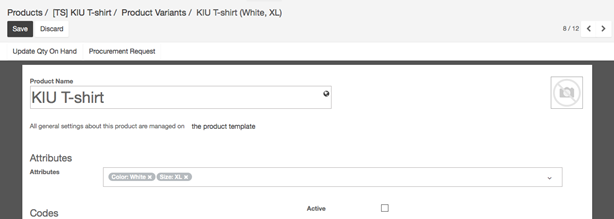
  • Managing combination possibilities: By default, with the above product (KIU T-shirt) template, you get 12 different products (3 colors, 4 sizes). If the XL size only exists for red and black t-shirts, you can deactivate the white product variant.

To do this, click on the Variants button, select XL, White T-shirt. From the product form, uncheck the Activebox of the T-shirt White, XL

  • Setting a price per variant: You can add a cost over the main price for some of the variants of a product. Once you have activated the variant option, you can add variants to your products. To do so, go to the Sales module, open Sales ‣ Products and click on the product you want to modify. Click on the Variant Prices button to access the list of variant values.

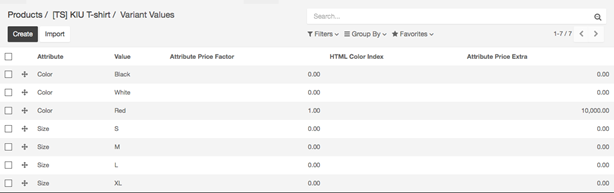
  • Click on the variant name you wish to add a value to, to make the 3 fields editable. In the Attribute Price Extra field, add the cost of the variant that will be added to the original price.
  • When you have entered all the extra values, click on Save.

6.2.1. How to use different units of measure?

In some cases, handling products in different unit of measures (UoM) is necessary. For example, if you buy products in a country where the metric system is of module and sell the product in a country where the imperial system is used, you will need to convert the units.

You can set up KIU BMP to work with different units of measure for one product.

Note: For each product, you only can set multi-UoM which belong to one UoM category, you can’t set different UoM of different UoM categories.

  • Configuration: In the Inventory Module, go to Configuration ‣ Settings. In the Products section, select “Some products may be sold/purchased in different units of measure (advanced)”, then click on Apply

  • Set up units on your product: In Inventory Control ‣ Products, open the product which you would like to change the purchase/sale unit of measure, and click on Edit.
  • In the Unit of Measure section, select the unit in which the product will be sold and in which internal transfers will be done.
  • In the Purchase Unit of Measure section, select the unit in which you purchase the product. When you’re done, click on Save.

  • Transfer from one unit to another: When doing inter-unit transfers, the rounding is automatically done by KIU BMP. The unit of measure can be changed throughout the whole process. The only condition is that the unit of measure is part of the same category.

In this example, we are in the beverage merchandise business (Please see image attached above)

Purchase: When doing your purchase order, you can still change the unit of measure

Receiving: The quantity control is managed by “Unit” . Therefore, the quantity check is done by unit

Sales: The liquor are sold by pack of 4 bottles as per customer’s requirement. You can choose the unit of measure on the sales order document. When doing it, the price is automatically computed from the unit to pack

In the delivery order, the initial demand is done in the unit of measure of sales order :

But the transfer is done in the product unit of measure. Everything is converted automatically:


6.1.3. Advanced flows

In this document, the flows that are explained are the most simple ones. Kiu BMP also suits for companies having advanced warehouse management.

  • By default, only receipts and deliveries are configured but you can activate the use of multi-locations and multi-warehouses to do internal transfers.
  • Routes: you can automate flows with push and pull rules
  • Multi-step receipts and deliveries can be easily configured for each warehouse
  • Much more: Barcode scanning, serial numbers, lots, cross-docking, dropshipping, integration with a third-party shipper, putaway and removal strategies…. All of it is possible with Kiu BMP.

6.1.2. How to process a delivery?

Same as receipt process above, you can retrieve the delivery order in 2 ways:

→ From the sale order:

On the top right of your sale order, you will see a button with the related Delivery:


Click on it to see the Transfer order.

→ From the Inventory Dashboard:

When opening the Inventory Module, click on # to do to see the list of your receipts to process.

Note: If the product is not in stock, the sales order will be listed as Waiting on your dashboard.

To process the stock transfer. Simply click on Validate to complete the transfer. A message will appear asking if you want to process the whole order, accept it by clicking on

Note: E-Commerce orders are processed the same way.

You can easily integrate your delivery orders with different delivery methods. Please read the document How to set up a delivery method?

6.1.1. How to process a receipt?

You can retrieve the receipt order in 2 ways:

→ From the purchase order

On the top right of your confirmed purchase order, you will see a button with the related Receipt:


Click on it to see the Transfer order.

→ From the Inventory Dashboard

When opening the Inventory module, click on # to receive to see the list of your deliveries to process.

In the list, click on the one related to the purchase order:

To process the stock transfer. Simply click on Validate to complete the transfer. A message will appear asking if you want to process the whole order, accept it by clicking on Apply.

In case you receive a part of your PO, just click Edit or

6. Inventory

6.1. Inventory Process from procurement to delivery
6.1.1. How to process a receipt?
6.1.2. How to process a delivery?
6.1.3. Advanced flows

6.2. Settings – Products
6.2.1. How to use different units of measure?
6.2.2. Using product variants
6.2.3. When should you use packages, units of measure or kits?
6.2.4. How to use packages?

6.3. Setting – Warehouses
6.3.1. What is the difference between warehouses and locations?
6.3.2. How to create a new warehouse?
6.3.3. How to create a new location?
6.3.4. How to make the initial inventory?
6.3.5. How to choose between minimum stock rule and make to order?

6.4. Delivery Orders
6.4.1. How to choose the right inventory flow to handle delivery orders?
6.4.2. How to process delivery orders in one step (shipping)?
6.4.3. How to process delivery orders in two steps (pick + ship)?
6.4.4. How to process delivery orders in three steps (pick + pack + ship)?
6.4.5. How is the scheduled delivery date computed?
6.4.6. How to send products to customers directly from suppliers (drop-shipping)?
6.4.7. How to change the packaging type for your sale order?
6.4.8. How to cancel a delivery order?

6.5. Miscellaneous Operations
6.5.1. How to scrap products?
6.5.2. How to manage stock that you don’t own?
6.5.3. How to configure and run schedulers?

6.6. Lots and Serial Numbers
6.6.1. What’s the difference between lots and serial numbers?
6.6.2. How to work with serial numbers?
6.6.3. How to manage lots of identical products?

6.7. Valuation Methods
6.7.1. Overview
6.7.2. How to do an inventory valuation? (Continental Accounting)
6.7.3. How to do an inventory valuation? (Anglo-Saxon Accounting)

6.8. Shipping
6.8.1. How to set up a delivery method?
6.8.2. How to invoice the shipping cost to the customer?

6.9. Advanced Routes
6.9.1. How to use routes?
6.9.2. Make-to-Order Route
6.9.3. What is a procurement rule?
6.9.4. What is a push rule?
6.9.5. How to do inter-warehouses transfers?
6.9.6. What is a putaway strategy?
6.9.7. What is a removal strategy (FIFO, LIFO, and FEFO)?

6.10. Other FAQ in practising
6.10.1. How to process Raw Material to Manufacture
6.10.2. How to integrate landed costs in the cost of the product?

5.4.5. How to return and refund products on POS?

To return a product and refund to customer, from POS main view, you need to insert negative values: Select the product your customer wants to return, use the +/- button and enter the quantity they need to return. If they need to return multiple products, repeat the process.

As you can see, the total is negative, to end the refund you simply have to process the payment:

5.4.4. How to discount on POS

You can apply manual discounts in two different ways. You can directly set a discount on the product (discount on order lines) or you can set a global discount (discount on total bill) on the whole cart.

→ Discount on order lines

  • Configuration: If you want to set a global discount, you need to go to Configuration ‣ Settings and tick “Allow discounts on order lines only”

Back to dashboard, click on “New session”, you will get into the main point of sale interface:

Click on “Disc” and then type the discount (in percent). This is how you insert a manual discount on a specific product.

→ Discount on total bill

Configuration: If you want to set a global discount, you need to go to Configuration ‣ Settings and tick Allow global discounts

  • Then from the dashboard, click on More ‣ Settings

  • You have to activate Order Discounts and create a product that will be added as a product with a negative price to deduct the discount:

  • On the product used to create the discount, set the price to 0, choose Income account and do not forget to define all the relating taxes:

  • Now when you come back to the dashboard and start a new session, a Discount button appears and by clicking on it you can set a discount: 

  • You can choose discount percentage as per promotion programme: 

By clicking Ok button, the discount line appears on the order and you can now process to the payment:

5.4.3. How to split the bill

This feature only works in POS for restaurant. In configuration for a restaurant POS in Point of Sale ‣ Configuration ‣ Point of Sale, activate Bill Splitting function.

An order can be split in 2 ways: One is based on product, and the other is based on the amount of payment. Let’s place an order and split it for example.

Start a New Session.

Choose a table and register an order.

  • Splitting based on product

 In the calculation screen, click Split.

Select products and their quantities the first customer wants to pay and click on Payment when you get the total for this split bill.

Process the payment.

Print receipt and move to Next Order.

Follow the same procedure for the next customer of the same table.

  • Splitting based on the amount of payment

Process the Payment. You only have to insert the money tendered by each customer.

Click on the payment method (cash, credit card,…) and enter the amount. Repeat it for each customer.


5.4.2. How to pay a bill both by card and in cash?

  • Press Payment on POS ‣ to go to Payment interface 
  • Choose Cash payment method ‣ Input amount paid in cash 
  • Choose Credit Card payment method ‣ Input amount paid by Credit Card ‣ Swipe the card and input amount paid by Credit Card again ‣ Press enter on swiping machine ‣ Customer sign
  • Press Validate Payment on Kiu POS to finish the transaction.