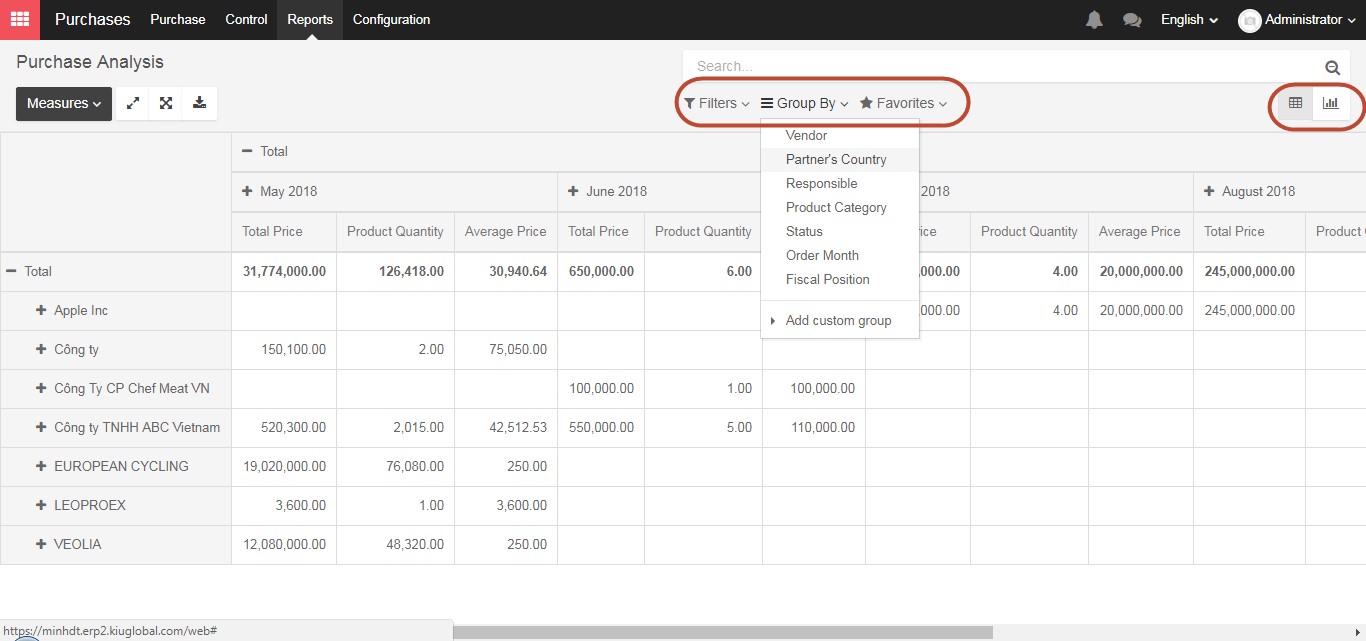
In the KIU BMP System, there are several options for reporting of purchase process from Purchase/ Reports.
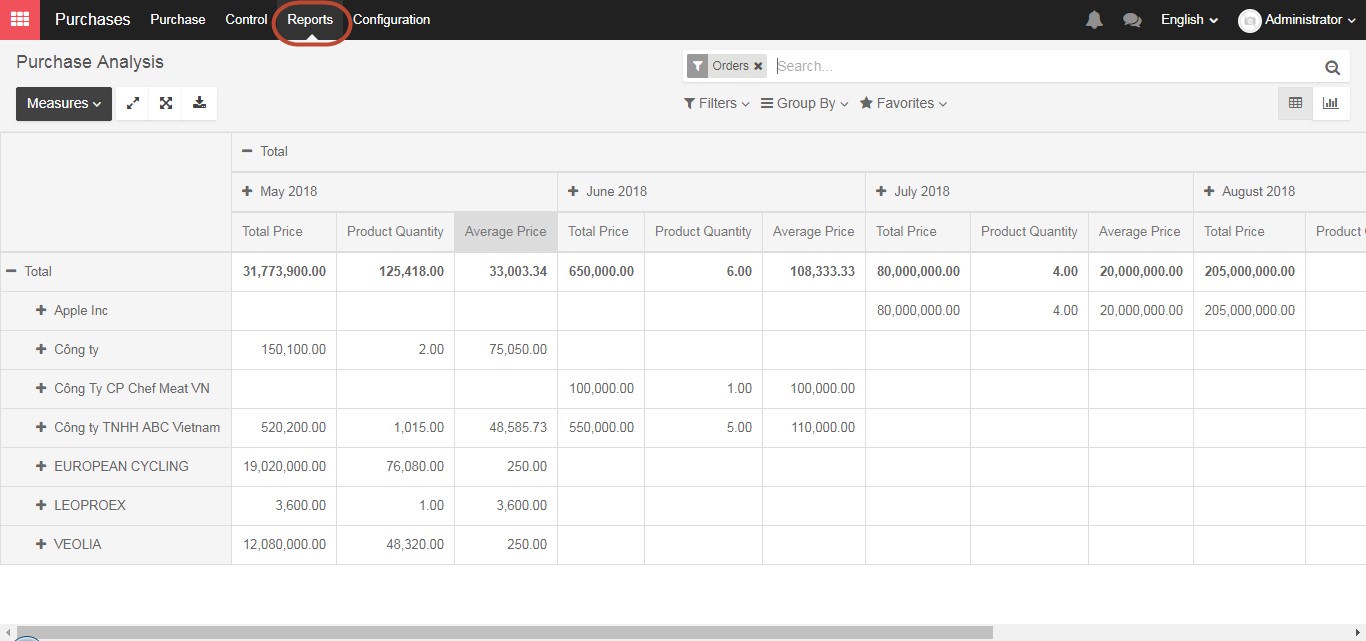
You can also change the display method to a bar graph in the top right of your screen as well as change other options of group data.

Kiu Solutions User Guidelines
In the KIU BMP System, there are several options for reporting of purchase process from Purchase/ Reports.
You can also change the display method to a bar graph in the top right of your screen as well as change other options of group data.
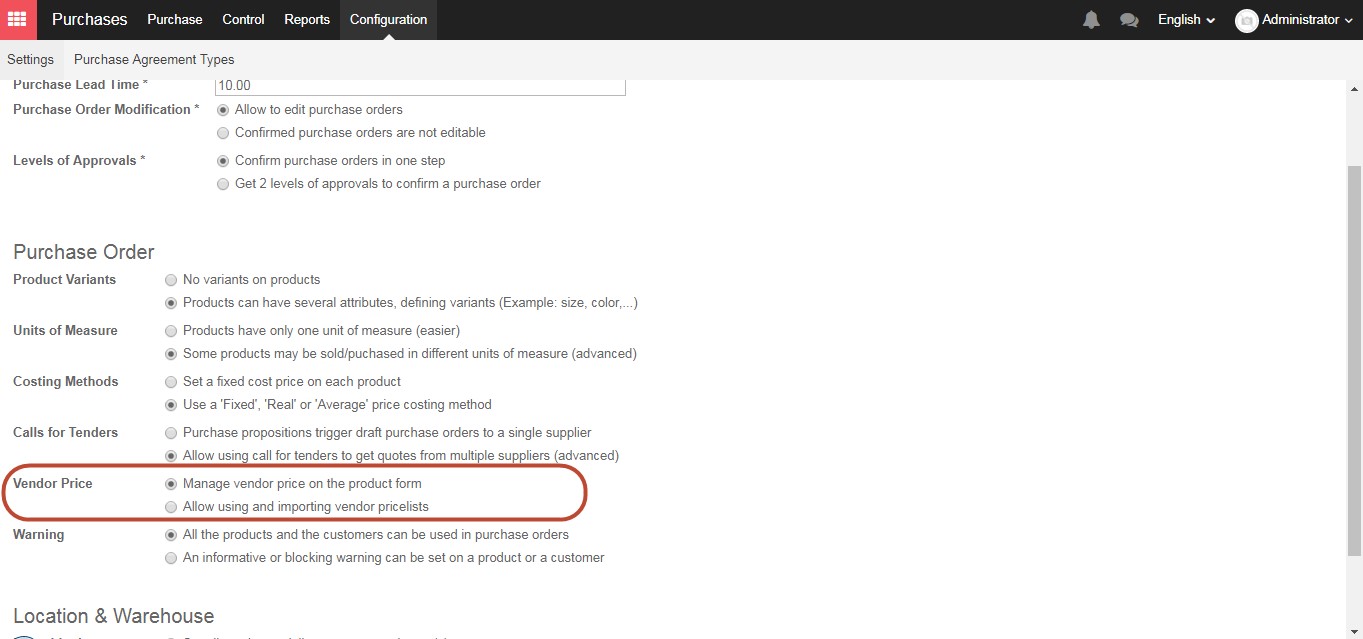
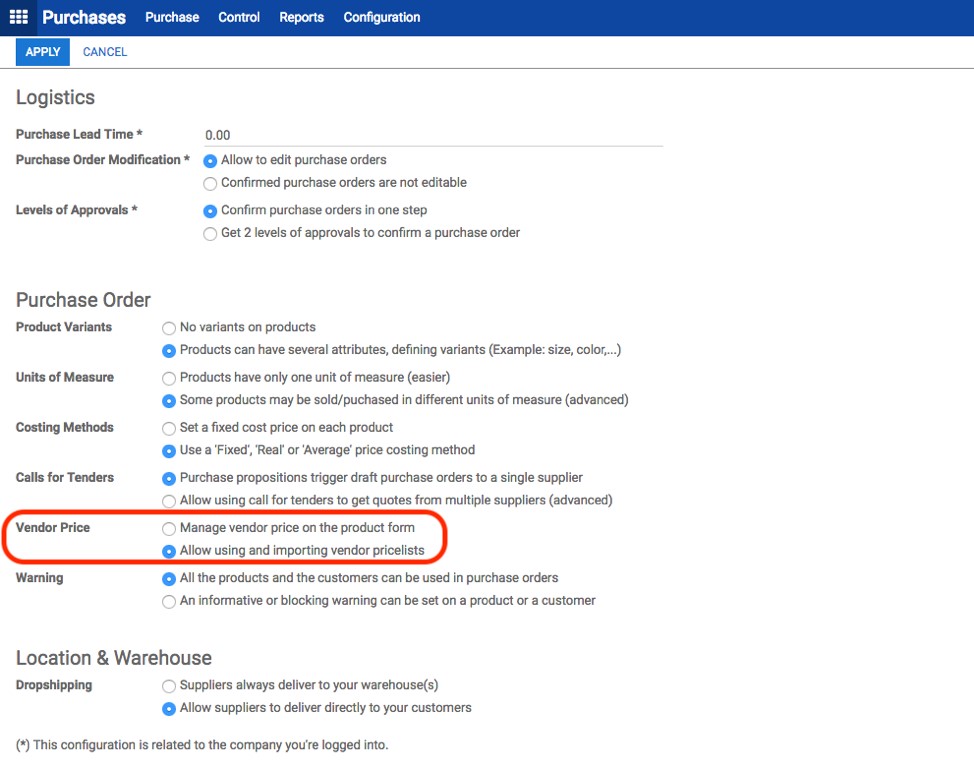
Go to Purchase/ Configuration/ Purchase order/ Vendor price/ Select “Manage vendor price on the product form” then click Apply
After that, go to tab Inventory of product form which is needed to update vendor price:
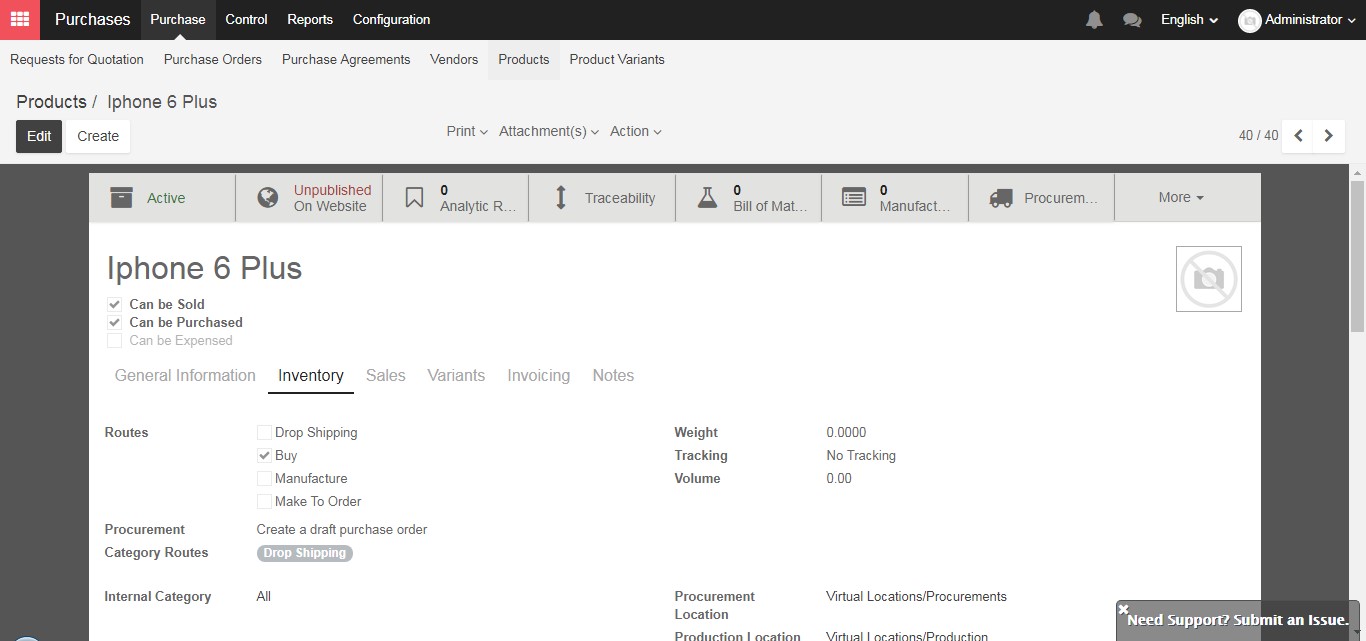
In this tab, scroll down and update vendor price in Vendor field:
Purchase Module ‣ Configuration ‣ Vendor Price ‣ Choose Allow using and importing Vendor pricelists
Then from Purchase Module ‣ Purchase ‣ Vendor Price list ‣ Group the list by Partner or by Product
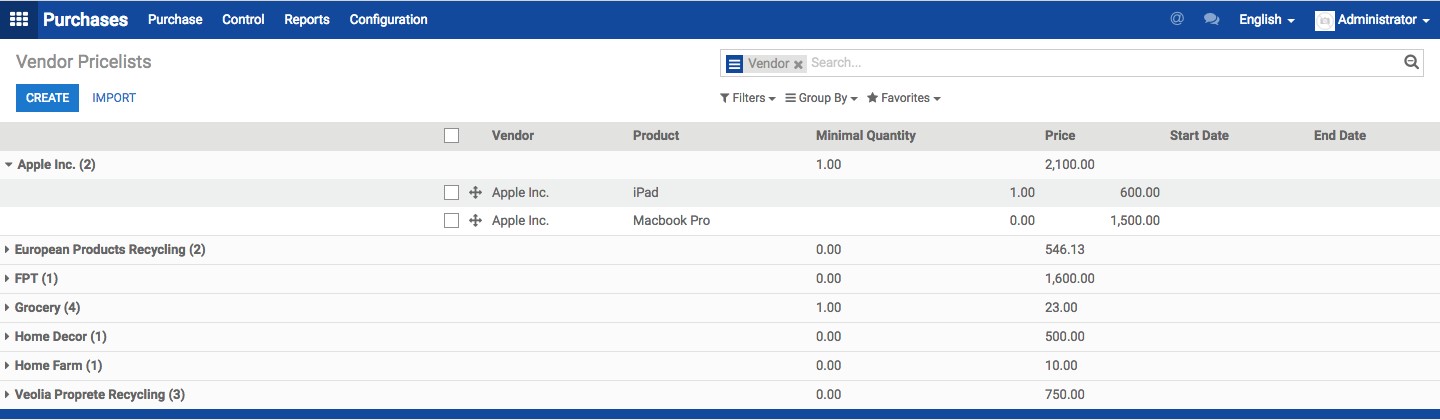
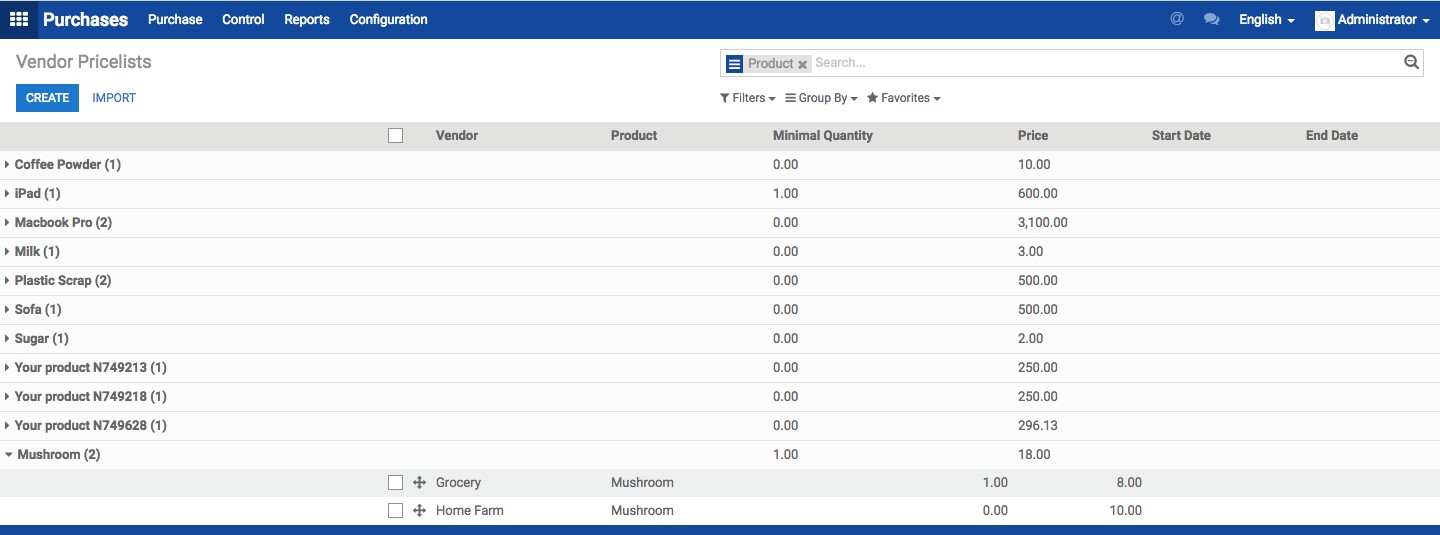
‣ Filter by Partner or Product to search if needed.
Going to Sales‣Sales‣Quotations, click “Create” to draw up a quotation.
Step 1: Record Quotation/Sales order from Customer
– Fill the general information on the Header of the document, other details of the quotation can be added on the Lines. Once the draft quotation is saved, it is labelled with an auto-generated reference (E.g. SO020)
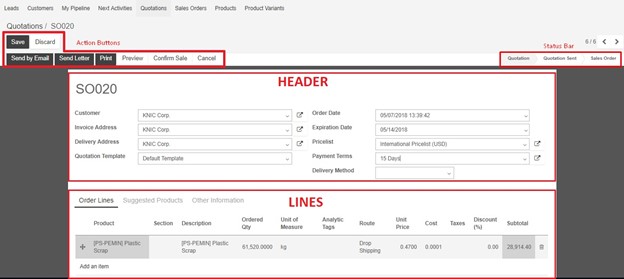
| No | Name | Description |
| Header | General Information | |
| 1. | Customer | Name of the individual/organization orders your product |
| 2. | Invoice Address | The address displayed on invoice issued to your customer |
| 3. | Delivery Address | The address to which goods are delivered |
| 4. | Order Date | The date on which the order is recorded from customer |
| 5. | Expiration Date | The date on which your quotation becomes invalid |
| 6. | Price list | The pricing strategy applying to customer This can be created if going to Sales‣Configuration‣Price list |
| 7. | Payment Terms | The terms specify the period allowed to a customer to pay off the amount due when your company completes a sale |
| 8. | Delivery Method | Fill this field if you plan to invoice the shipping based on picking |
Step 2: Confirm Order with Suppliers
– Click “Confirm” to close the deal with customer. The quotation becomes Sales Order.
Case 1: Draft Purchase Requisition
Looking for the draft Purchase Requisition by going to Purchases‣Purchase‣Purchase Agreement

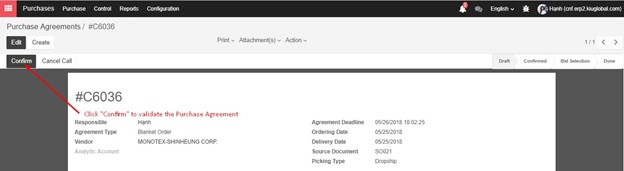
Step 1: Review and Confirm a Purchase Agreement
– The purchase requisition is drawn up as a Purchase Agreement and recognized with a reference (E.g. TE00001) that can be changed. Click on the document to review its details and make any change if necessary.
| No | Name | Description | |
| 1. | Agreement Reference | The reference to identify a Purchase Agreement. Automatically generate by KIU BMP but changable | |
| 2. | Responsible | Purchaser in charge of requesting the order | |
| 3. | Agreement Type | Purchase Tender | Blanket Order |
| 4. | Ordering Date | The date when a purchase order to a chosen vendor is submitted | The starting date of the contract |
| 5. | Delivery Date | The date when the products have to be delivered | Do not have to fill because each release has different dates |
| 6. | Vendor | Do not have to fill because the vendor is defined after bidding | Choose the vendor with whom the contract is signed |
| 7. | Agreement Deadline | The date informing vendors when to have their offer submitted | |
| 8. | Source Document | Related document to this purchase requisition | |
| 9. | Picking Type | Dropship | |
– To verify the Purchase Agreement, click “Confirm”.
Step 2: Create and Confirm a RfQ
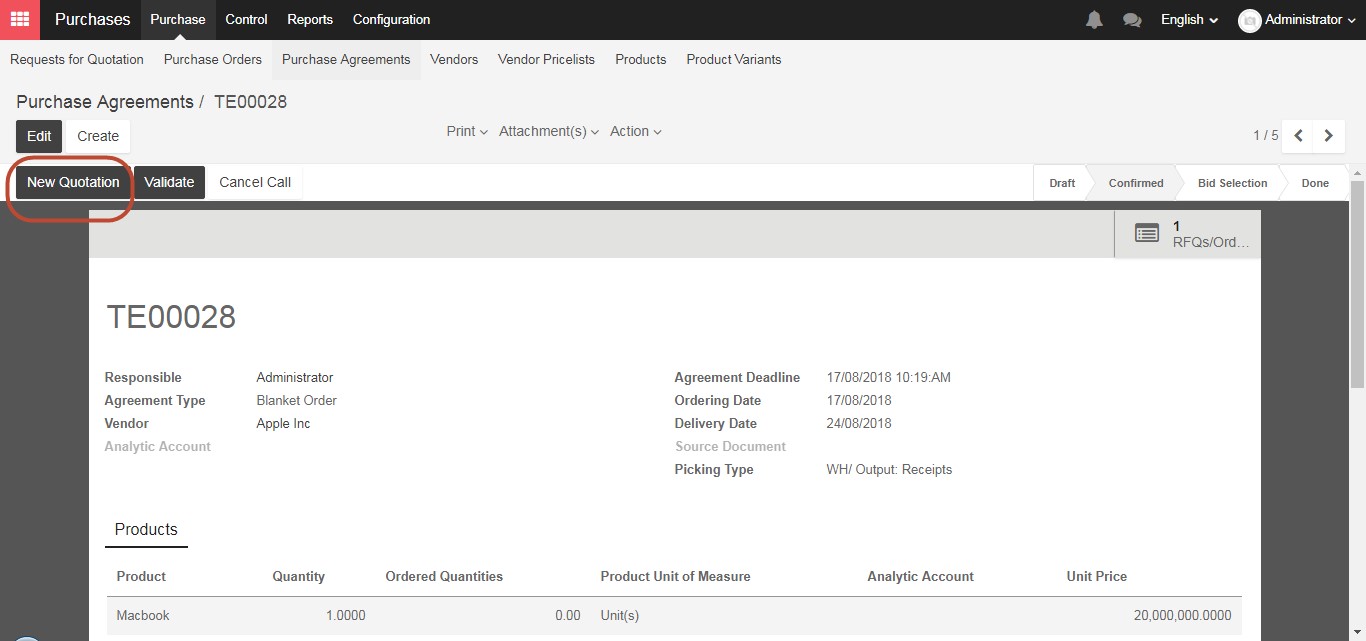
– KIU BMP displays button “New Quotation” after confirmation. Click this button to form a draft Purchase Order (or so-called Request for Quotation).
– A RfQ is created with the products listed on the Purchase Agreement. The next practice applied to different types of Purchase Agreement varies as shown in table.
| Agreement Type | Purchase Tender | Blanket Order |
| Quantity on RfQ | Quantity on RfQ is set percisely as entered on Purchase Agreement. | By default, the RFQ quantity is set to 0. Individual deliveries should be smaller. |
| Operation | Choose a vendor and send the RfQ. | Enter the quantity and date for each delivery. Send the RfQ to the vendor. |
| Repeat this operation for each vendor. | Repeat this operation for each release. | |
| Validation | Validate the Purchase Agreement once all the RfQ(s) are sent. | Validate the Purchase Agreement when all releases (Purchase Order) have been delivered and paid. |
| Mark as Done | When a RfQ related to this requisition is confirm (a vendor offering the best price is selected) | When all releases are fully paid. |
| A finished (Status: Done) Purchase Agreement can not be added to any RfQ. | ||
– Fill the Dropship Address with the customer’s address. Send the RfQ to vendors and Confirm the RfQ of the chosen supplier.
– After confirmation, 2 buttons linking to Shipment and Vendor Bill is displayed.
Case 2: Draft Purchase Order (RfQ)
Looking for the auto generated Request for Quotation based on customer’s order by going to Purchases‣Purchase‣Requests for Quotation
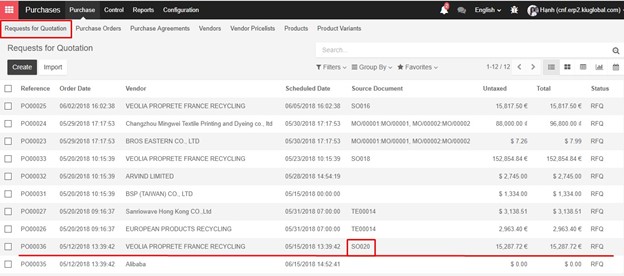
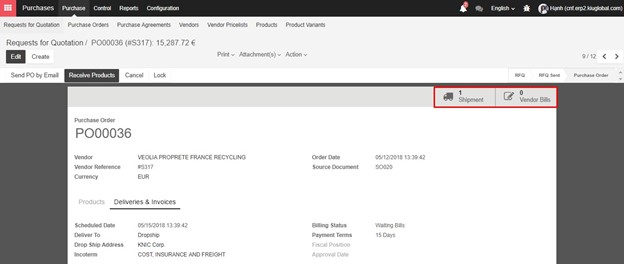
– As the Request for Quotation is already prepared by KIU BMP, it is labelled with a reference (E.g. PO00036). Click on the document to review its Header and Lines to make any change (if necessary).
– Finalizing the Request for Quotation by clicking button “Confirm” to change its status into Purchase Order.

After confirmation, 2 buttons linking to Shipment and Vendor Bill is displayed.
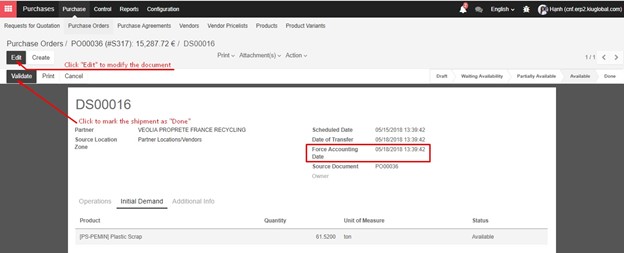
– As shipment delivering goods from Vendor to Customer is auto generated, it is vital to go over the it and enter the date on which goods is expectedly delivered to customer (the information is taken from Packing List and Bill of Lading).
Noted that Force Accounting Date is related to the date recognized in accounting journal entry.
– Validate the shipment to mark as done once the goods is delivered to customer.
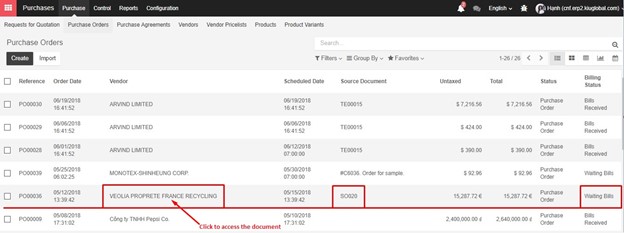
– Find the purchase order confirmed with supplier based on the following information: PO Reference, Vendor, Source Document, Billing Status …
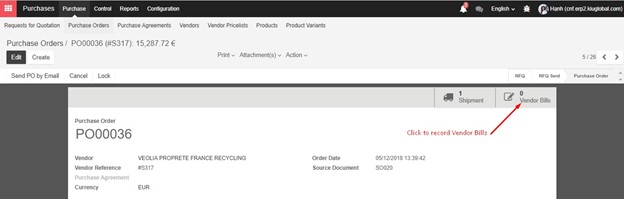
– Click button Vendor Bill then button “Create” to draw draft bill.
– Enter the details of document, noted that the Currency and Accounting Date will influence the value and date of accounting journal entry. Validate the bill to mark the amount as a payable.
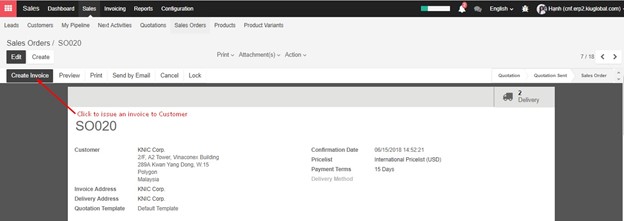
– Find the sales order confirmed with customer based on the following information: Order Number, Customer, Total Value, Invoice Status …
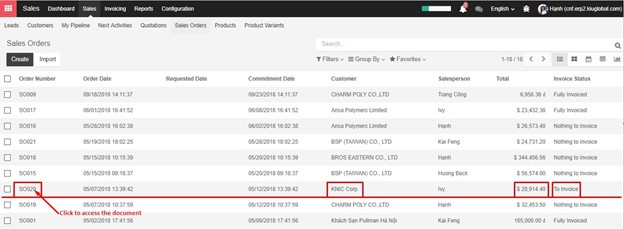
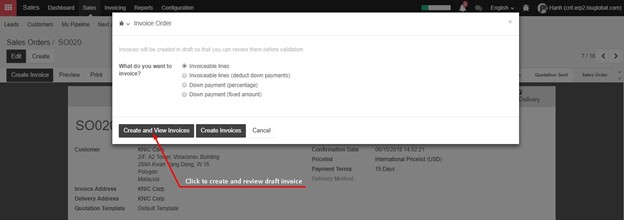
– Click “Create Invoice” to open the fly of issuing an invoice to the Customer. Select Invoiceable lines
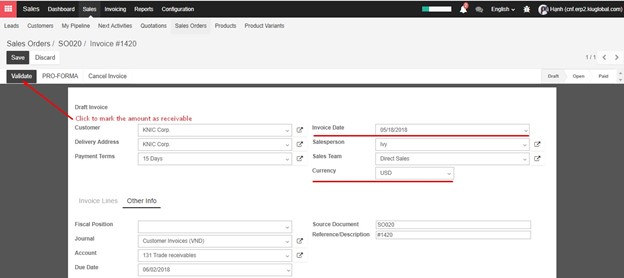
– Enter the details of document, noted that the Currency and Invoice Date will influence the value and date of accounting journal entry. Validate the document to mark the amount as a receivable.
The purchase process for drop-shipping is divided into 2 cases:
Case 1: Draft Purchase Agreement
The purchase requisition is set up as Purchase Agreement that have two types: (1) Purchase Tender and (2) Blanket Order.
The former allows user to create as many Requests for Quotation as possible and send to different suppliers to select the best price (A vendor provides the best price will win the deal). While the latter is used to negotiate a discounted price over a period of time with one vendor (It is able to take multiple smaller deliveries during the settled period).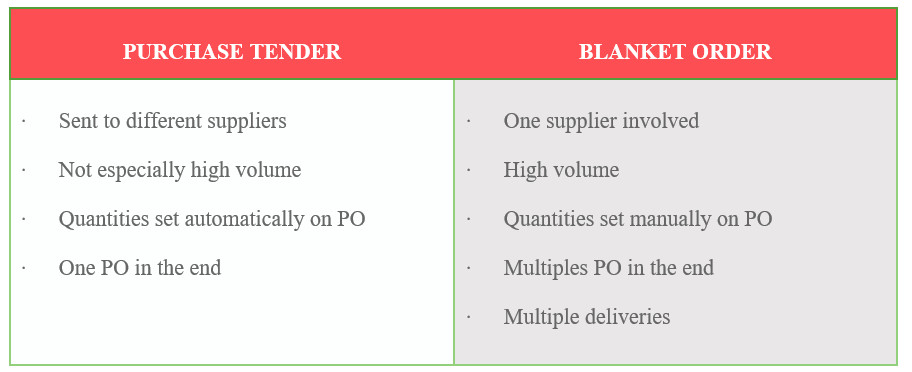
Technically, Purchase Tenders is for the purpose of having better prices through competing suppliers, whereas Blanket Order is for the purpose of managing delivery dates with a supplier.
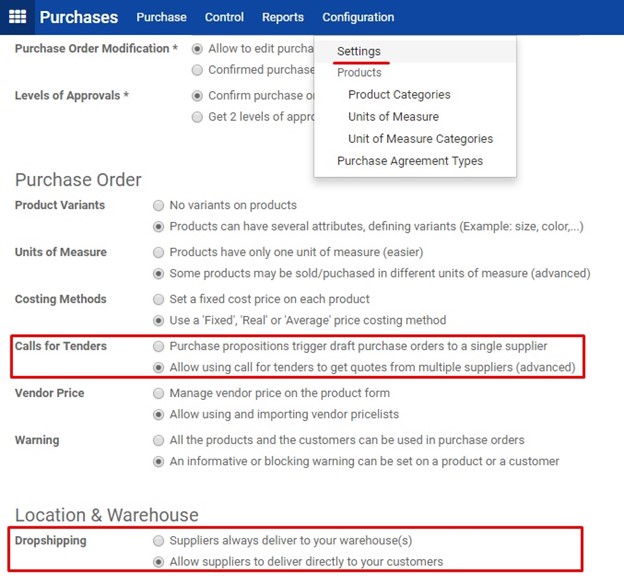
To enable the Purchase Agreement feature in KIU BMP, user must active the option by going to Purchase‣ Configuration‣ Settings‣ Calls for Tenders
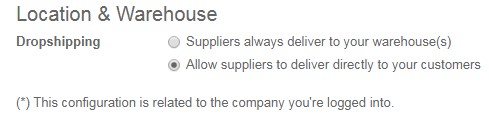
And going to Purchase‣ Configuration‣ Settings‣ Location & Warehouse
In accordance with purchase configuration, all items bought or sold in drop-shipping flow must be set up as below.
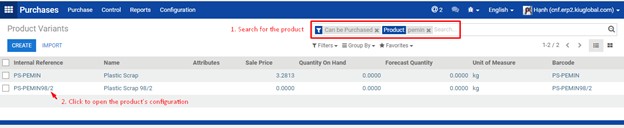
Going to Purchases‣Purchase‣Product Variants and search for the product. Click on the product to open its configuration form.
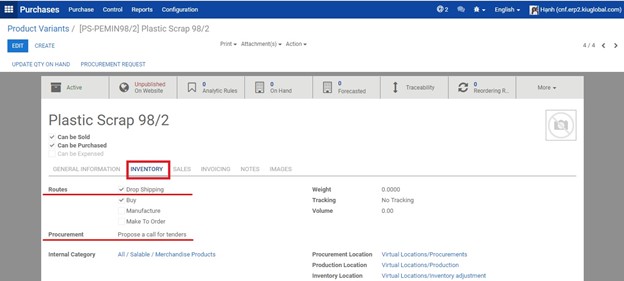
In tab Inventory‣Routes
In tab Inventory‣Procurement
Case 2: Draft Purchase Order
Enable function “Draft Purchase Order” to partner one indicated supplier. This type allows user to draw up an initial Request for Quotation to the identified vendor offering the most acceptable price, which is based on the list of vendor’s price set up in the product configuration.
Going to Purchase‣Configuration‣Settings‣Calls for Tenders
Going to Purchase‣Configuration‣Settings‣Location & Warehouse

In accordance with purchase configuration, all items bought or sold in drop-shipping flow must be set up as below.
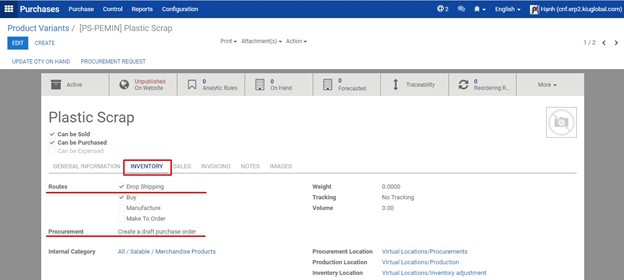
Going to Purchases‣Purchase‣Product Variants and search for the product. Click on the product to open its configuration form.

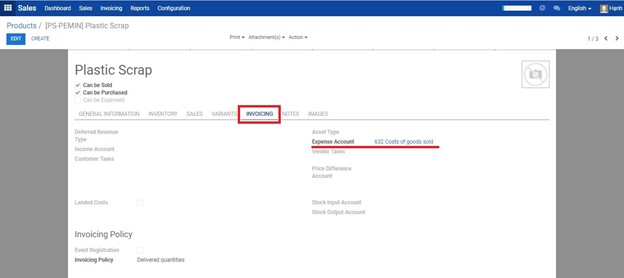
On tab Inventory‣Routes, click Drop-shipping, on tab Inventory‣Procurement, click Create a draft purchase order and on tab Invoicing‣Expense Account, choose account number 632 Cost of goods sold.
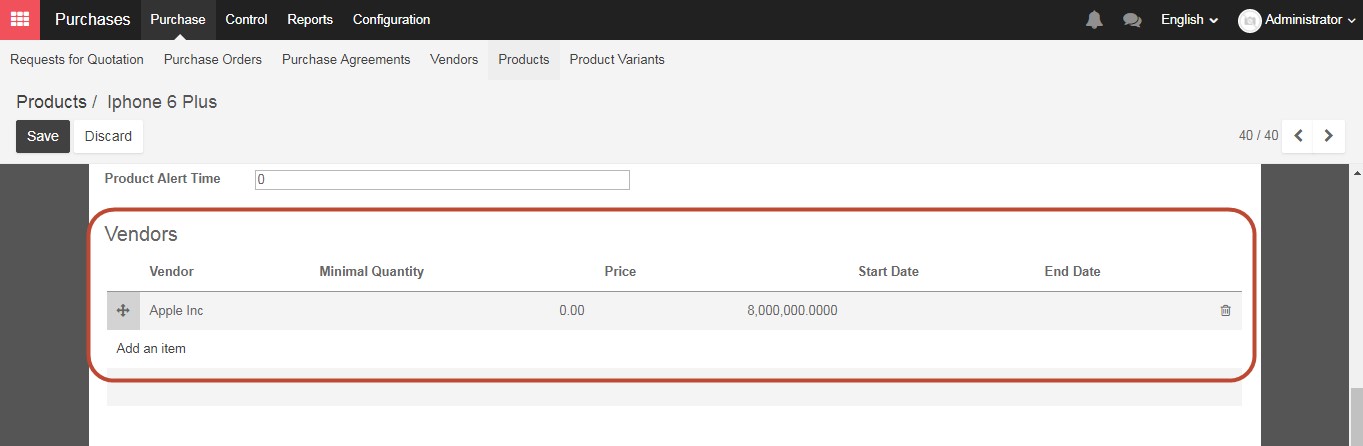
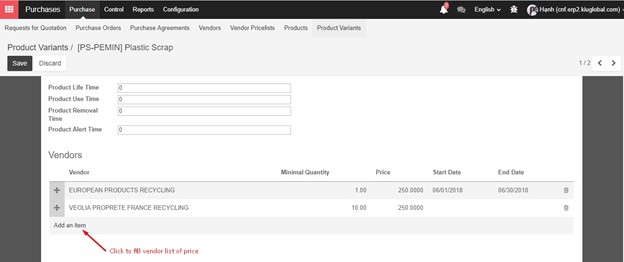
On tab Inventory‣Vendors, click “Add an item” to fill the vendor list of price.
Fill the necessary fields as guided below
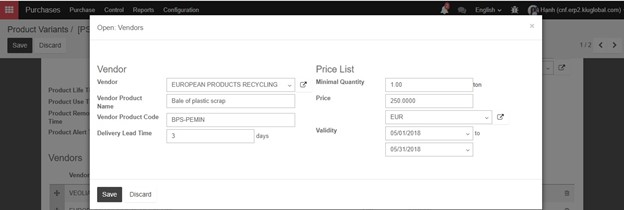
Fill in the information of Vendor, vendor product name, product code, delivery lead time, minimal quantity (the lowest quantity of the product that a supplier is willing to sell), price as well as the period of time in which the price is valid.
Sales module
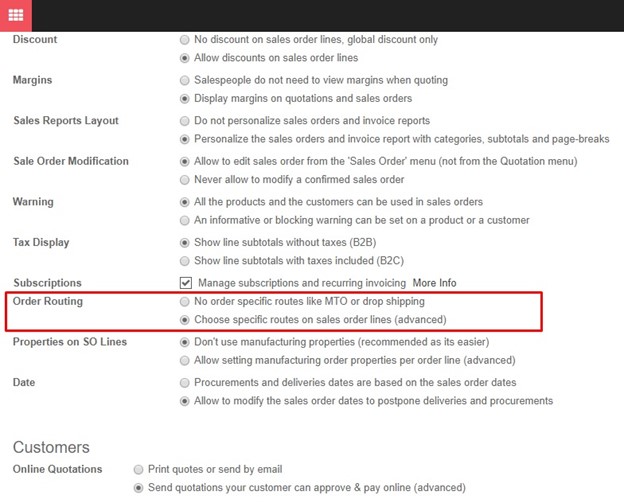
Enable Order Routing
Going to Sales‣Configuration‣Settings‣Quotation & Sales‣Order Routing
When all the mentioned items are properly checked, start recording all the document for this business practice.
Drop-shipping on KIU BMP is a method allowing user to transport ordered parcel directly from supplier to customer. The model is illustrated as below:
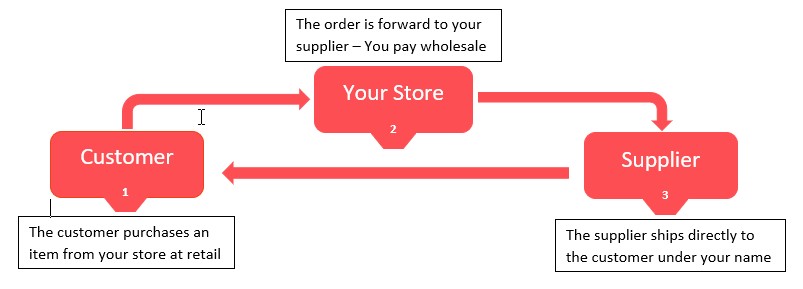
Reflecting the drop-shipping model, the workflow in KIU BMP is demonstrated as below:
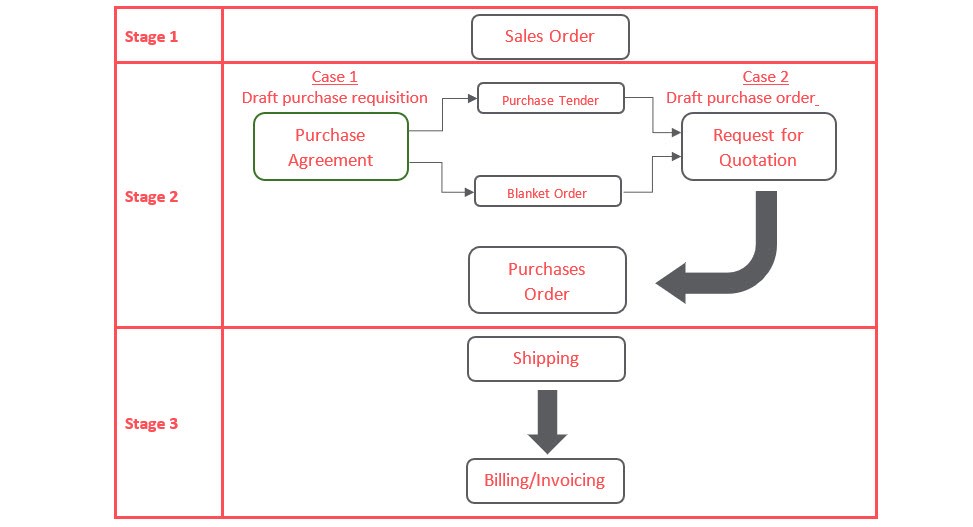
To successfully record all your document in accordance with system workflow, please go over the following configuration first:
Inventory module
General Settings
Going to Inventory module‣Configuration‣Settings. Check “Advanced routing of products using rules” in the Routes section and “Allow suppliers to deliver directly to your customers” in the Drop Shipping section.
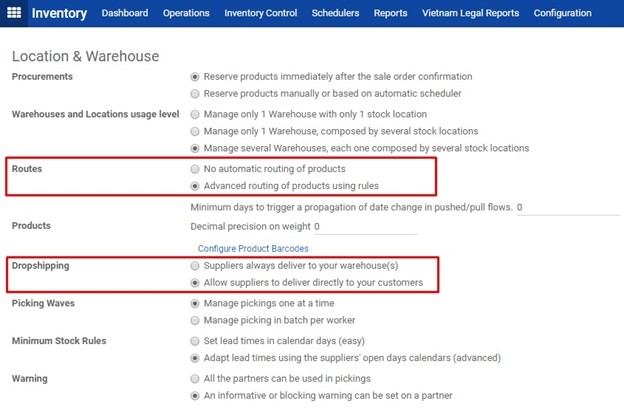
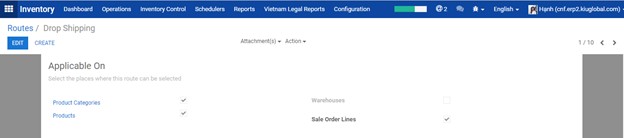
Drop Shipping Route
Going to Inventory‣Configuration‣Routes
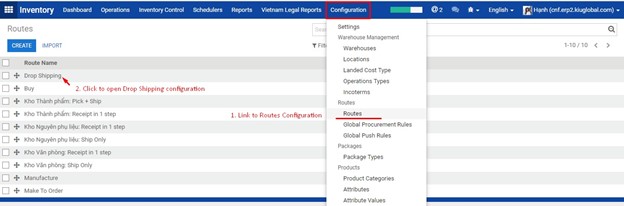
Open to view the establishment of Dropshipping module on
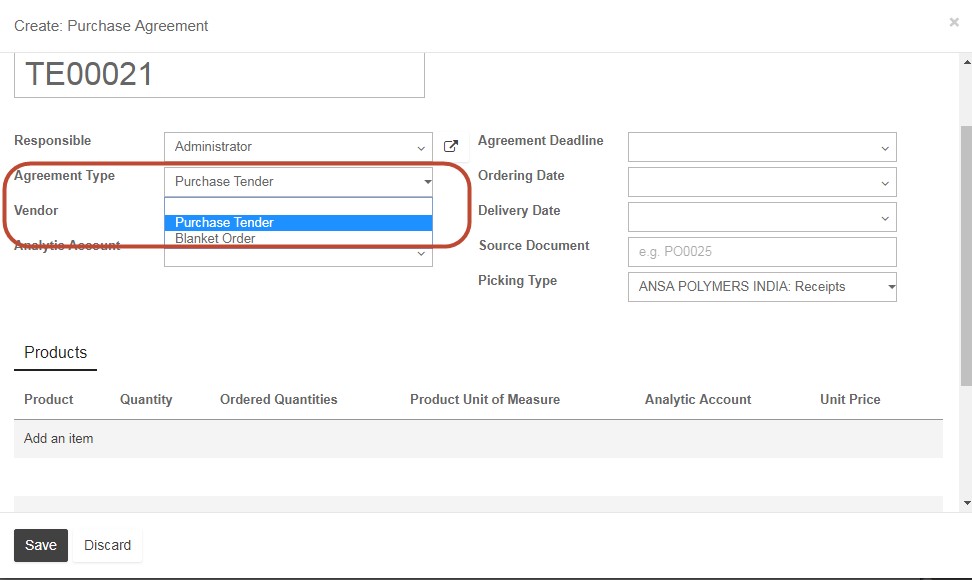
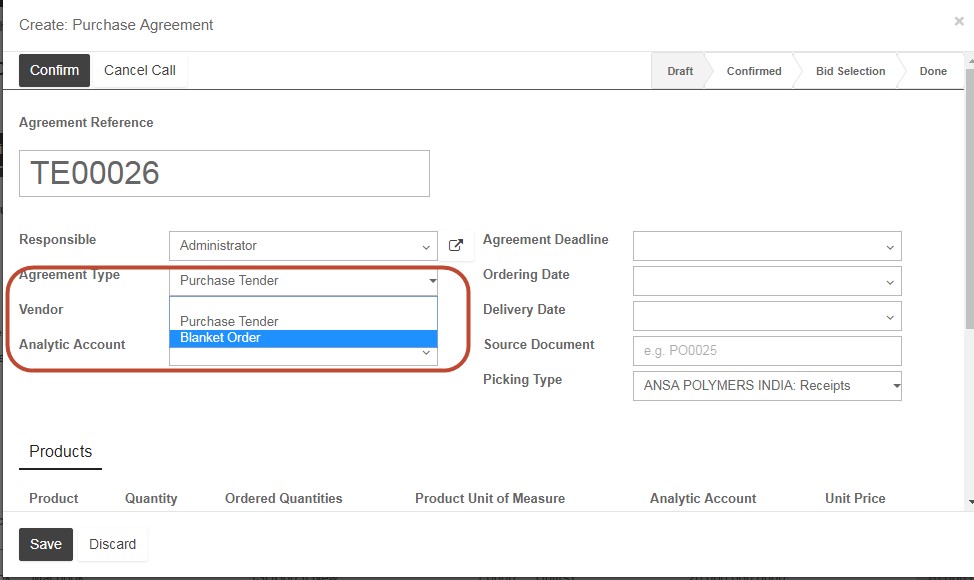
After creating new products, the regular purchase process can begin with the Purchase Agreement. You can negotiate specific condition and choosing the best price from Purchase Agreement before proceeding to the official Request for Quotation. In Purchase module of Kiu BMP, If choosing to create new purchase agreement, then in next window of purchase agreement, you can specify the type of agreement is purchase tender or blanket order.
A Purchase Tender is sent to multiple suppliers, where a Blanket Order is only sent to a single supplier. In a Purchase Tender, the Quantities are set automatically on the Purchase Order, while with a Blanket Order you will set those quantities manually on the Purchase Order. Additionally after using Purchase Tender you will have only a single Purchase Order, while with Blanket Order you will have used multiple POs.
Firstly we will create Purchase tender by choosing dropdown menu from Agreement type:
In the form of purchase agreement, you can choose the analytic account which is the internal account used for monitoring and examining the costs, sales and margins by specific department/resources or products. In daily use, it is useful to mark the analytic account on each purchase invoice. When the invoice is approved, it will automatically generate the entries for both the general and the corresponding analytic accounts. For each entry on the general accounts, there is at least one analytic entry that allocates costs to the department which incurred them
For Agreement deadline, this is the last day in which the purchase agreement is still active and this can be modified based on specific quotation/ purchase agreement
For Ordering Date, this is the starting date of the agreement. And for delivery date, this field should be blank as we can have multiple delivery date for multiple orders or quotations from different vendors.
In the Products section, click on Add an item. Select products in the Product list, then insert Quantity. You can add as many products as you wish then click Save.
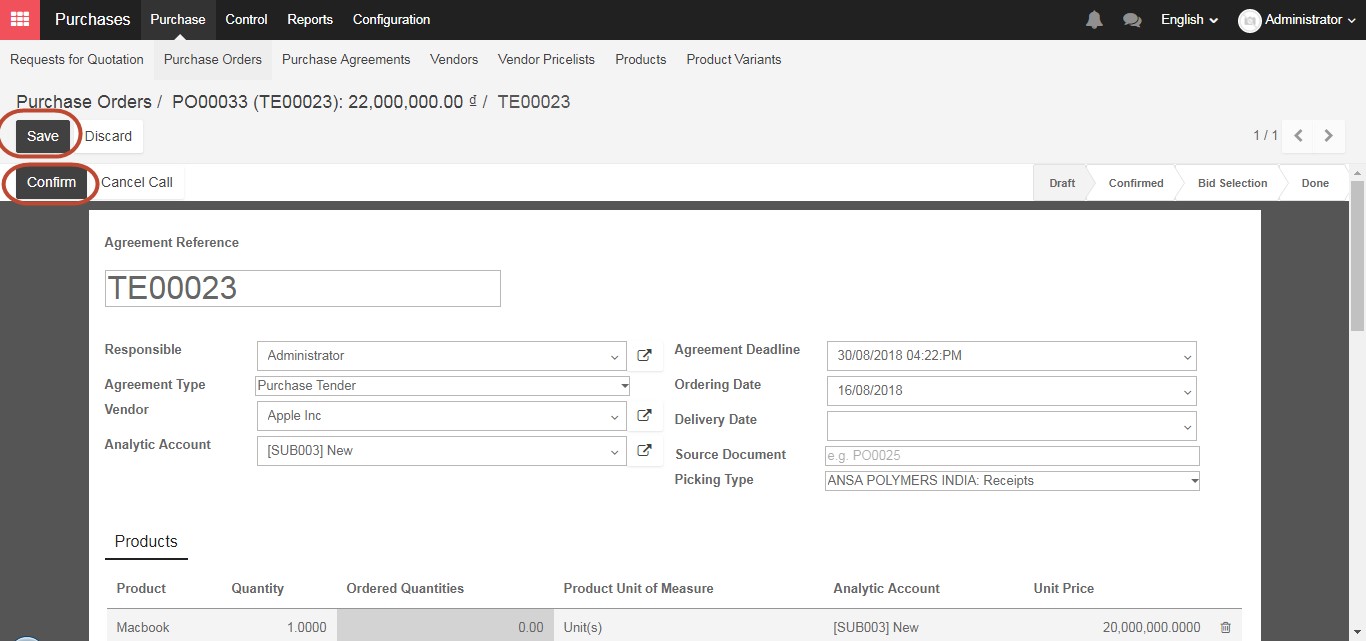
One Purchase tender can be sent to multiple suppliers in order to choose the best offer with the most reasonable price from different vendors, therefore you can create multiple Request for Quotation within one Purchase tender by clicking New Quotation after Confirm the Purchase agreement.
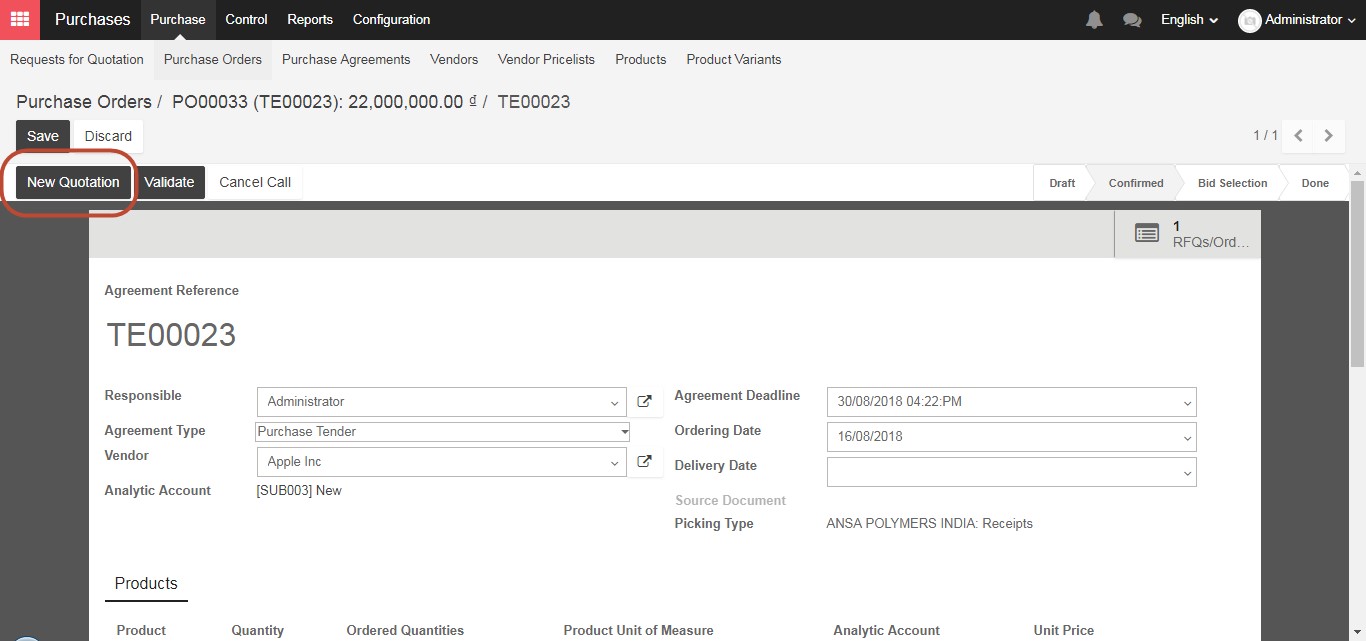
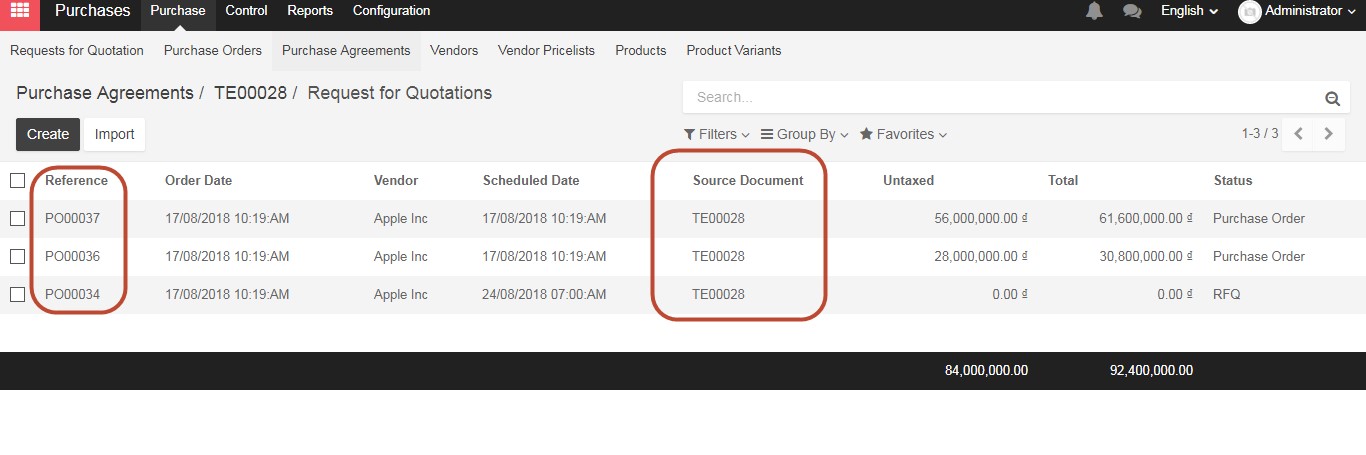
New quotation from different vendor has been created within one Purchase tender
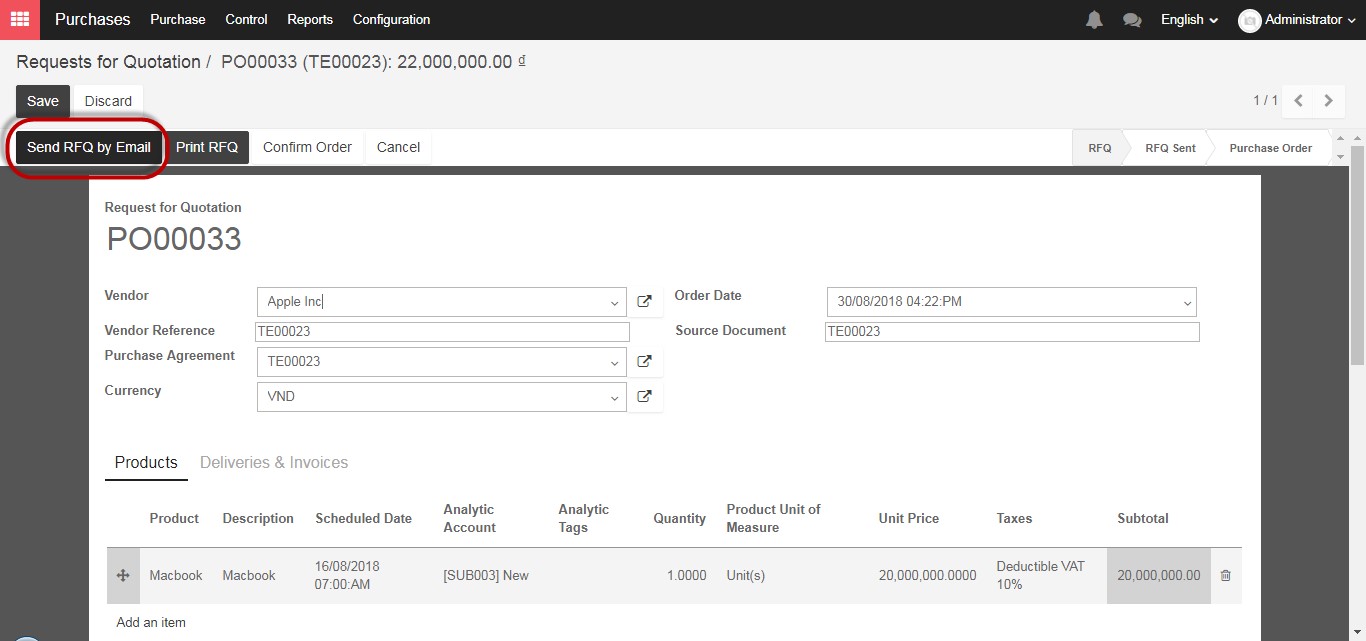
The quotation is ready to send to the vendor by clicking on Send RFQ by email button
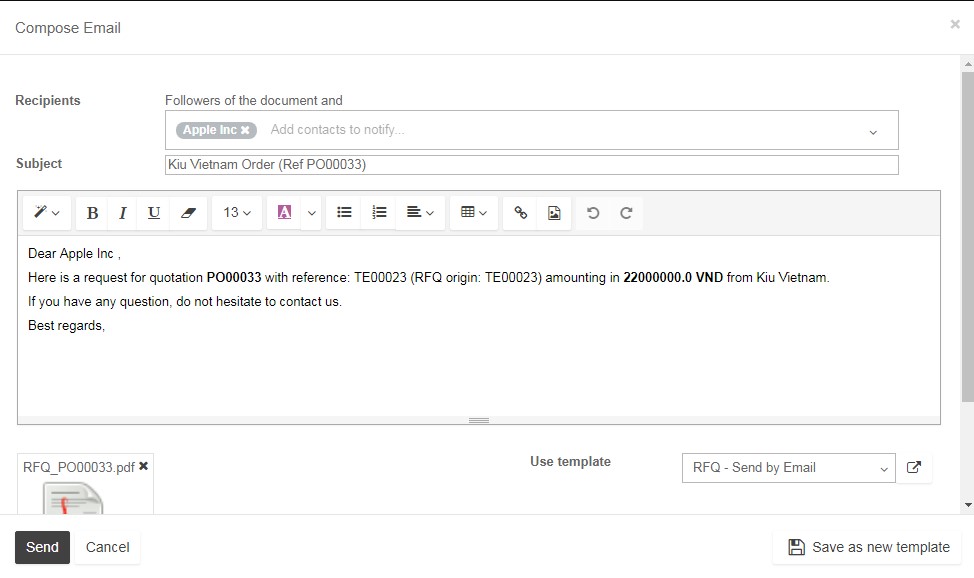
Verify the details of the email as well as the information of the vendor then click Send
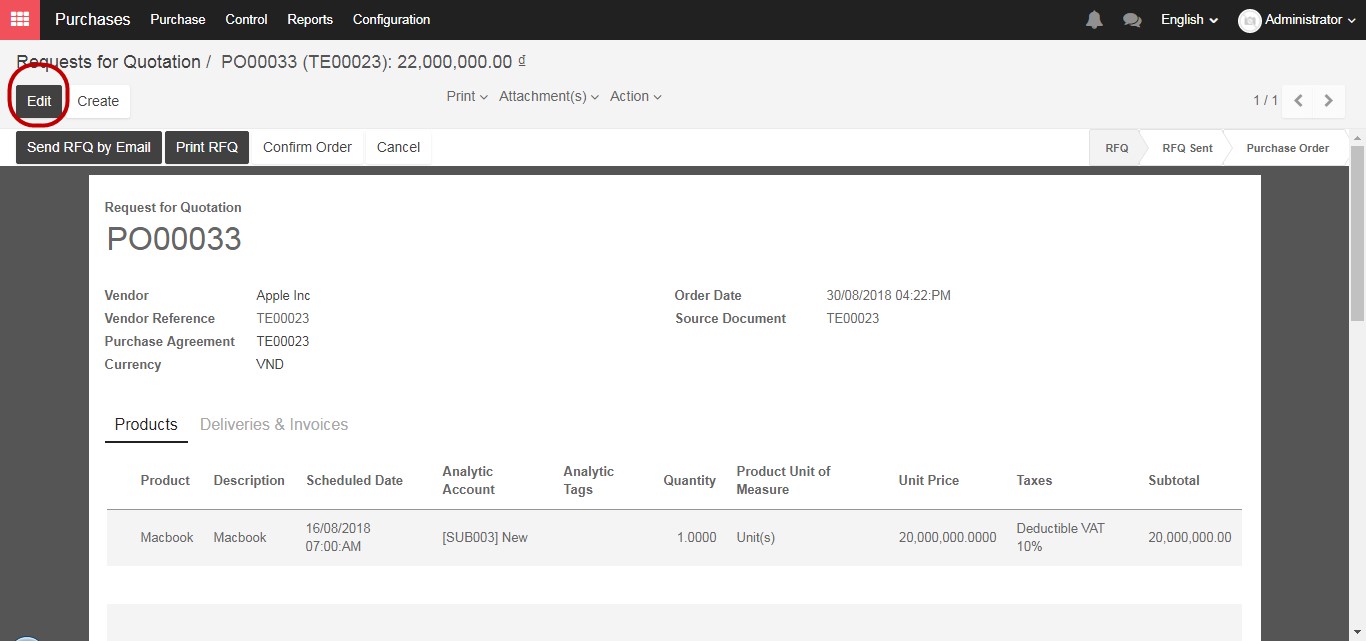
After sending the Request for Quotation successfully and receive the feedback from the vendors,Click “Edit” in the top left, to update the quotation with the new information provided, such as the price, any taxes, expected delivery lead time, payment terms, or any other information the supplier has given you, then click “Save” at the top of the screen.
Once all the Requests for Quote are sent, you can click on “Validate” on the Purchase Tender.
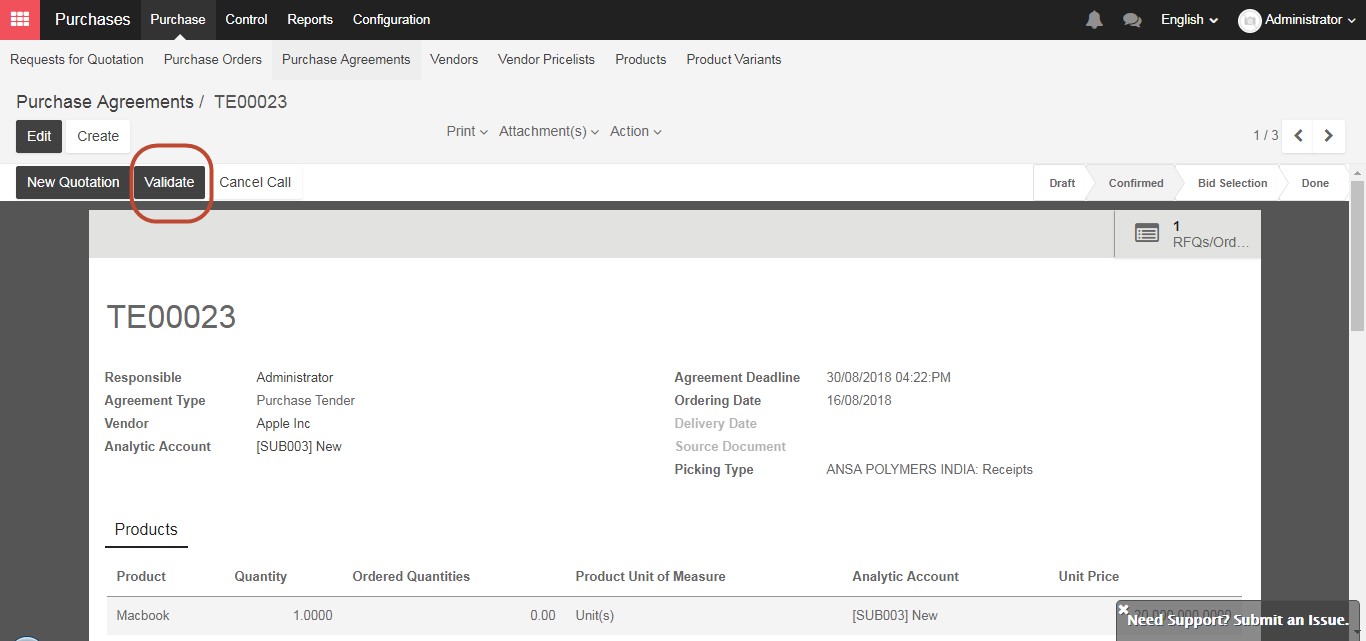
The vendors will send their offers, and you can update their Request for Quotation accordingly. Then, choose the ones you want to accept by clicking on ”Confirm Order” for the Request for Quotation and “Cancel” on the others. Finally, after the purchase order had been confirmed, you can click Done on the Purchase tender to close the agreement.
Secondly, for creating Blanket order from the drop down menu of Agreement type:
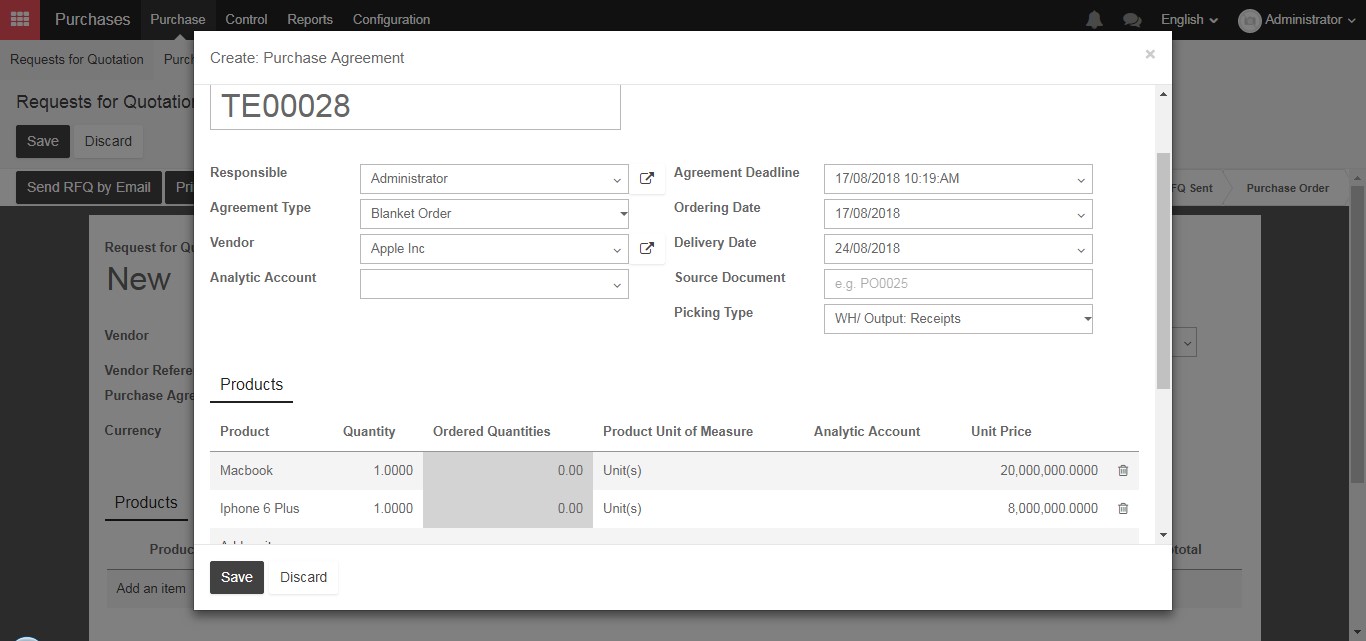
A “Blanket Order” is similar to a framework contract, where you lock in a good price with a vendor for a specific period of time and plan multiple deliveries during that interval. In the supplier field select the vendor you intend to purchase from. In the “Product Tab” below, click “Add an Item” to add one or more products. Select the quantity, which will be the sum of all deliveries to be covered by this Blanket Agreement, and add the negotiated price in the “Unit Price” column.
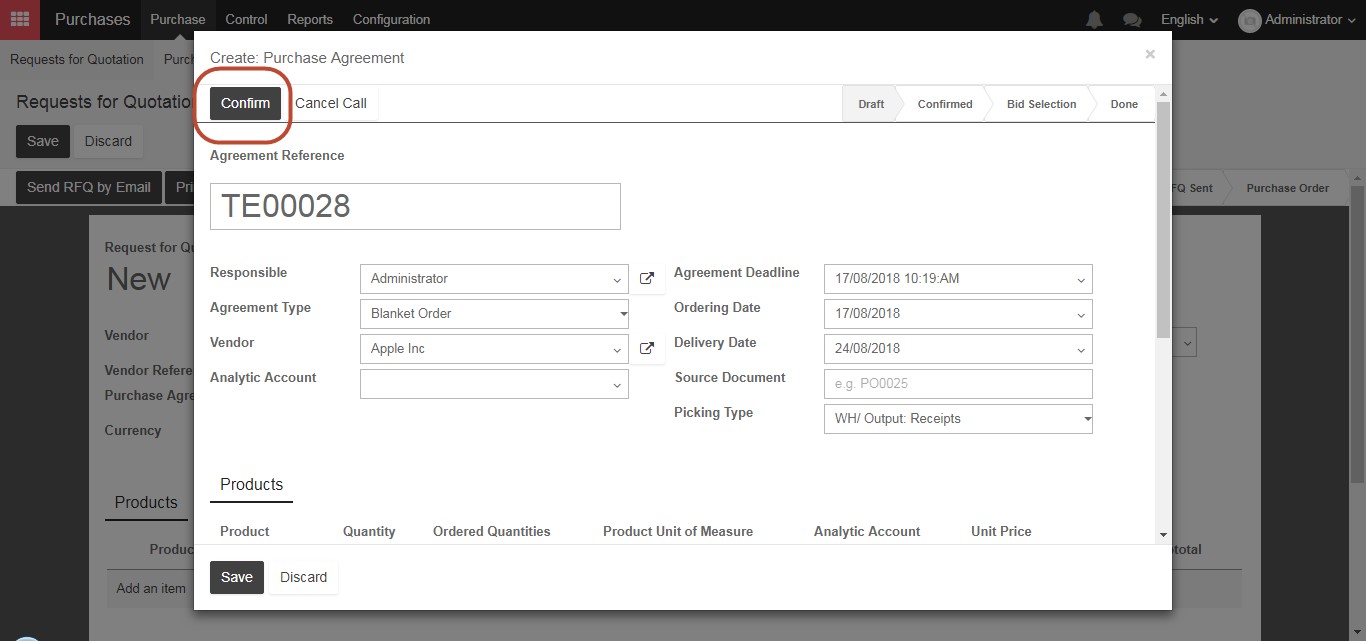
When you have completed filling in these details, click “Confirm”.
Now you can start creating different Purchase Orders with multiple scheduled delivery dates within the agreed period, all linked to this Blanket Order.
The system will auto-fill the document with the product(s) from your blanket order, you only have to choose the quantity and confirm the order. When you go back on the blanket order, you will see how many quantities you have already ordered from your blanket order.

This way, you can easily track how many products you have ordered within a particular agreement, and the quantity remaining with that vendor.
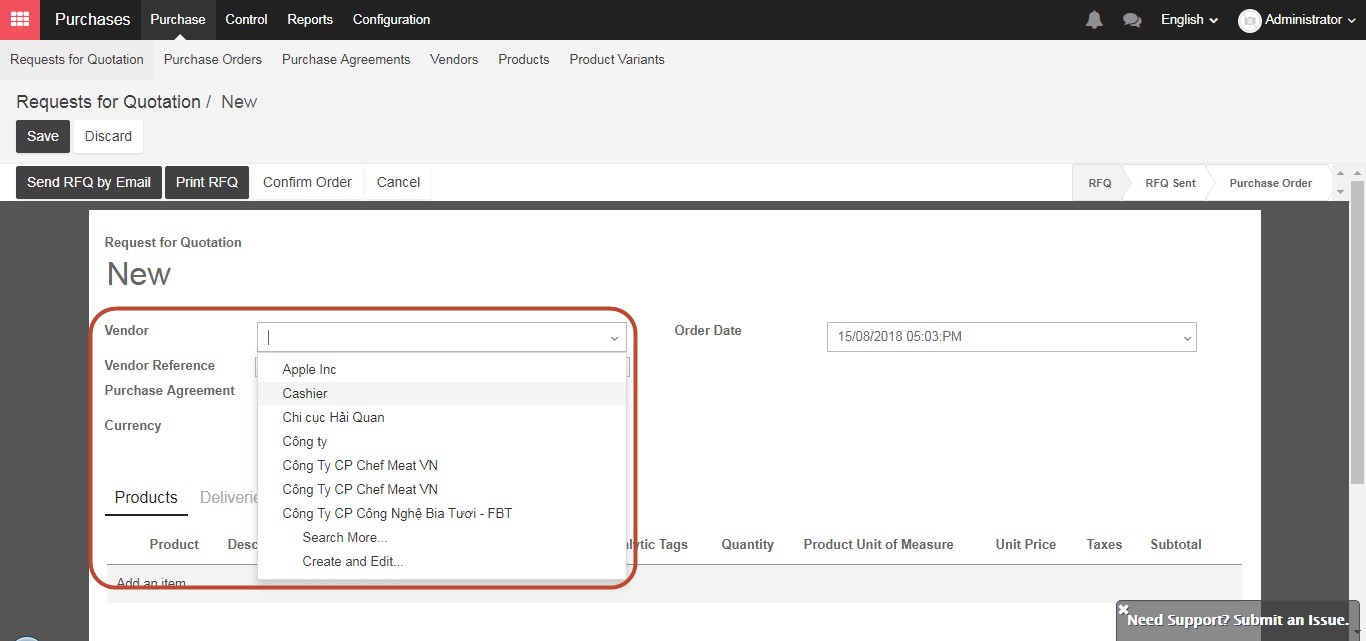
After Purchase agreement has been created and the most suitable quotation has been selected from these purchase agreement, the process would continue by select Purchase/ Request for Quotation and select create button to create a new Request for Quotation

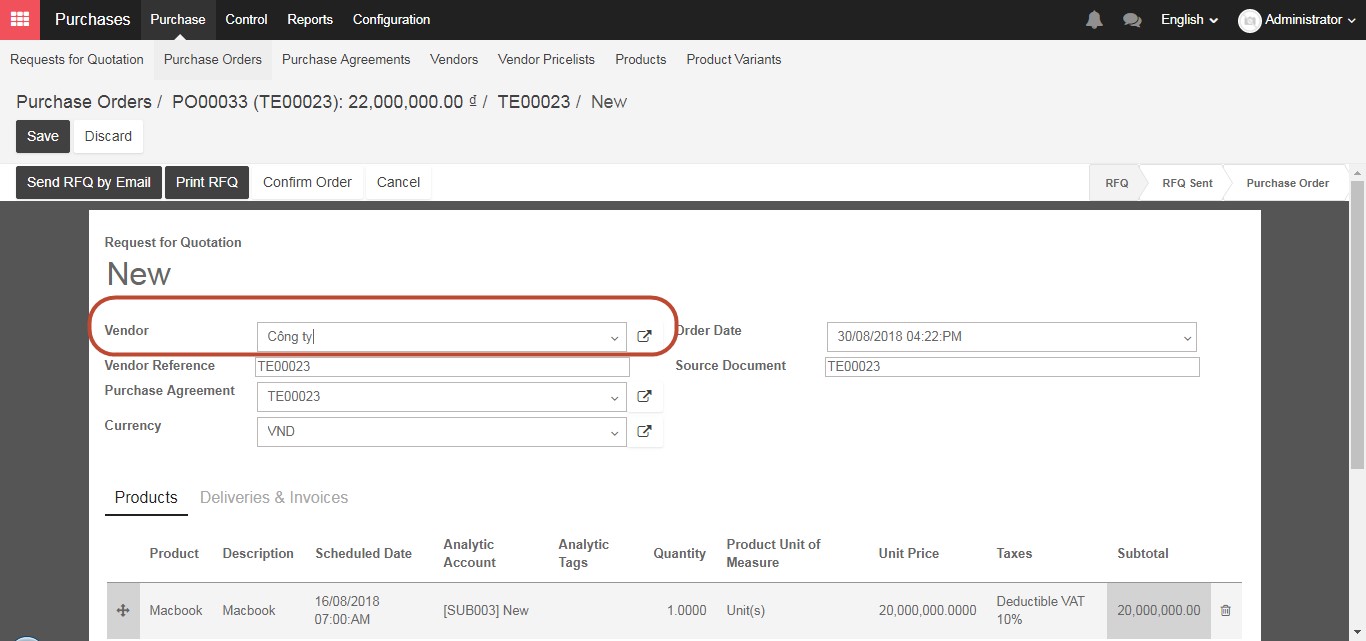
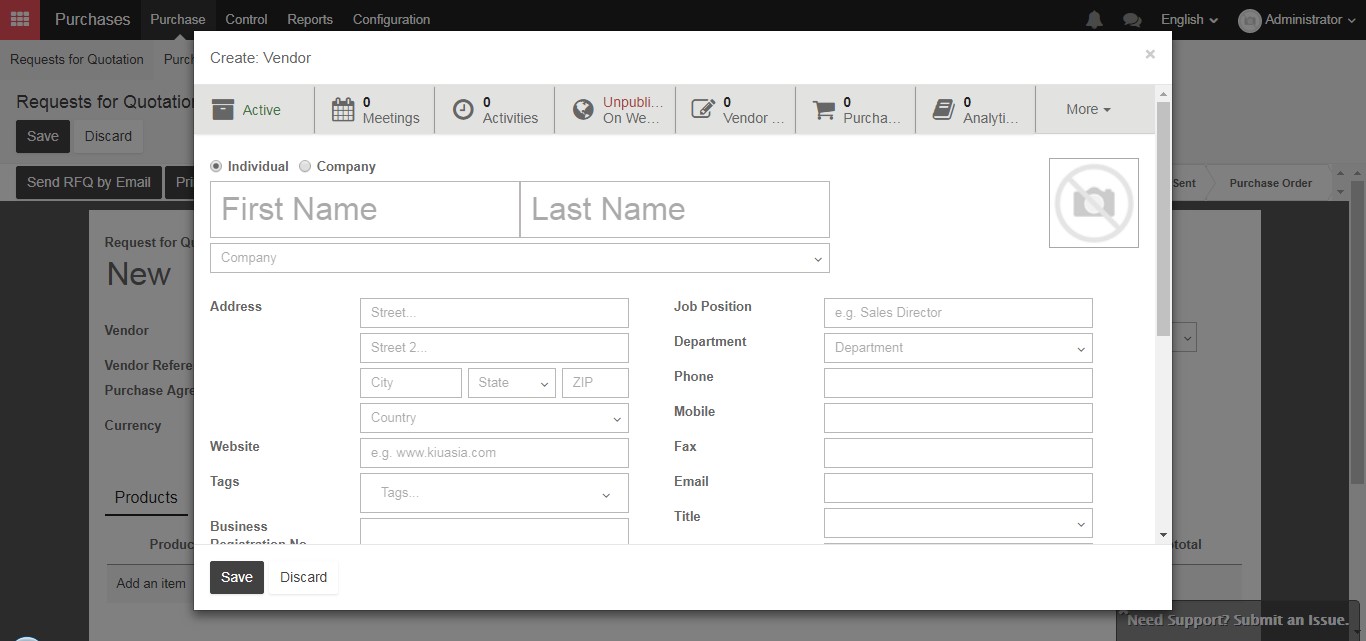
In new screen of Request for Quotation, Select existed supplier in the “Vendor” menu, or create new supplier by clicking on “Create and Edit”.
If choosing to create new supplier, then new window of Vendor will appear. General information of new supplier must be filled in such as selecting this as a company or individual, name, address, email, phone, etc…
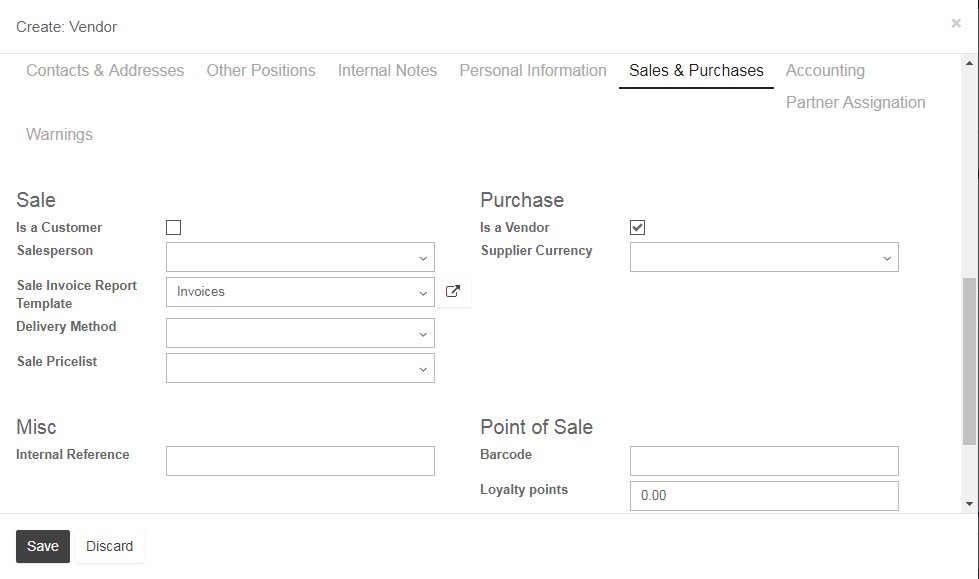
In Sale & Purchase tab of new vendor form, tick a box “Is a vendor” and specify the supplier currency if needed.
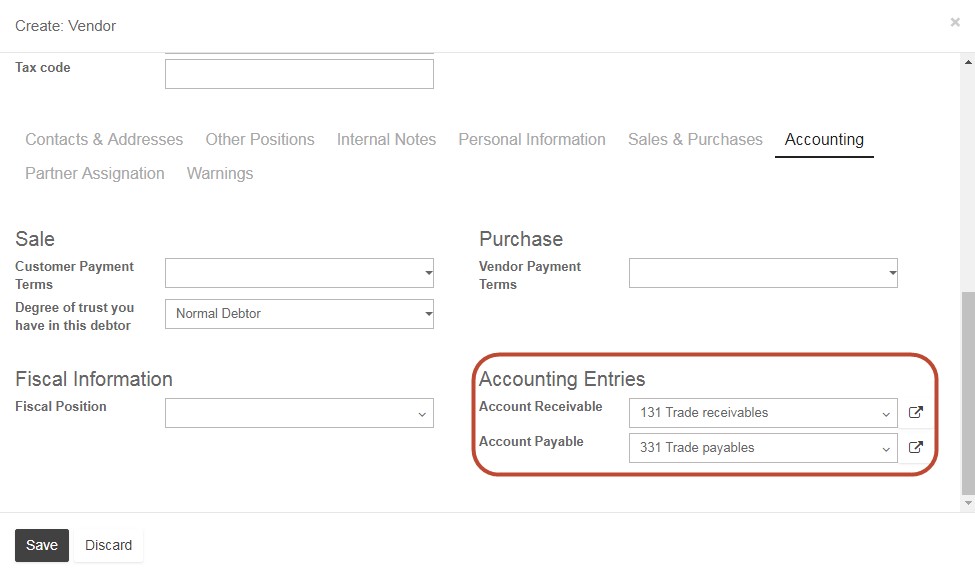
In accounting tab, default receivable and payable accounts have been set up automatically for new vendors. These default accounts can be changed only in special circumstances.
After selecting Vendors successfully, reference to identify specific vendors can be filled in:

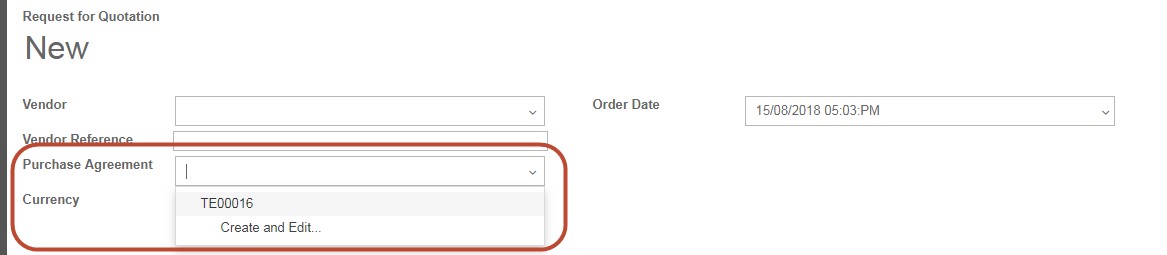
If not choosing purchase agreement and leaving this field as blank, this would be treated as a normal request for quotation. Otherwise, this would be purchase tender or blanket order. We can choose existed purchase agreement or choose to create a new purchase agreement:
So far we’ve shown how to create a “Request for Quotation”, and a “Purchase Tender”with several RFQs included, sent those requests to suppliers, and then used the returned Quotations to update our Request, before finally placing a “Purchase Order” with a supplier.
If your company accept the quotation, click “Confirm order” button to transfer the Quotation to official Purchase order. Otherwise, If you already know the price of the item you want to purchase, and you only intend to purchase one time, you can skip the “Request for Quotation”, “Purchase Tender”, and “Blanket Order” and proceed directly to creating a “Purchase Order”.
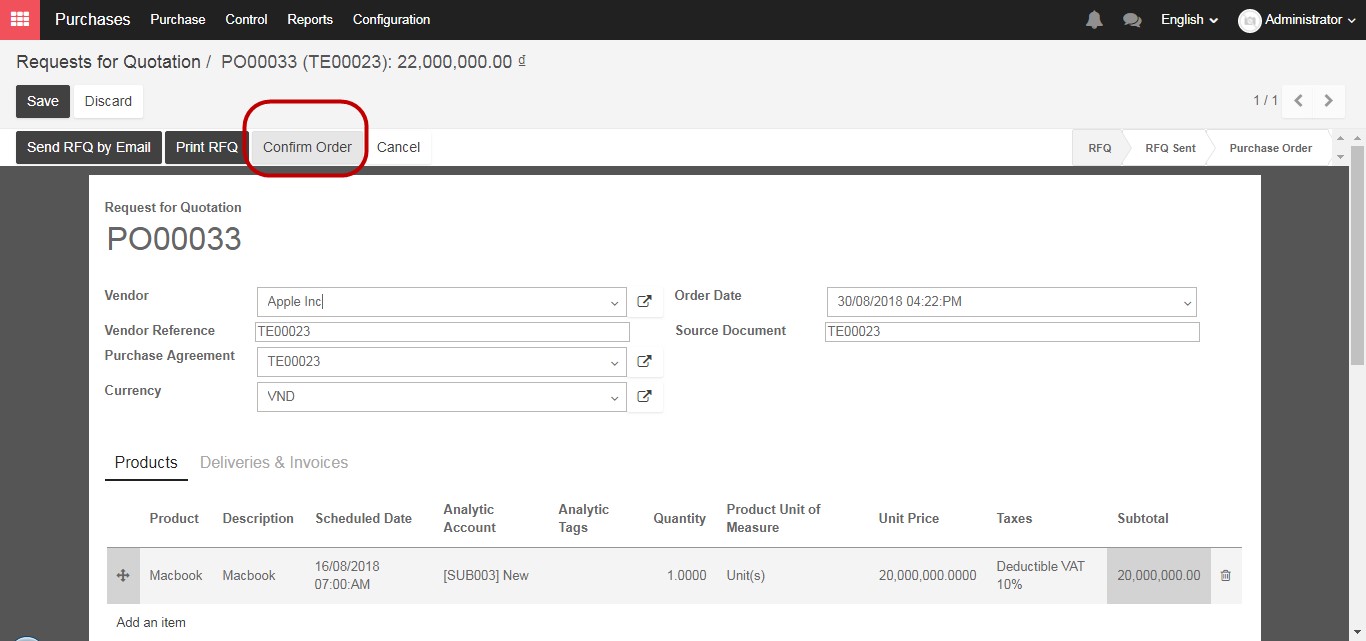
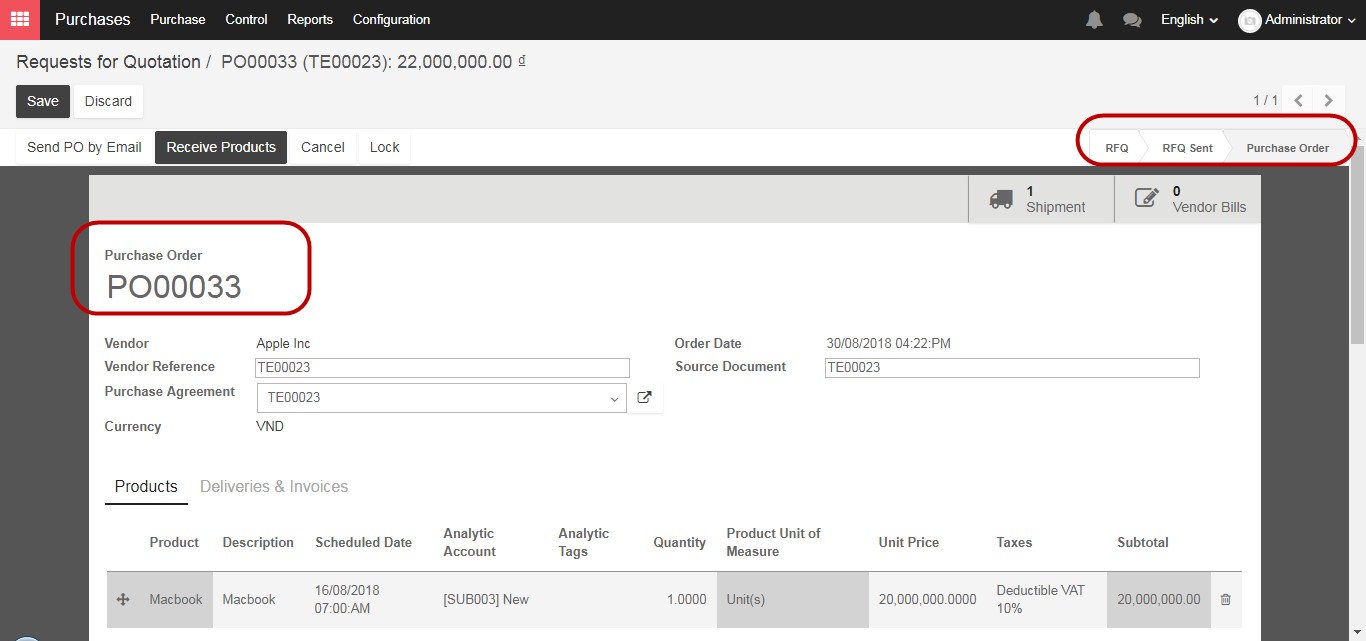
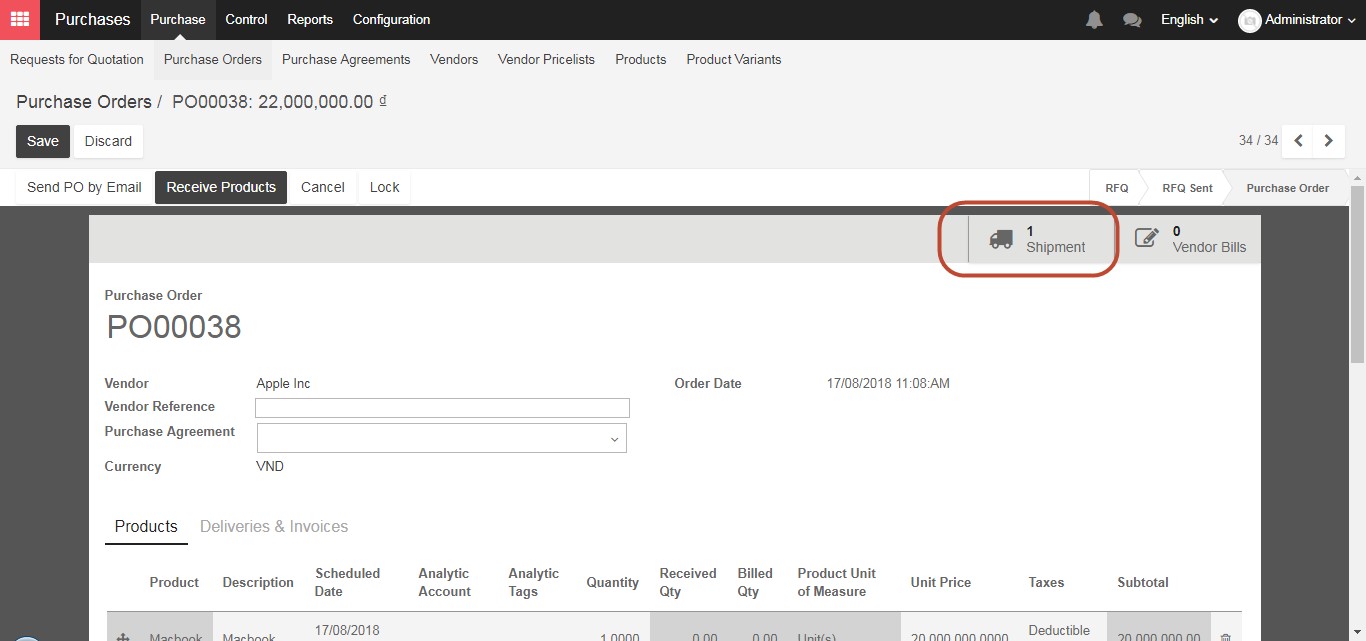
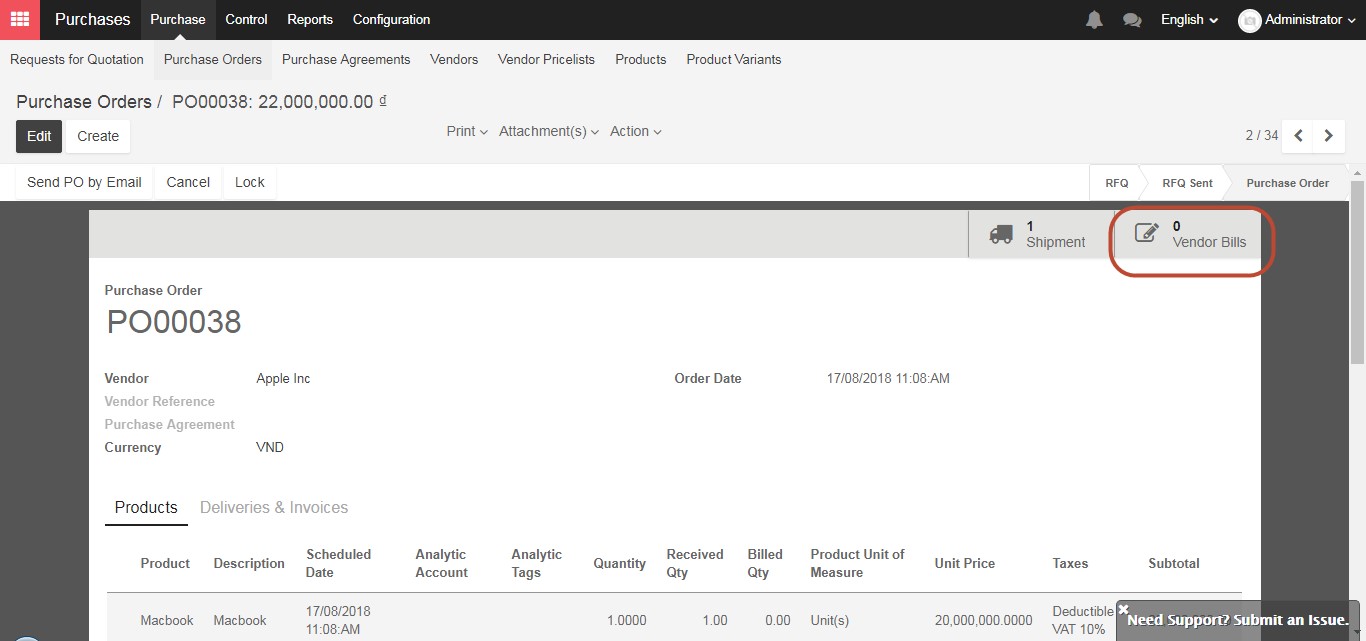
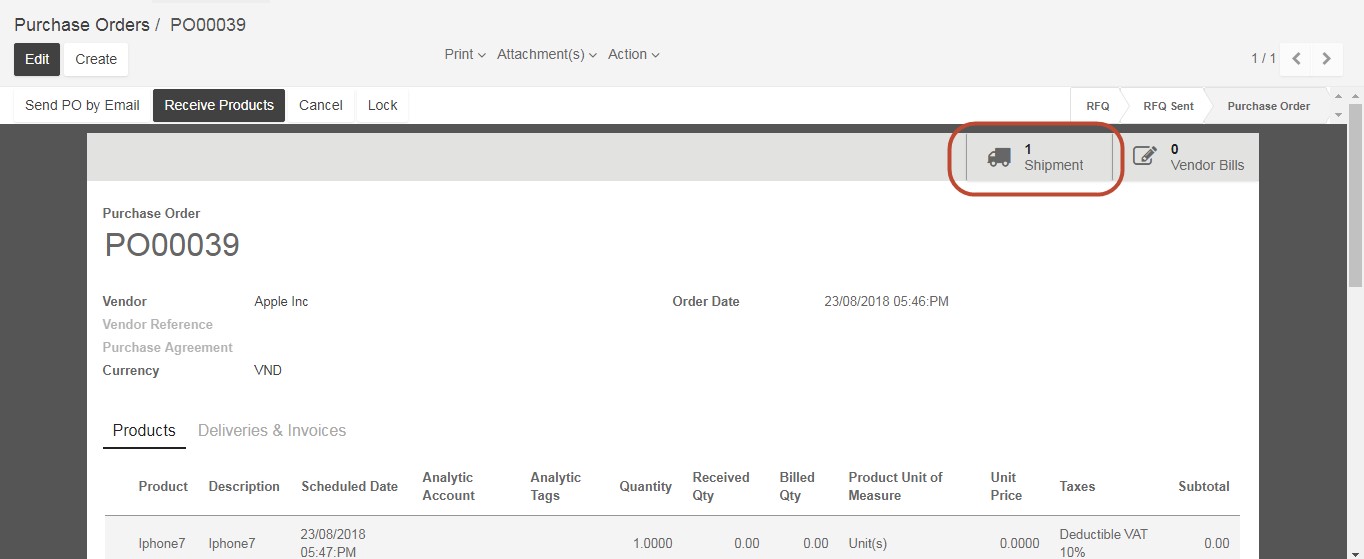
After clicking on “Confirm order”, new purchase order based on this quotation has been created successfully and the status of the request for quotation will change to “Purchase Order” and the icons in the upper right corner of the order will show “1 Shipment” and “0 Vendor Bills”.
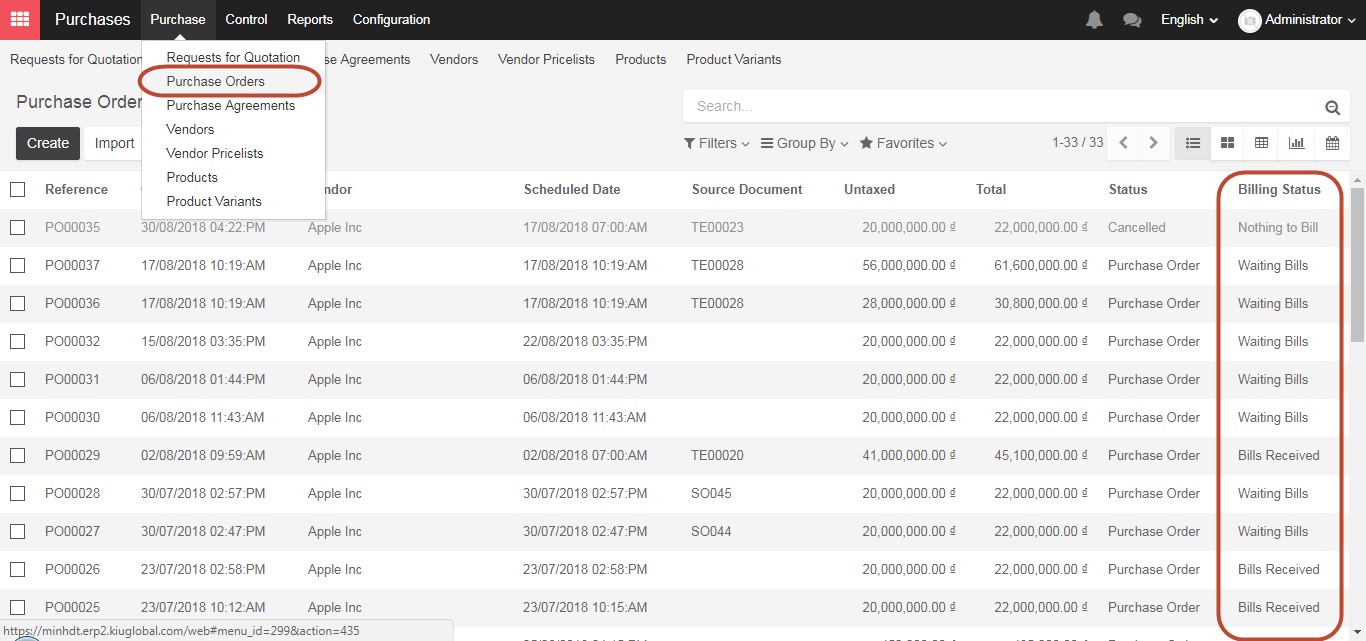
However, if you already know the price of the item you want to purchase, and you only intend to purchase one time, you can skip the “Request for Quotation”, “Purchase Tender”, and “Blanket Order” and proceed directly to creating a “Purchase Order”. Within the “Purchases” module, click the “Purchase” drop down menu at the top of the screen, and select “Purchase Orders”. The system will now open to a list of Purchase Orders. The list shows all Purchase Orders created. When you click “Create” you will see a screen very similar to the “Request for Quotation” form. The status field can be “Waiting Bill”, “Bills Received”, or “Nothing to Bill” for a cancelled order. “Waiting Bill” means that the Purchase Order has already been confirmed and “Bills Received” means that the Vendor Bill has been created.
If you want to view an existing Purchase Order, you can choose the Purchase Order from the list. To create a new Purchase Order click on the “Create” button. The only difference between the “Request for Quotation” and the “Purchase Order” views, is the addition of the columns “Received Quantity” and “Billed Quantity”.
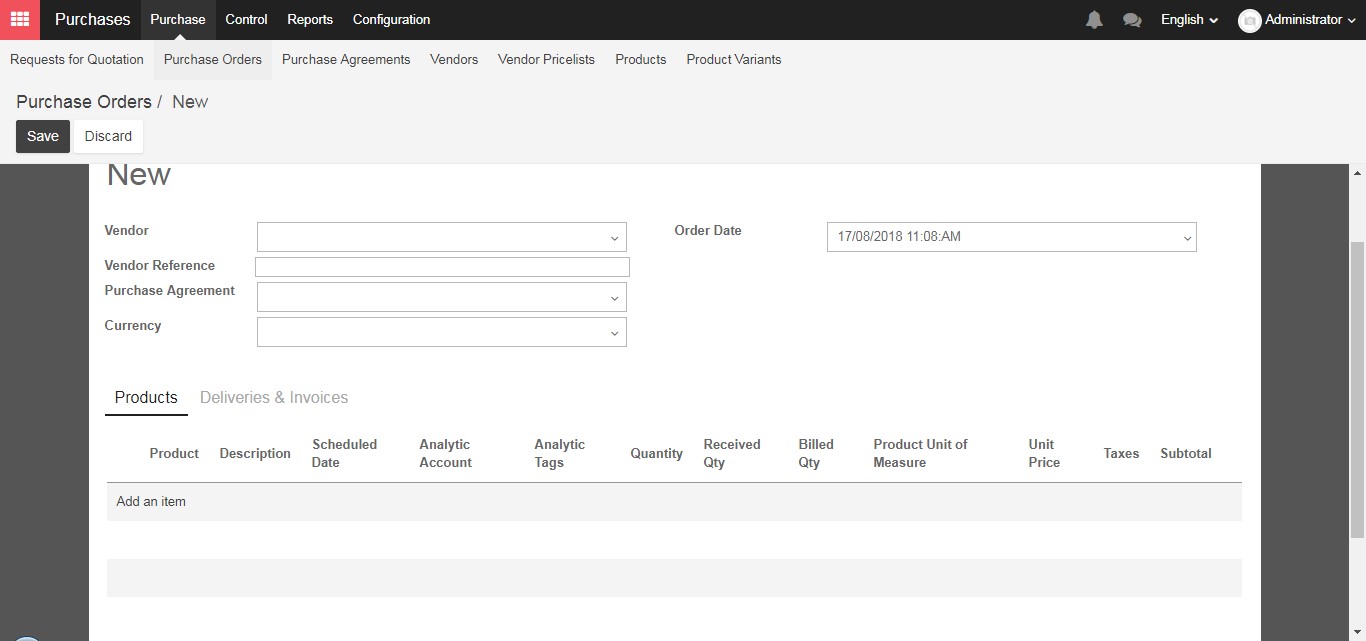
The “Received Quantity” column will show the number you have received and the “Billed Quantity” will contain the number of items your company has received an invoice for.
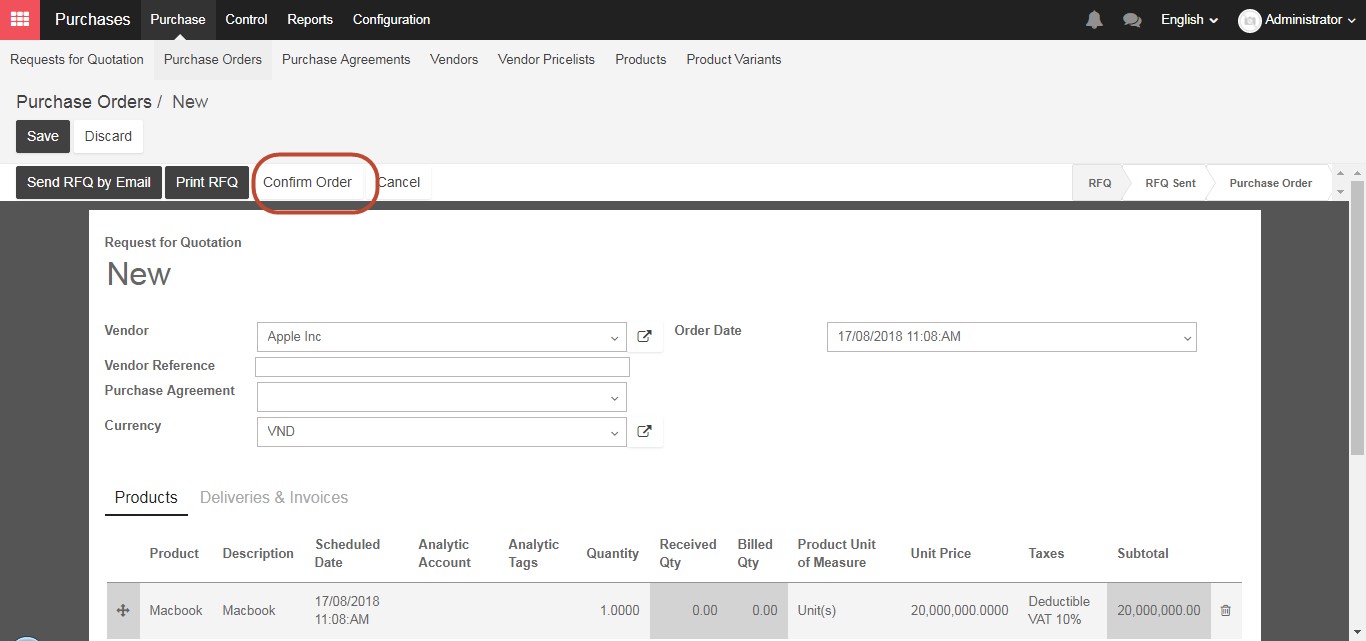
To finalize the Purchase Order, you can click on the “Confirm Order” button, which will initiate purchase from your supplier, and is the last step to creating a Purchase Order.
When the supplier sends you the shipment, you will have to receive the products and register their invoice with a Vendor Bill. When the purchase order opens you will notice the “Shipment” and “Vendor Bill” icons in the top right of the screen.
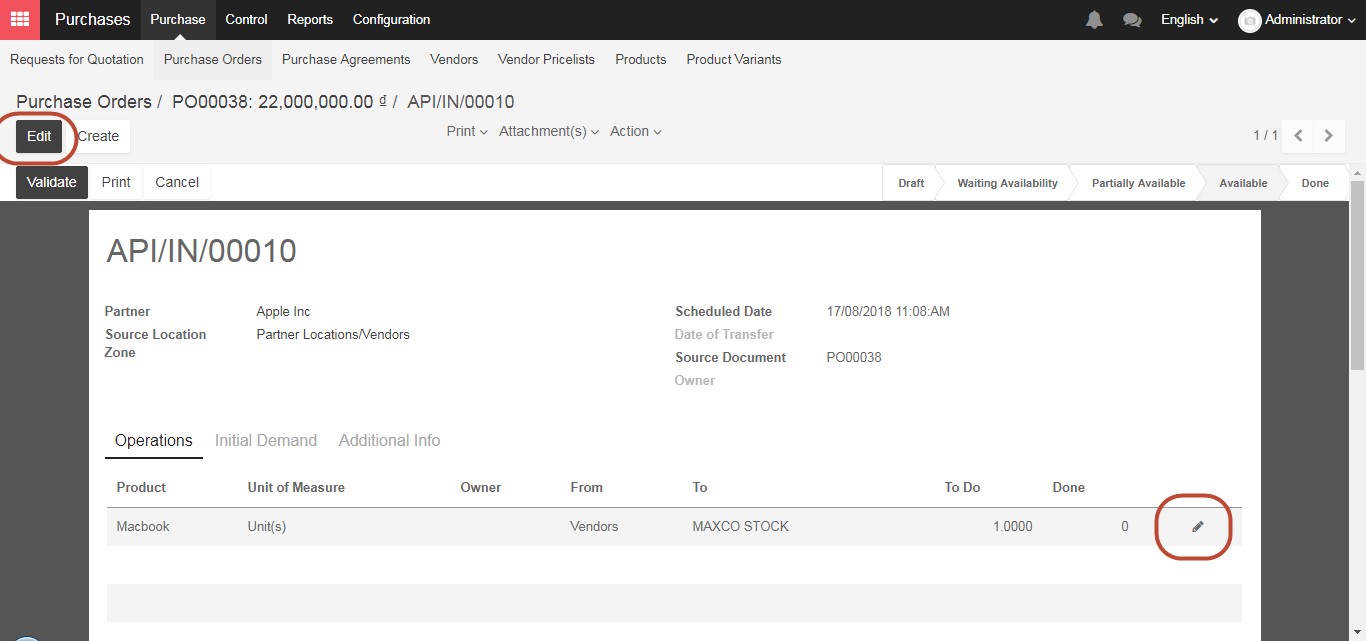
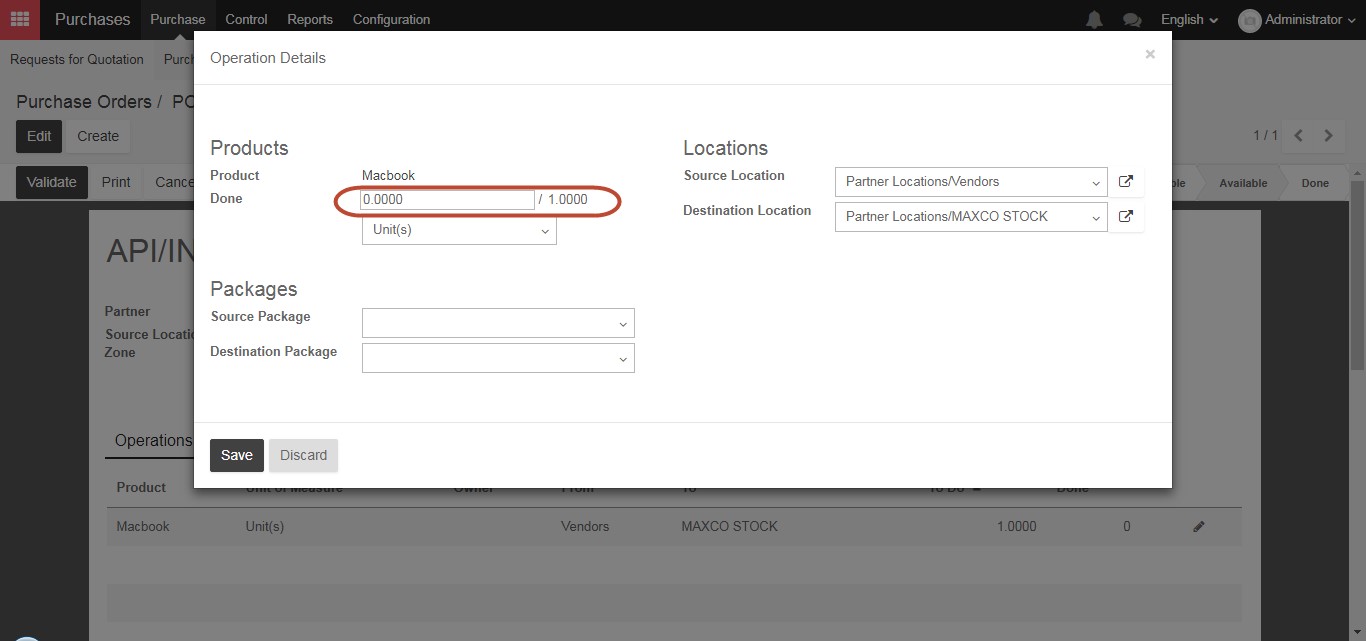
If we click on the “Shipment” button, the details of our shipment will appear. If the items displayed does not match the items you received, Click on the “Edit” button, or the small “Pencil Icon” next to each line of your shipment, and then select the number of products you have received.
Verify the actual units the company has received from the suppliers
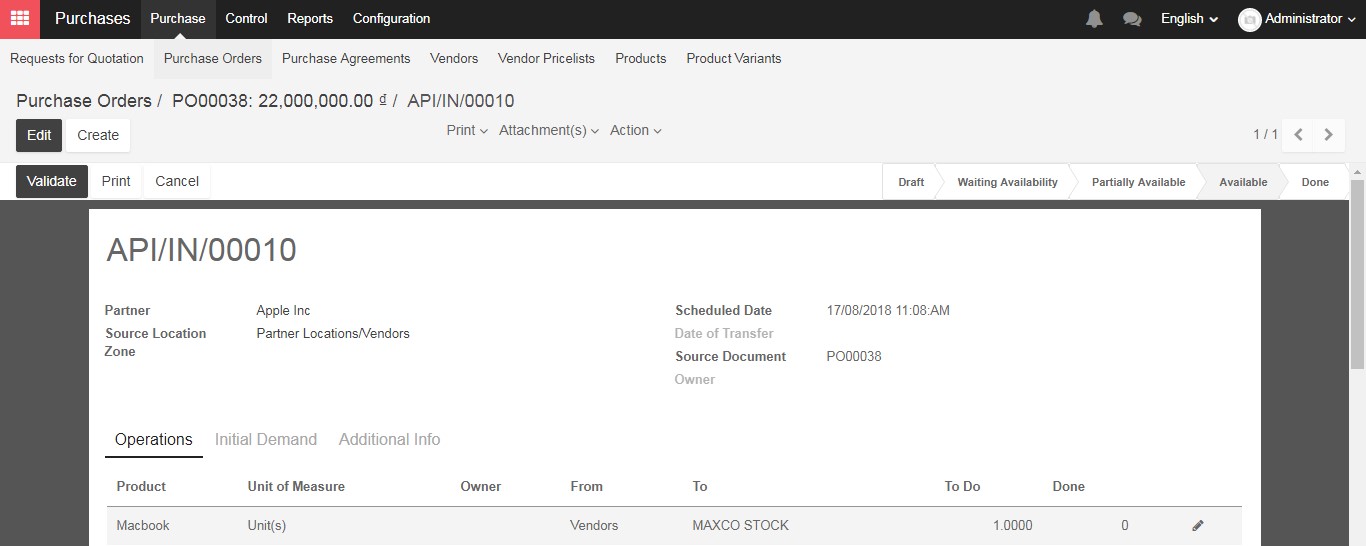
If you have received all of the products in the shipment, the number of products you have received in the “Done” column matches the number in the “To Do” column, you can now click “Validate” at the top of the screen, and the status will change to “Done” in the top right, and you will have received the products to your warehouse.
After receiving the product in our warehouse, we’ll have to pay for them. In the Kiu BMP system, we can create a Vendor Bill, which will be the last step in our purchasing process.
Coming back to Purchase order, select “Vendor Bills” icons in the top right of the screen.
Click on the “Vendor Bills” icon, and when the screen refreshes click the “Create” button.
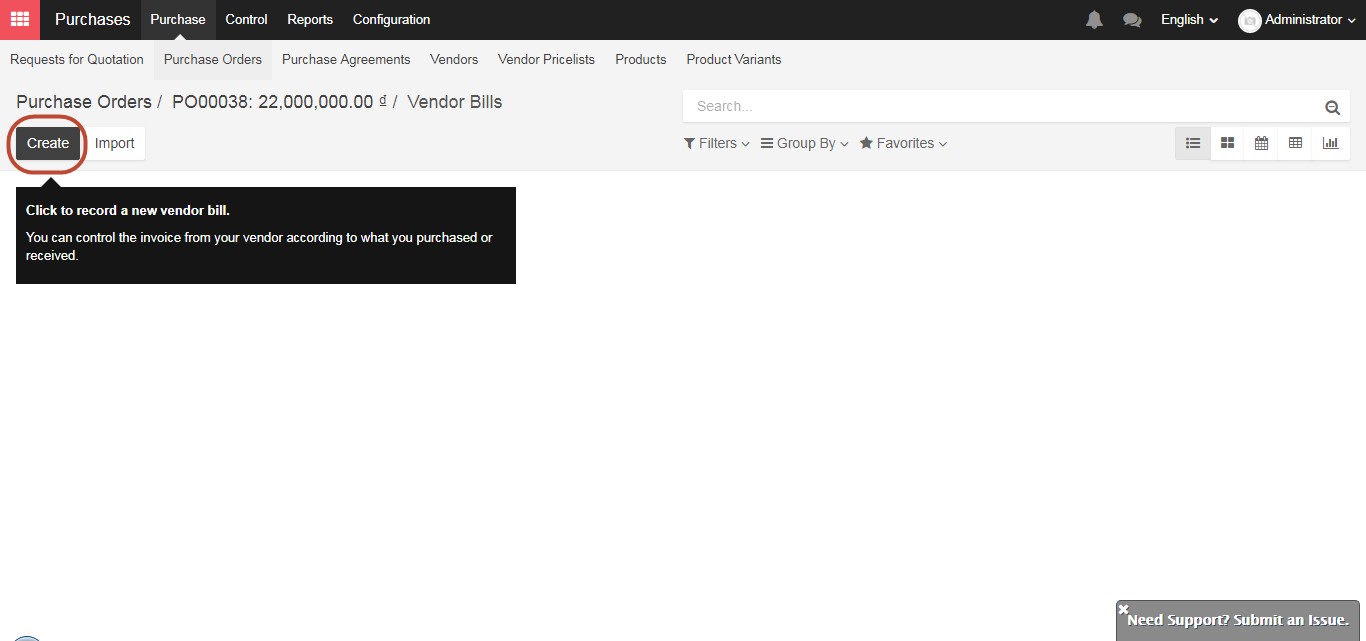
The Vendor Bill will be prepopulated with all of the information from your purchase already. If you have received all of the products in your Purchase Order, it will reflect that. If you have only received a partial shipment, the Vendor Bill will automatically update for the quantity received. When you are satisfied that the information matches what you have received, click “Validate”. At this point, the Vendor Bill is only a “Draft Vendor Bill”.
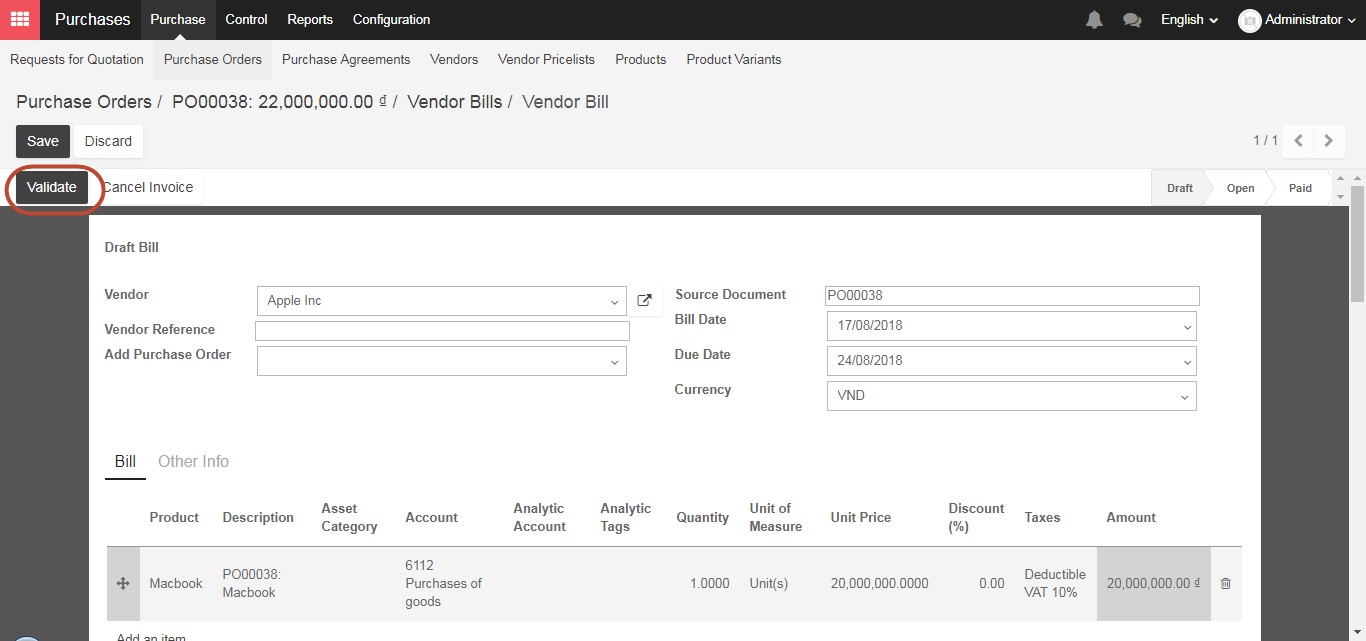
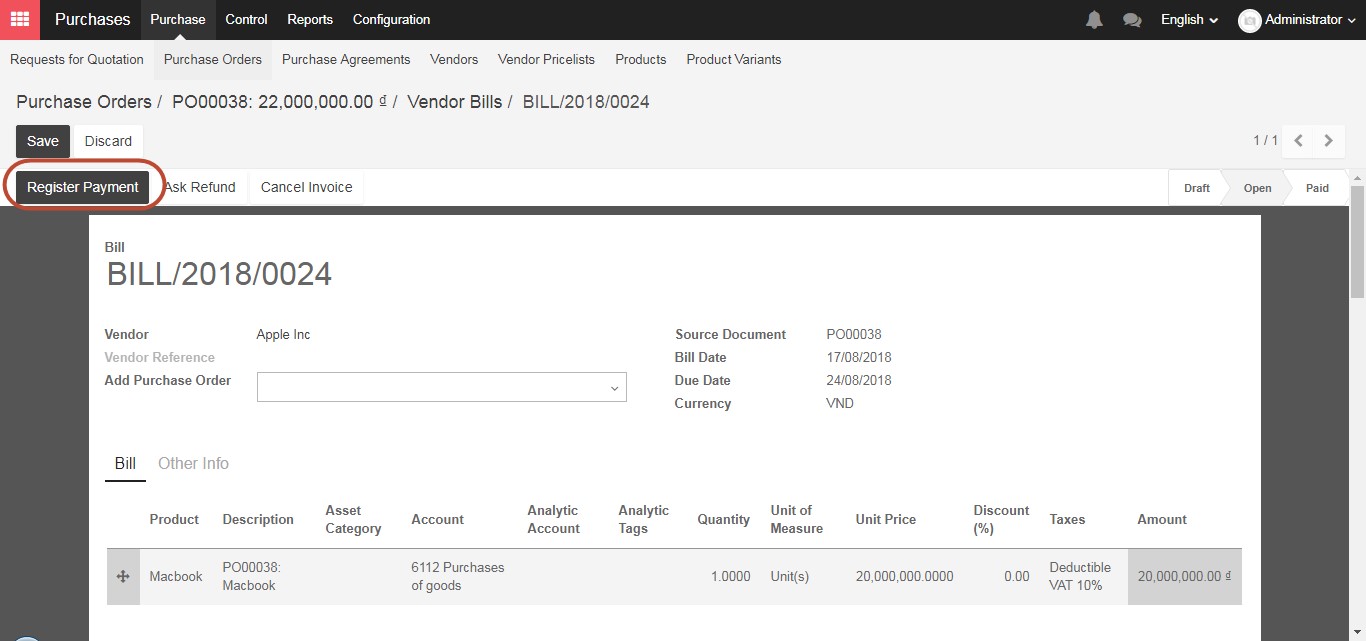
To create a final Vendor Bill, click on “Validate” to confirm all the information such as the number of product, price, bill date, due date, etc. Then the accountant or manager will work in the “Accounting” module to register the payment and finalize the purchase order.
This is the last step of regular purchase process.
Before proceeding to regular purchase process, we will find out how to create new products in KIU BMP. There are many ways to create new products such as go to Purchase module/ Purchase/ Products or Sales module/ Sales/ Products or Inventory module/ Inventory control/ Products then select Create to create new products
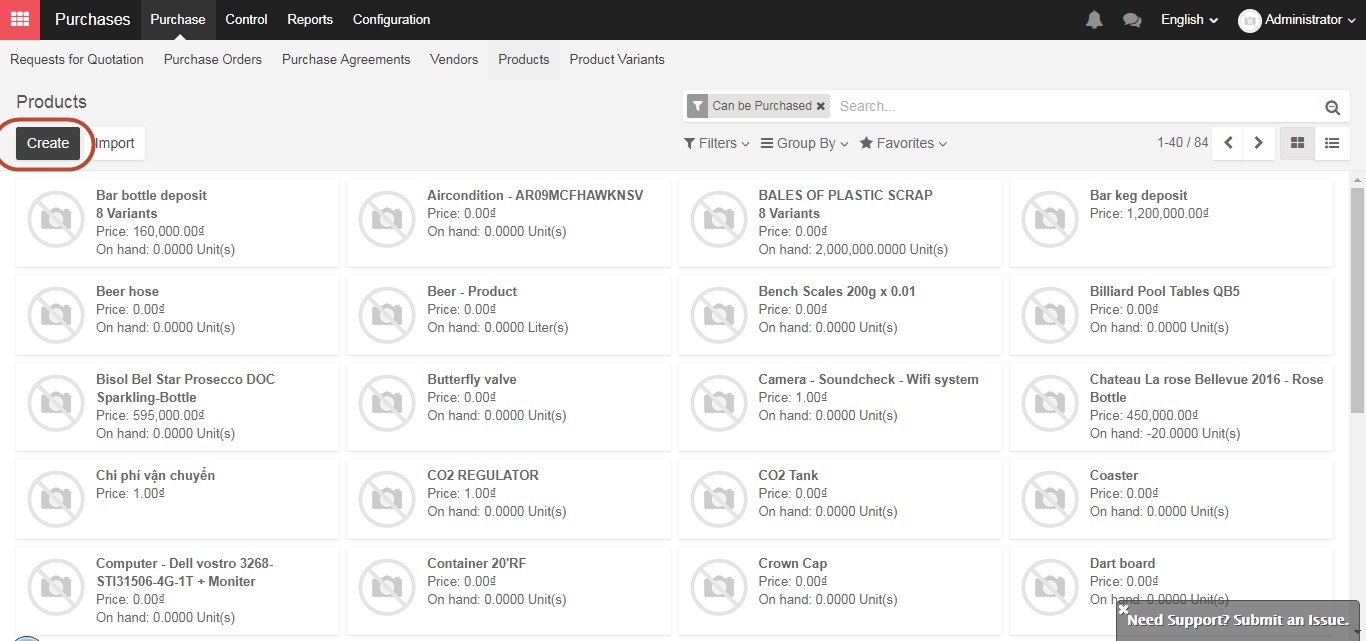
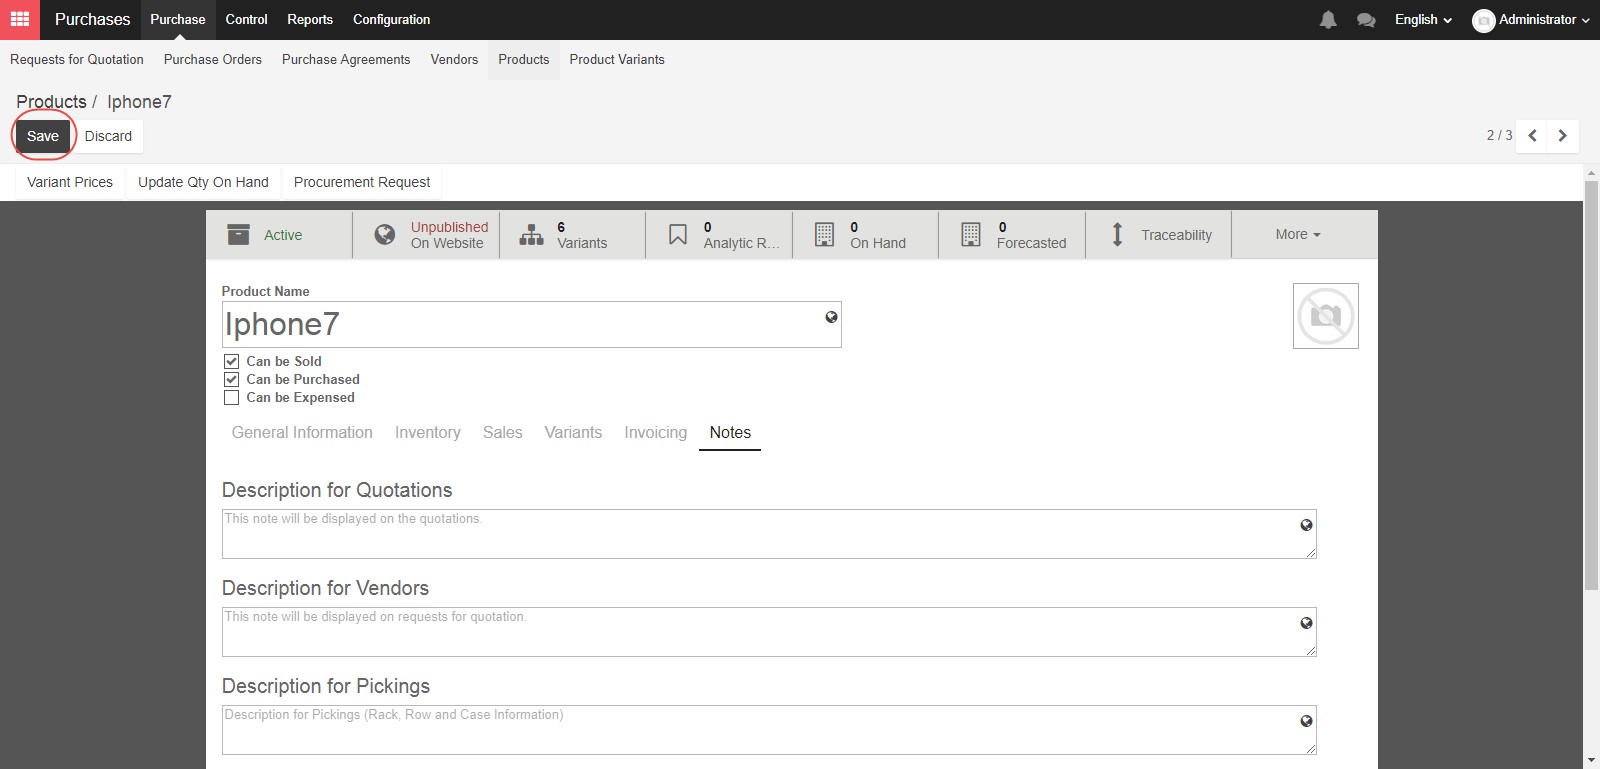
Fill in Product name and select “Can be sold” or “Can be purchase” or “Can be expenses”. The first is “Can Be Sold”, which as the name implies denotes a product that your company sells. Similarly, the second check box “Can Be Purchased” denotes a product that your company can buy. The final check box “Can Be Expensed” is for items which can be attached to employees’ payroll for reimbursement purposes. Examples of items which can be expensed are hotel rooms, conference fees, or airline tickets)

In tab General Information in the form of the product, there are three types of product: Consumable, stock product, service and digital products.
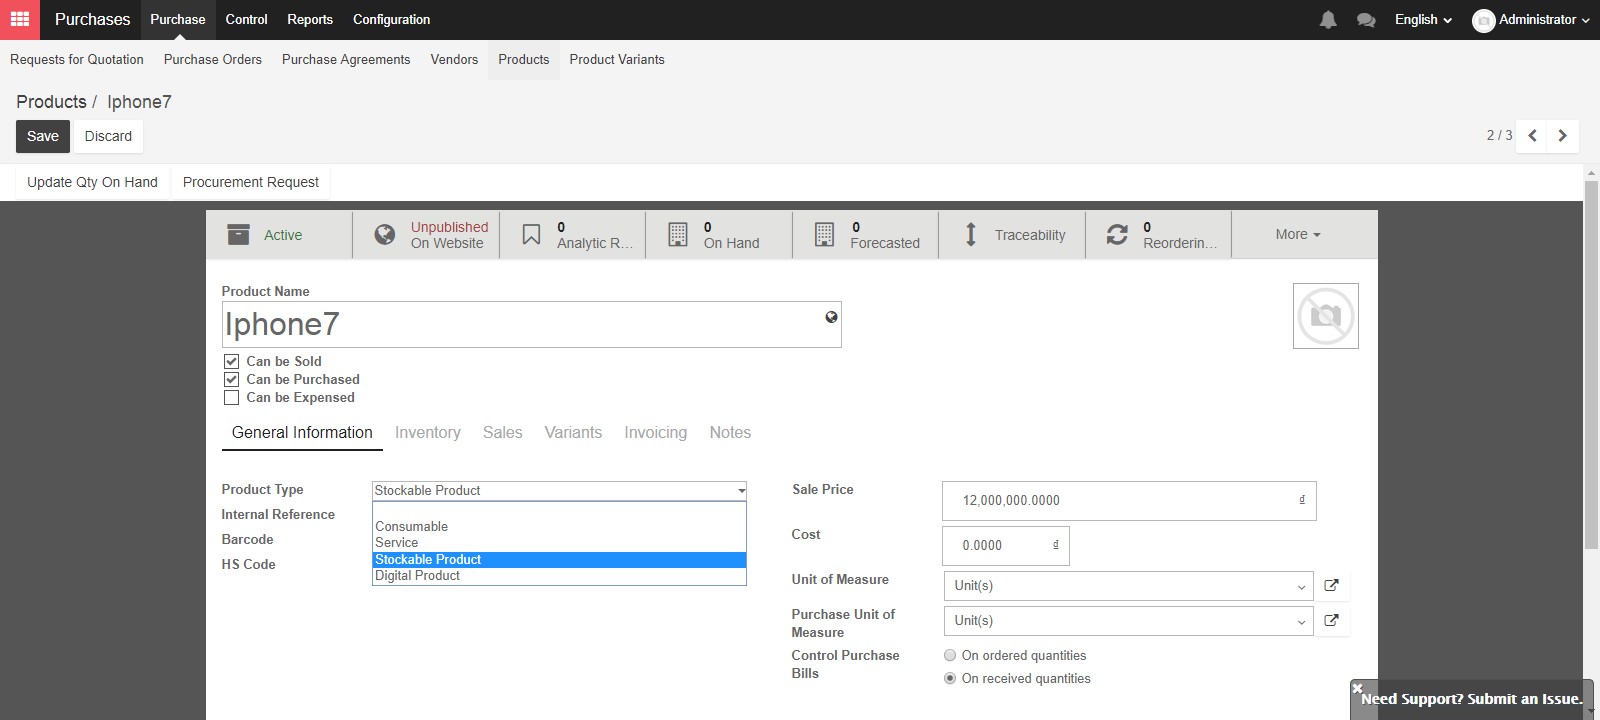
“Consumable products” are physical products which are treated like a stockable product, with the exception that stock management is not tracked by the BMP System. This means that there are no minimum stock rules or automatic procurement rules. Examples would include stationary for employees, or cleaning supplies for your office. These are typically not the main products which your company will sell or the raw materials to manufacture the products you will sell. You can buy consumable products, deliver them or produce them but the Kiu BMP system will always assume that there is enough of them in stock and there is no Journal Entry for your related Stock move.
For Stockable Products: are the physical products which your company has stock management rules to ensure they are in your inventory. These products are those that you will sell to customers, or the raw materials of your manufactured products. For stockable product, Kiu BMP will create shipment transaction against purchase order & delivery order against sales order by choosing the shipment icon in the top right hand side, before vendor bills/ customer invoices in purchase order or sales order.
The shipment tracking transaction has been created in accordance with the purchase order/ sales order.
“Service” type of product is an intangible product and not applied in any stock operation. Examples of “Services” are accounting, cleaning, insurance, or transportation. There are special features to track services in the “Invoicing” tab.
“Digital product” can be sold on Kiu BMP’s e-commerce module and can be downloaded by customers.
You can set Internal reference for internal control of the products or barcode field allows you to enter a barcode number to track your products. You can either type the barcode, or use a barcode scanning modules to enter the product’s barcode here. And HS code stands for the Harmonized System Code, which is a set of standardized names and numbers to classify traded products for international shipping and goods declaration.

In the “Sale price” field you can set a price for your product, if you will sell that product at a fixed price. Or you can leave it blank if you follow variable pricing strategy, where you will change the price depending on the customer, the time, sale quantity, or other variables. This can also be affected by the price list that you use for different customers or sales orders. For unit cost, The “Cost” field refers to either the purchase cost, or the production cost of the product. If the product follows standard price costing method, the value entered here, normally once per year, is also the cost price of the product. However, if it applies the average or real price costing method, this value will vary and automatically update according to actual purchase or production costs. If the cost of the products are set in the product form, this cost will be displayed automatically in the purchase order and be used to calculated inventory valuation in Inventory module.
Unit of measure is the selling unit of measure used in meanwhile purchase unit of measure is used in purchase order. Selling unit of measure can be different with purchase unit of measure, for example the company can buy products with unit of measure is ton(s) then sell to the customer with unit of measure is kg or g. The purchase unit of measure must be in the same category with the unit of measure.
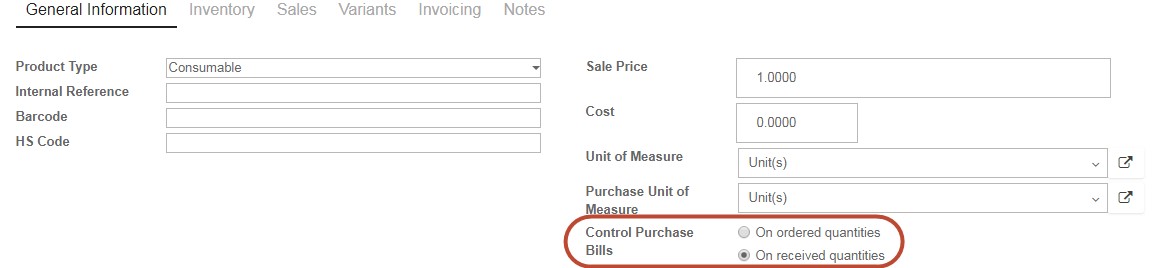
The Control Purchase Bill is based on the ordered quantities or the received quantities. If you would like to create a vendor bill before receiving shipments from a supplier, select “On Ordered Quantity” in the “Control Purchase Bills” section. The draft bill will be automatically created with the ordered quantity when you click on create bill. If you select Bill “On Received Quantity” you can bill based on the amount your vendor has delivered to you. After you receive products, you will have the opportunity to create a vendor bill at that time. If you received part or all of the shipment, the draft bill will reflect that corresponding amount.
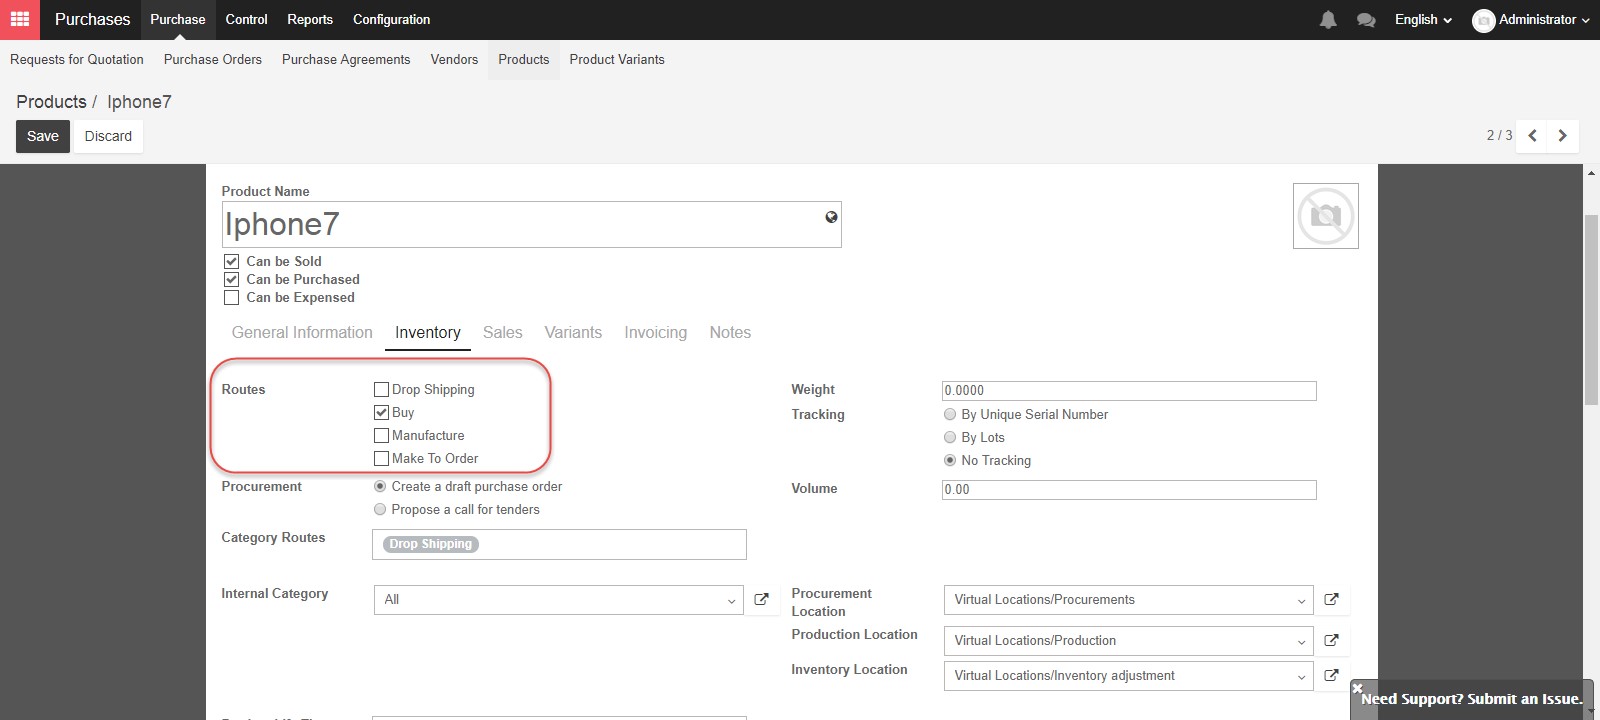
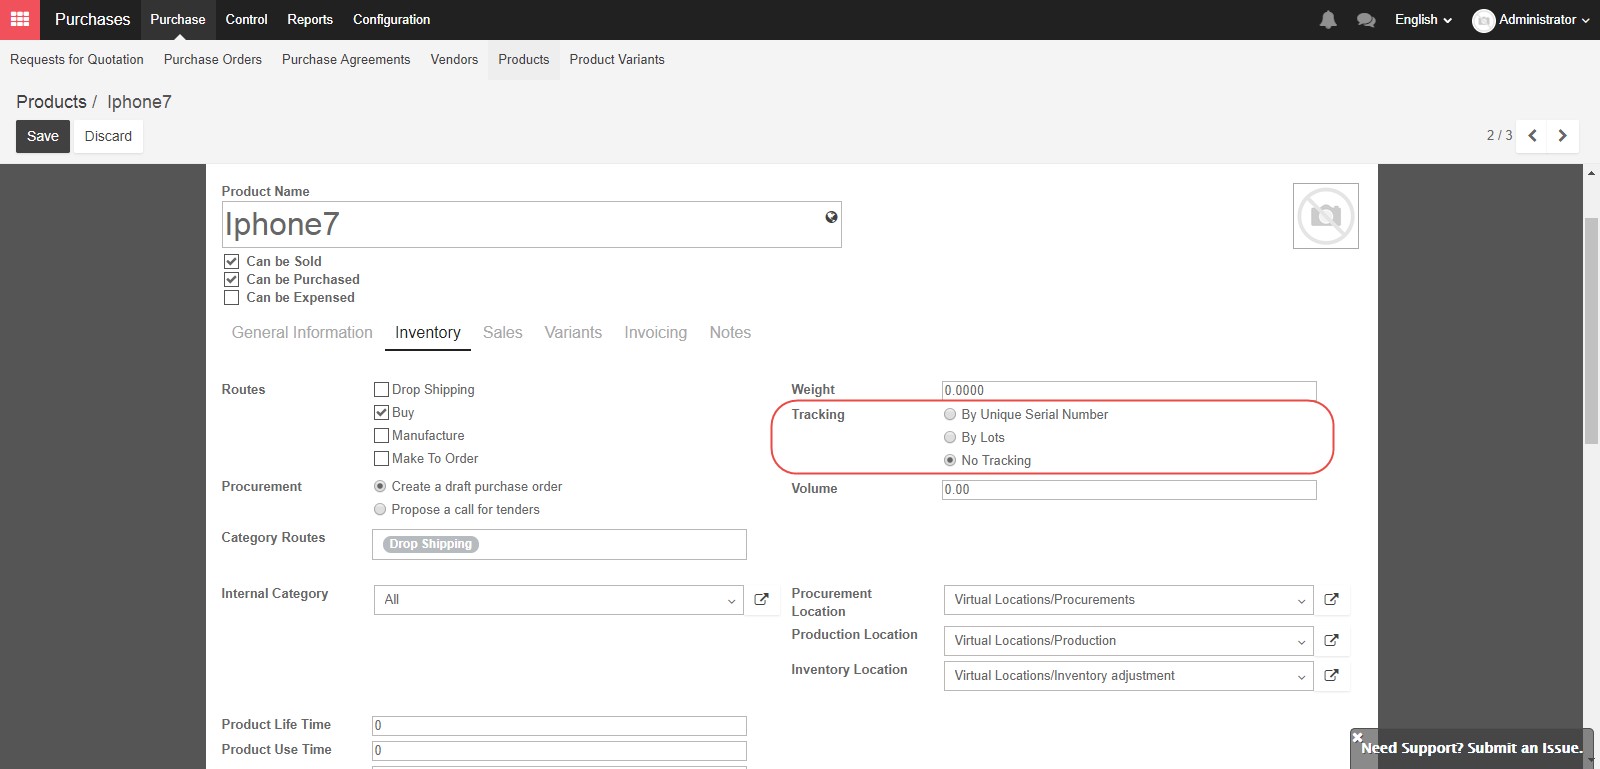
In tab Inventory in the product form, you can set the route for the product: Buy, drop-shipping, manufacture, order. These routes can be configured specifically in Inventory/ Configuration/ Routes. Routes in Kiu BMP depict the journey of the product whether the product will be travel from your vendor directly to your customer, as a “Drop Ship” product, be delivered to you and stored in your warehouse as a “Buy” product, or manufactured by your company as “Manufacture”.
“Make To Order” is a route used in combination with “Buy” or “Manufacture”, meaning you don’t store this product in your company’s warehouse. Instead you will “Buy” or “Manufacture” if there is a sales order for it. You can choose more than one option depending on the product you are creating, however these options are not available if the product type you selected earlier was “Service”.
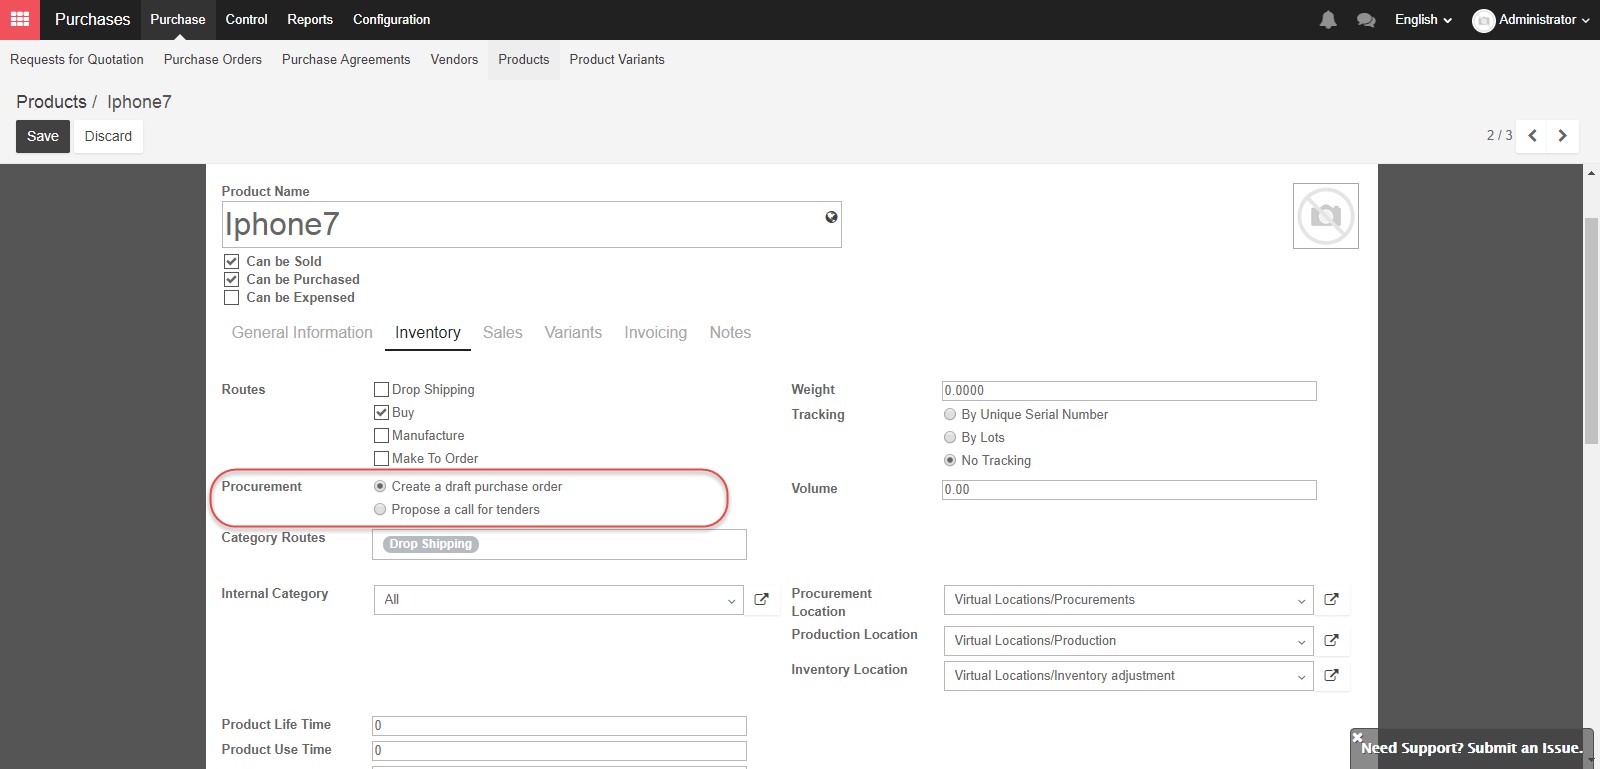
The next option for “Procurement” controls what kind of purchase order will be created when automated procurement is triggered. You can select either “Create a draft purchase order” or “Propose a call for tenders”.
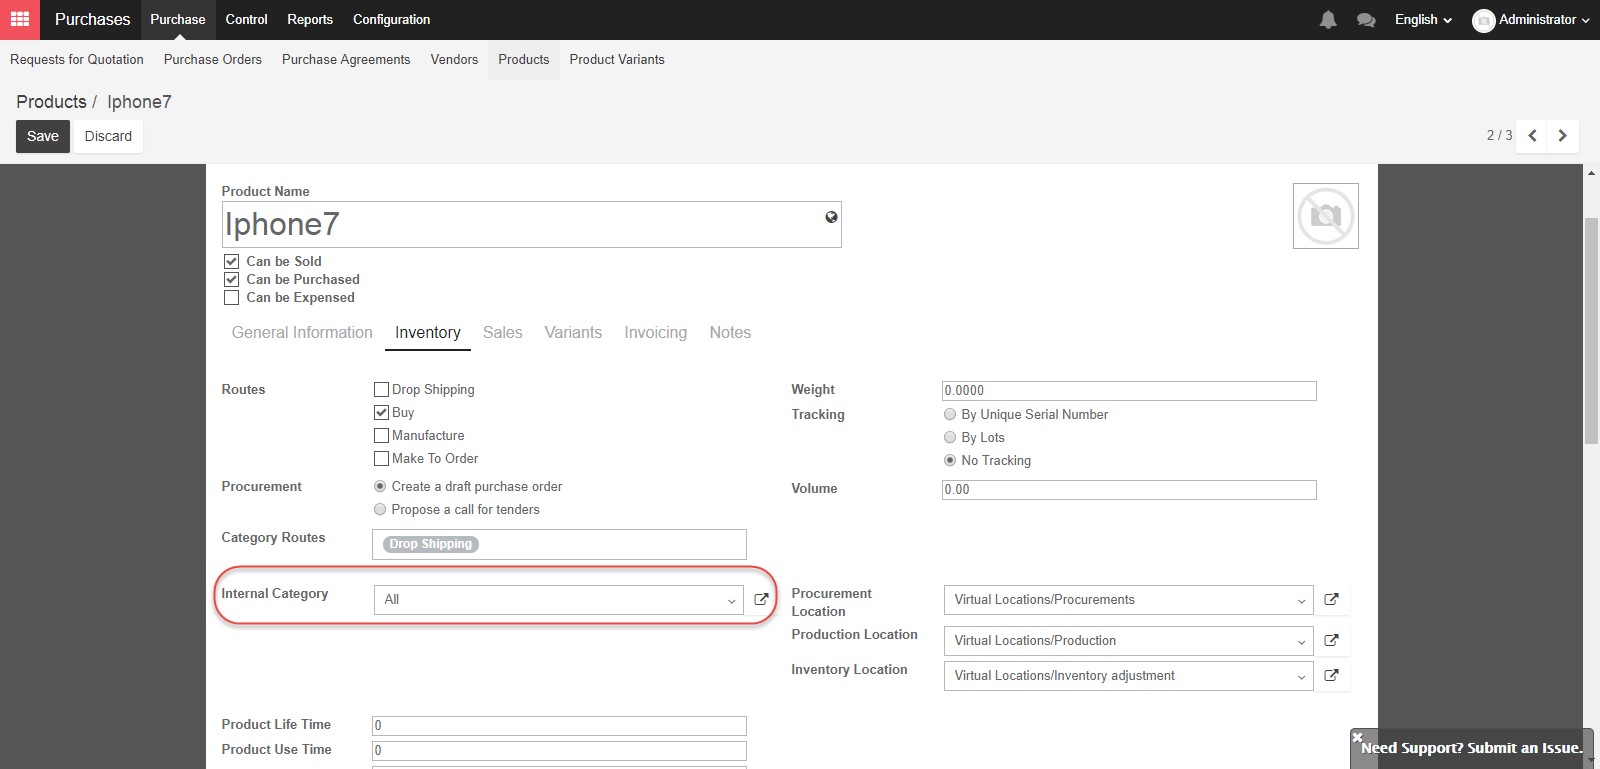
An Internal category defines how transactions, such as “Sold”, “Purchased”, “Stock Input”, “Stock Output”, “Manufactured”, or costing, inventory valuation, bookkeeping and stock removal methods for the product will be recorded in the accounting and inventory modules.
The weight of the product in kilograms and the volume in cubic meters can be entered in these fields. You may need these details for calculating shipping costs.
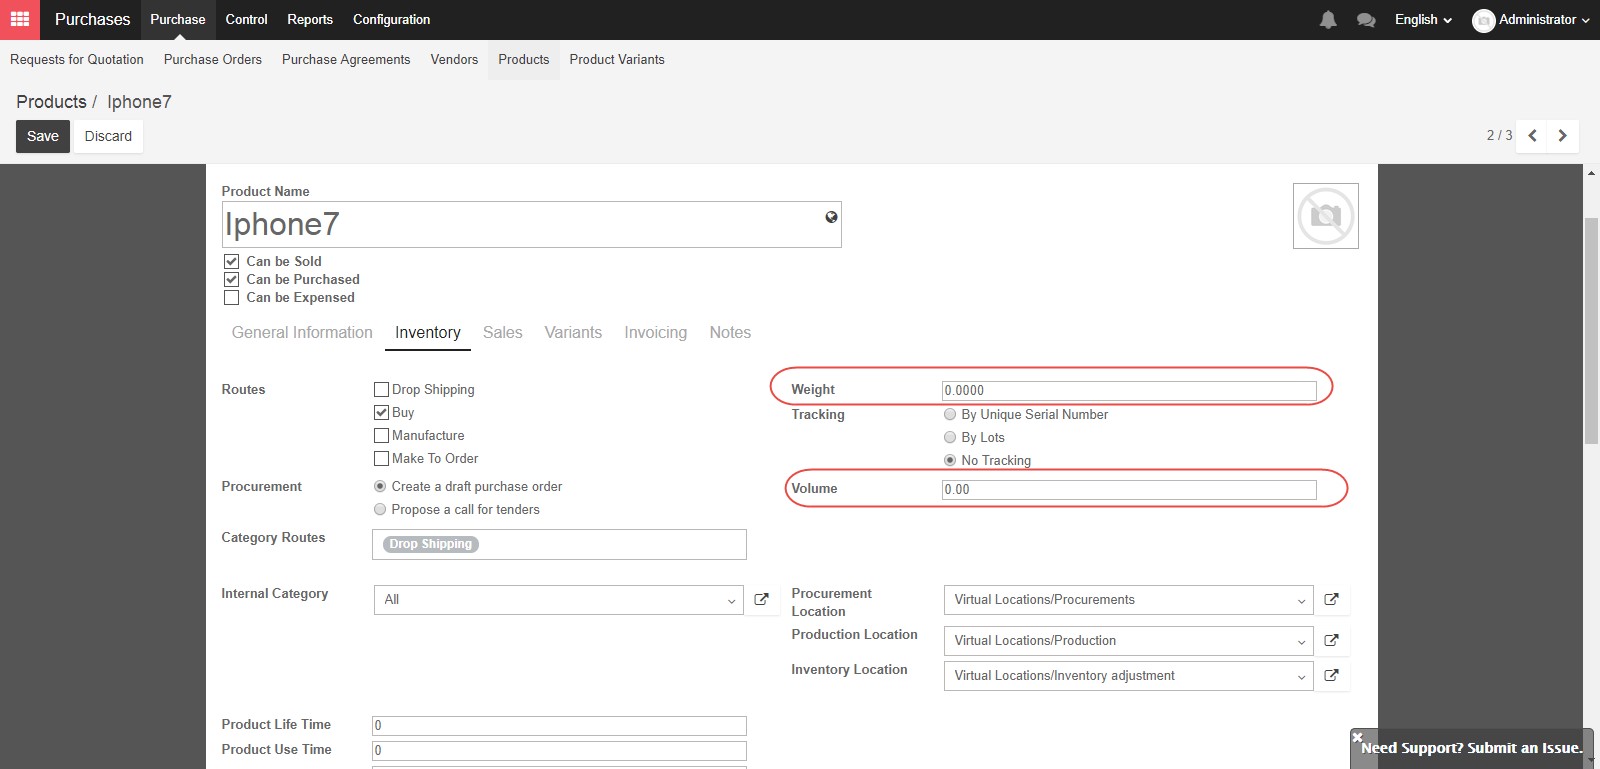
The three options for “Tracking” allow you to decide if you will track an item by unique serial number, where you will need to assign a unique serial number to each product unit, by lots, where you will assign an identification number to each lot, or with no tracking, where all of the products will be treated the same.
The Procurement location, Production location, and Inventory location are set by default. Procurement location is the source location used for stock moves generated by procurement, production location is the source location used for stock moves generated by manufacturing order, and inventory location is the source location used for stock moves generated by you do an inventory.
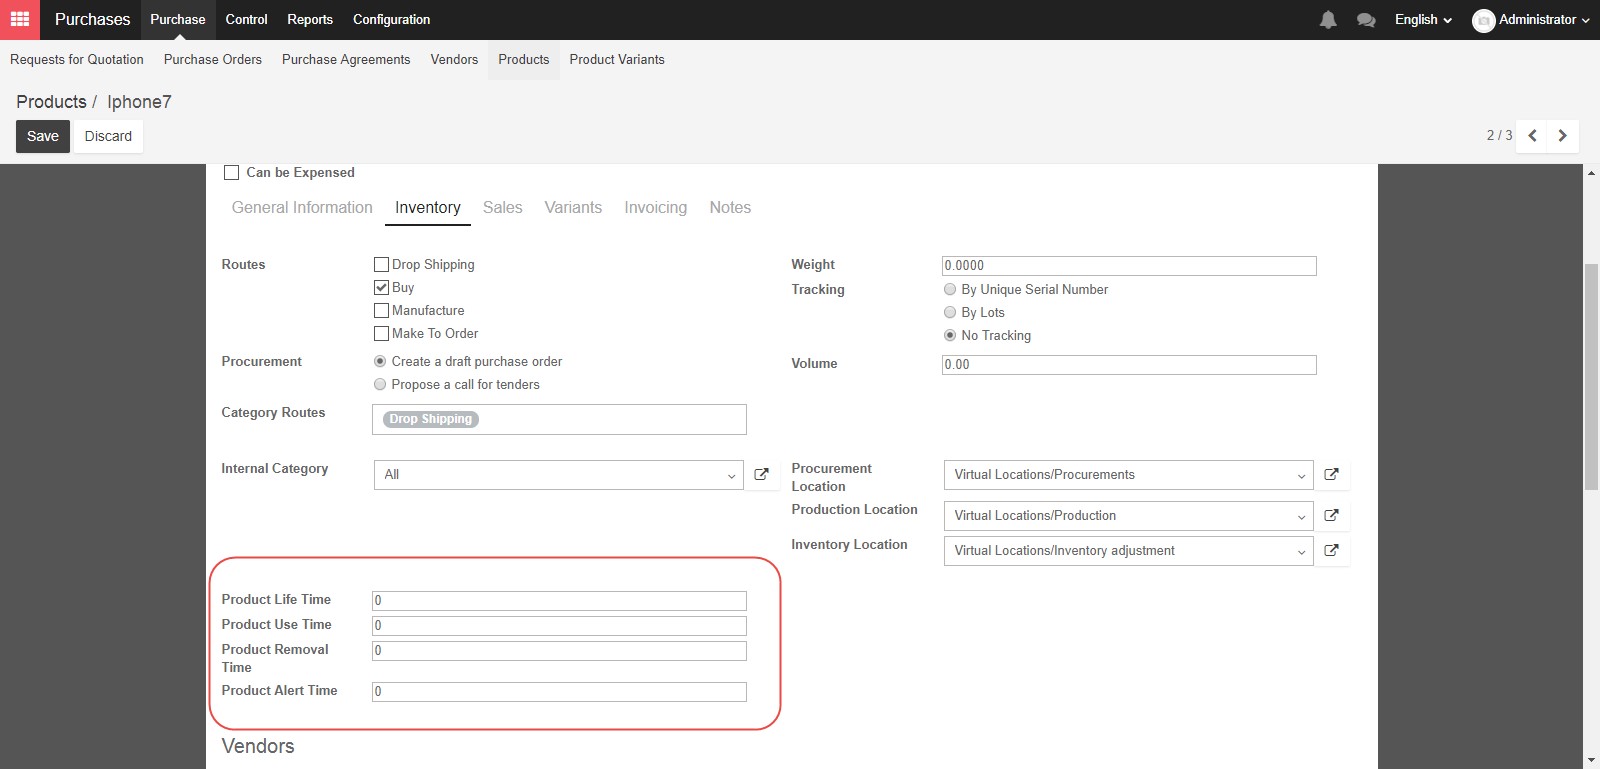
Next, Product Alert Time is when a generic alert about the product age is issued. Product Removal Time is when the product should be removed from stock. Product Use Time is when the product begins to deteriorate and is no longer useful. And finally Product Life Time is the amount of time after which the product is dangerous to use.
The Vendors section allows you to select a contact for this product, for use with Stockable products, to allow for automated procurement. Vendor’s information is a prerequisite if you want to run automated procurement. Otherwise, the system will not know which vendor should be included in the draft Request For Quotation. The first vendor listed will be selected by default for your draft Request For Quotation.
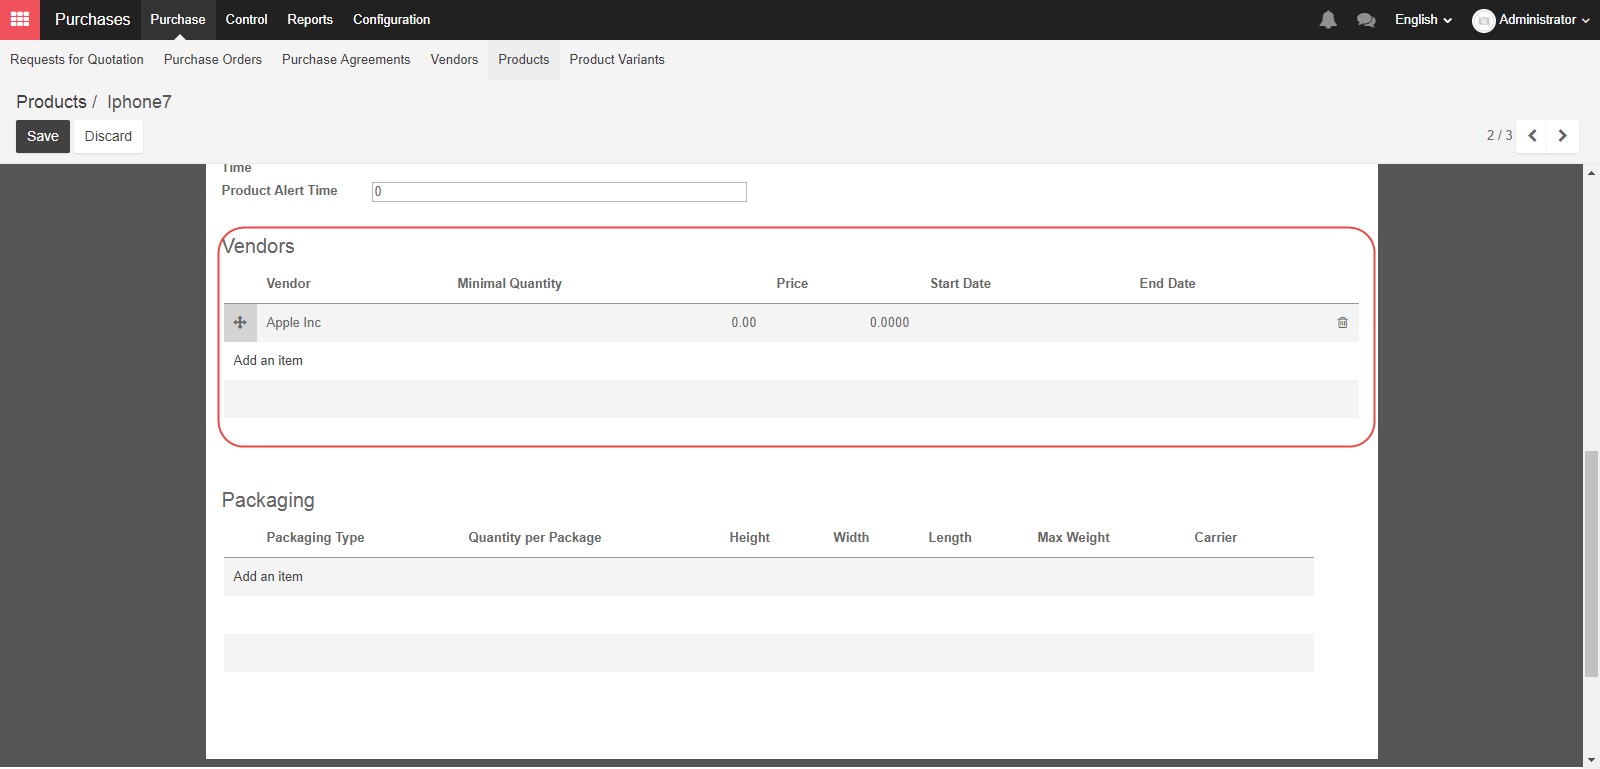
When you click Add an Item you will open a pop up window to enter more information.
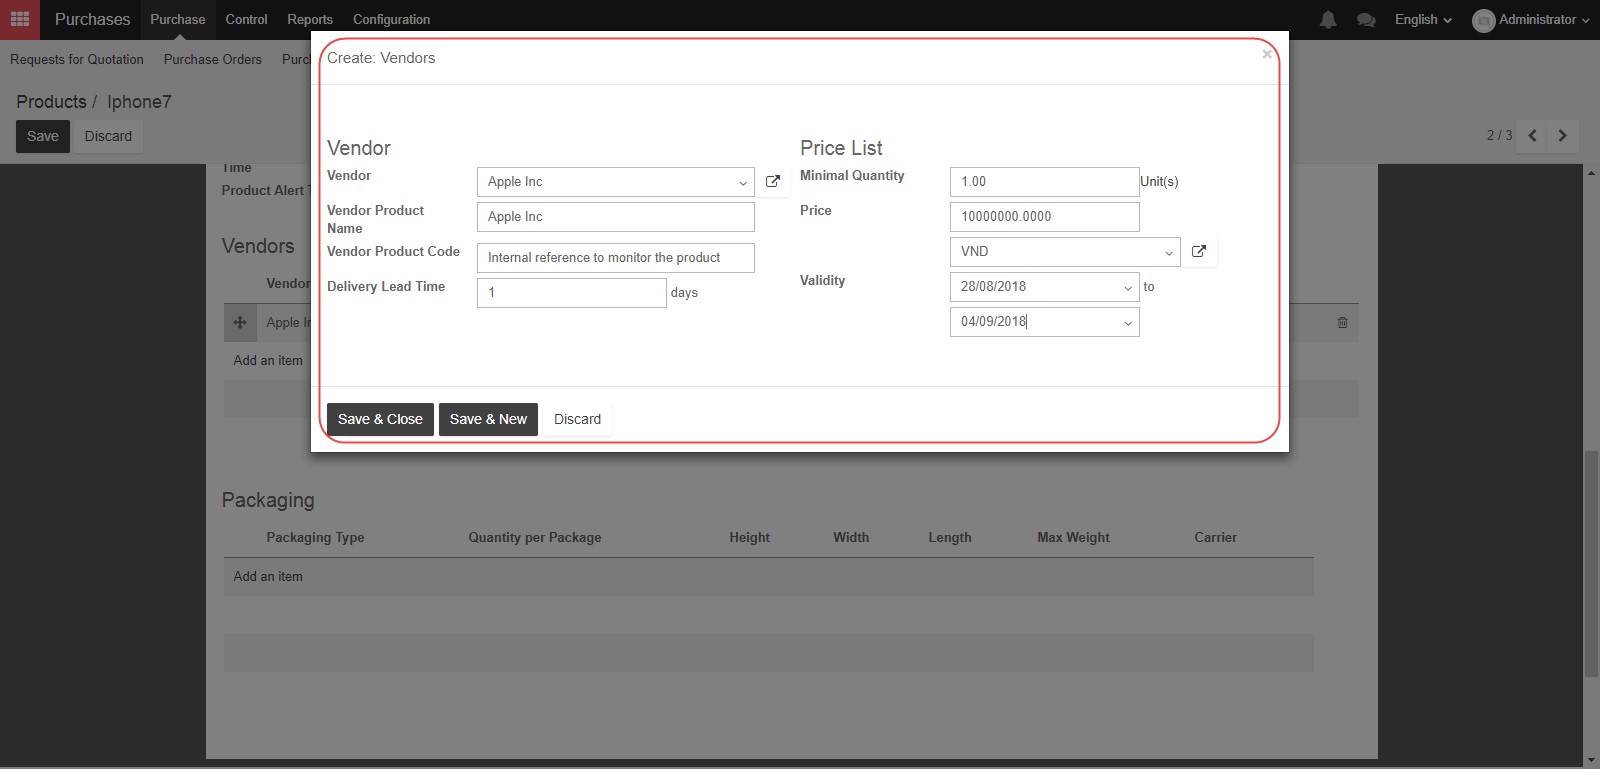
In the Vendor field, select an existing vendor who can provide this product, or create a new one. In the Vendor Product Name and Vendor Product Code fields, you can provide the vendor’s internal reference if you have them, or you can leave them blank. The Delivery Lead Time is the time it takes from when you confirm a purchase order from that supplier until you receive the product from them. In the Price list section, you can enter the Minimum Quantity if applicable, as well as the Price and “Currency”, and you can define the period of time for which the price is valid. You can also add more than one vendor by adding more lines
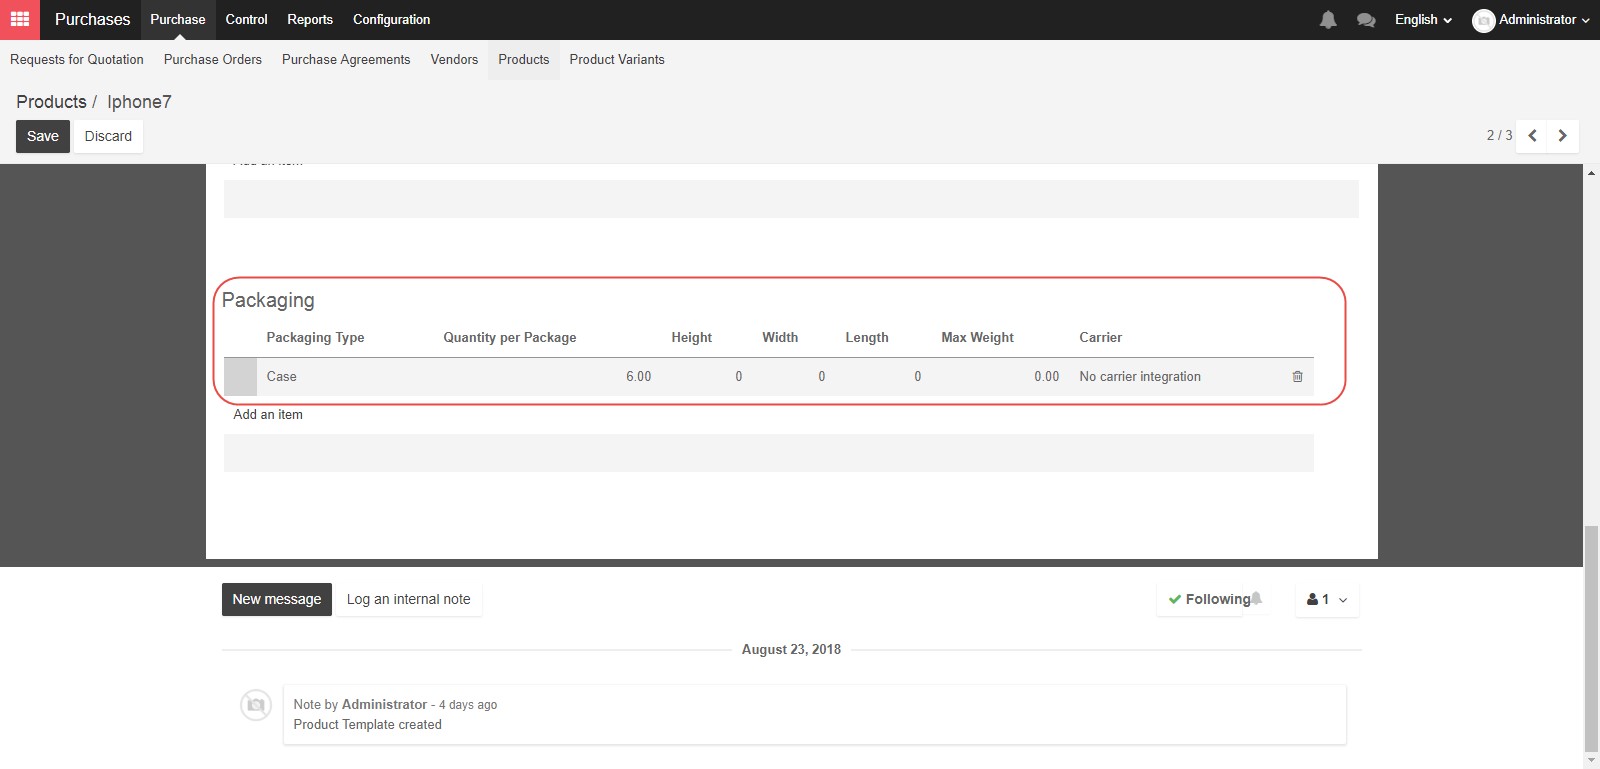
In the “Packaging” section, you can define how you combine multiple product units into larger packages. For example, six “Units” may be defined as a “Case”.
Now that we’ve completed all the items on the Inventory tab, let’s move to the Sales tab. The Point of Sale section can be utilized to control how a product interacts with the “Point of Sale” module. If you want the product to be visible for purchase, check the first box. You can also create categories for your items within the Point of Sale system, or require the product be weighed at the time of purchase.

In the Sales condition section, the two options control lead times. Customer Lead Time is the number of days between sales order confirmation and the delivery of a product, or said differently, the delivery time you promise to your customers. Manufacturing Lead Time is the number of days required to produce this product.
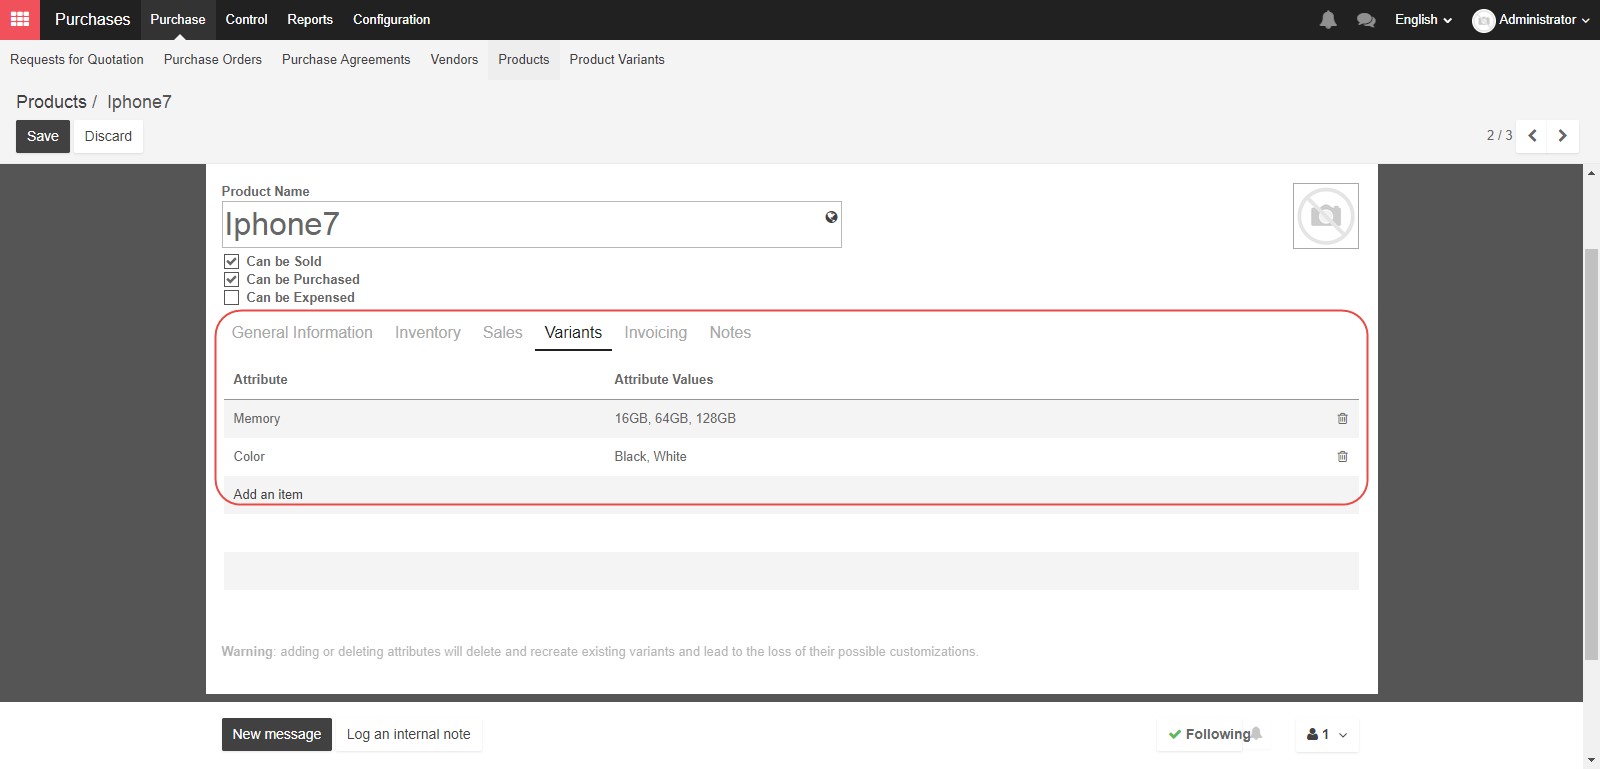
Now that we’ve completed the Sales tab, let’s change over to the Variants tab. Product variants can be used to manage products having different variations, like size, color, etc. It allows you to manage all variations of a product at what we will call the product level, and to set other controls for specific attributes at the variant level. For example, for selling Iphone as a product, you would expect variants for sizes and colors.
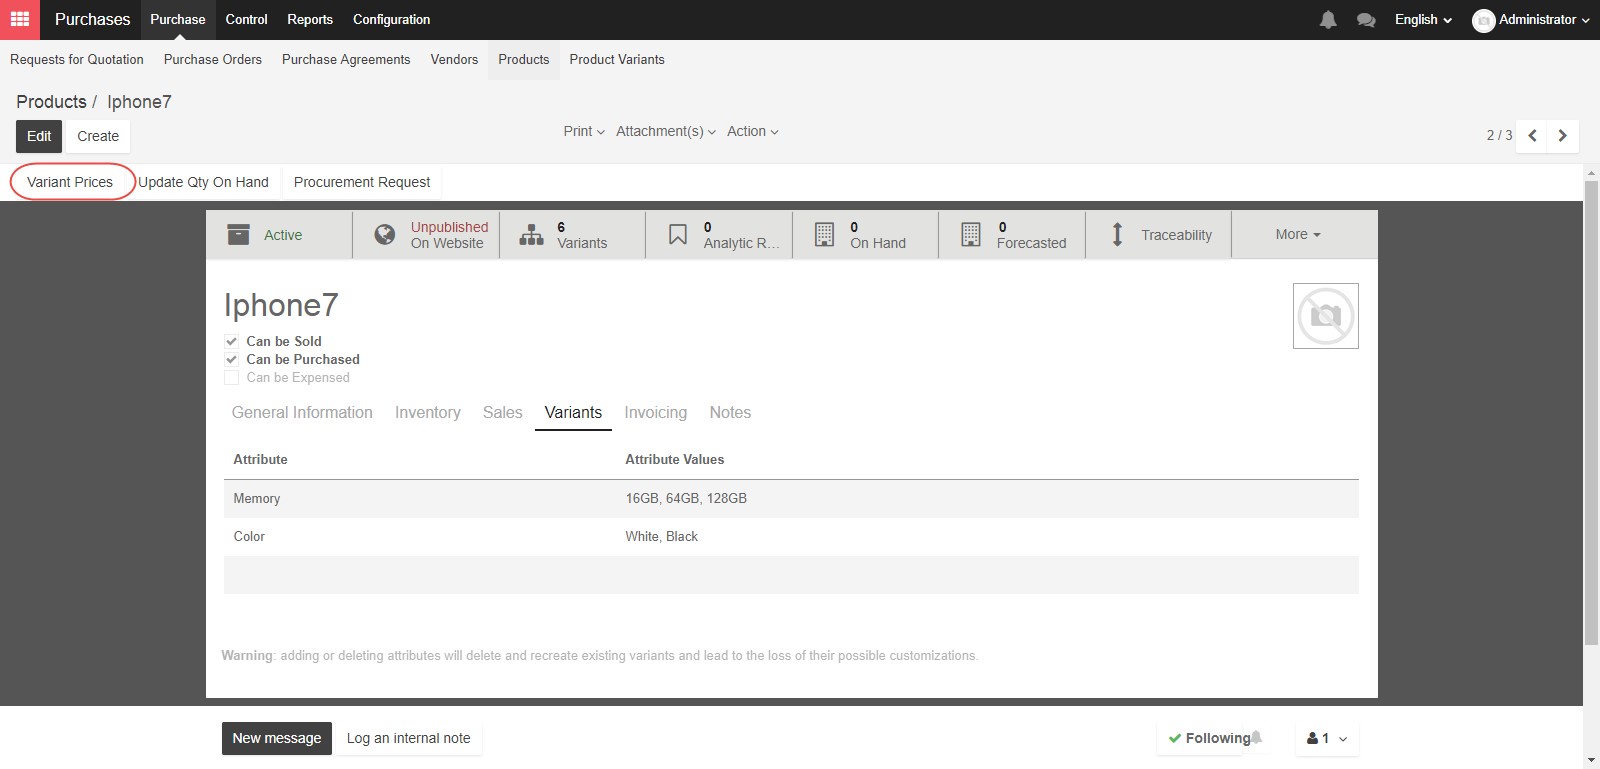
After saving the attribute value, you can set the price for attribute value by clicking Variant prices. The variant prices will be included in the sale price of the products.
Let’s switch to the “Invoicing” tab. The fields here are very similar to the “Internal Category” on the “Inventory” tab. Using the “Income Account” and “Expense Account” fields you can select the line from your “Chart of Accounts” which will be credited or debited for purchasing or selling this product.
If you fill in the fields here, then the rules for this product will override the rules for the internal category. Otherwise, if you leave these blank, account settings in the Internal Category will apply.
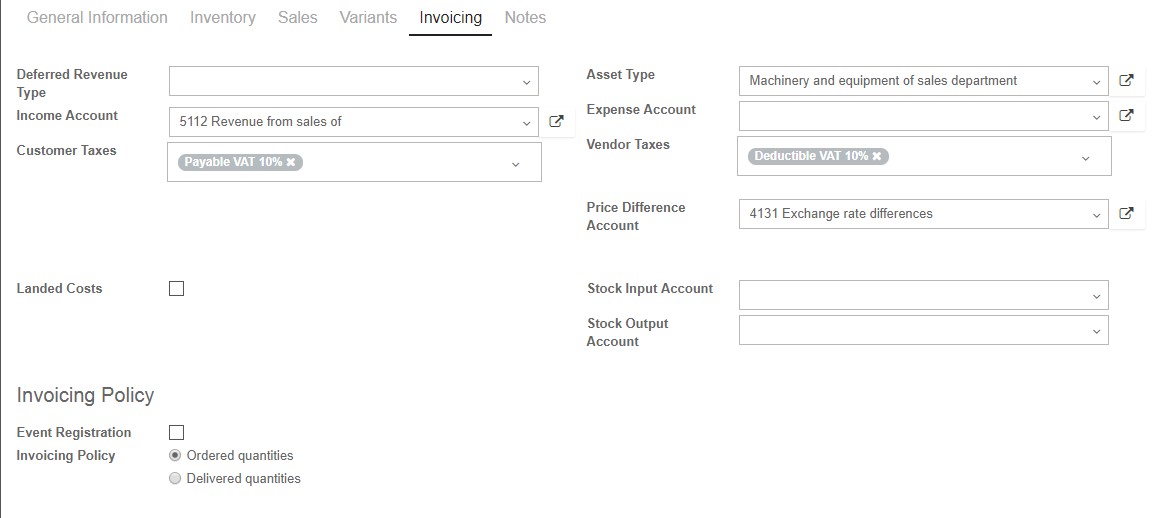
Asset Type field means that this item will be treated as an Asset from that particular category when purchased, including depreciation rules from the category.
Customer Taxes field will the tax to use for your customers when you are selling to them.
Vendor Taxes field will be the tax to use for your suppliers, when you are buying from them. Both of these fields, Customer taxes and Vendor taxes can be set for all product, but we can change these fields when we create separate Sales Orders or Purchase Orders”
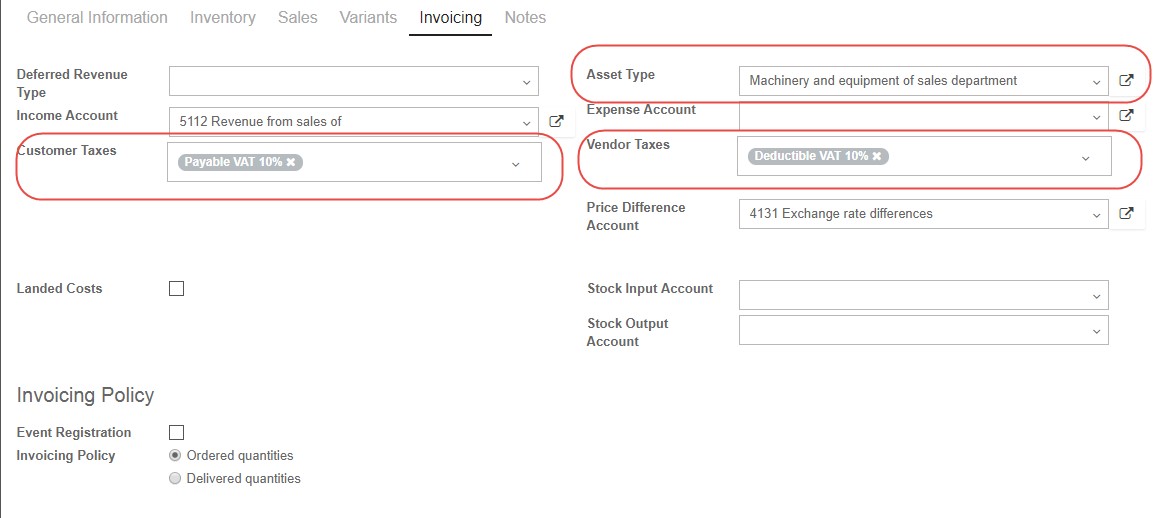
Price Difference Account is used to track cost price changes when working with multiple currencies. If you track costs in one currency, and issue an invoice in another, the receivable journal entry will be created using the currency conversion rate on the day it was entered. If the exchange rate between the two currencies changes by the time the payment is made, then the payment in the bank journal would not match. The Price Difference Account tracks those changes.
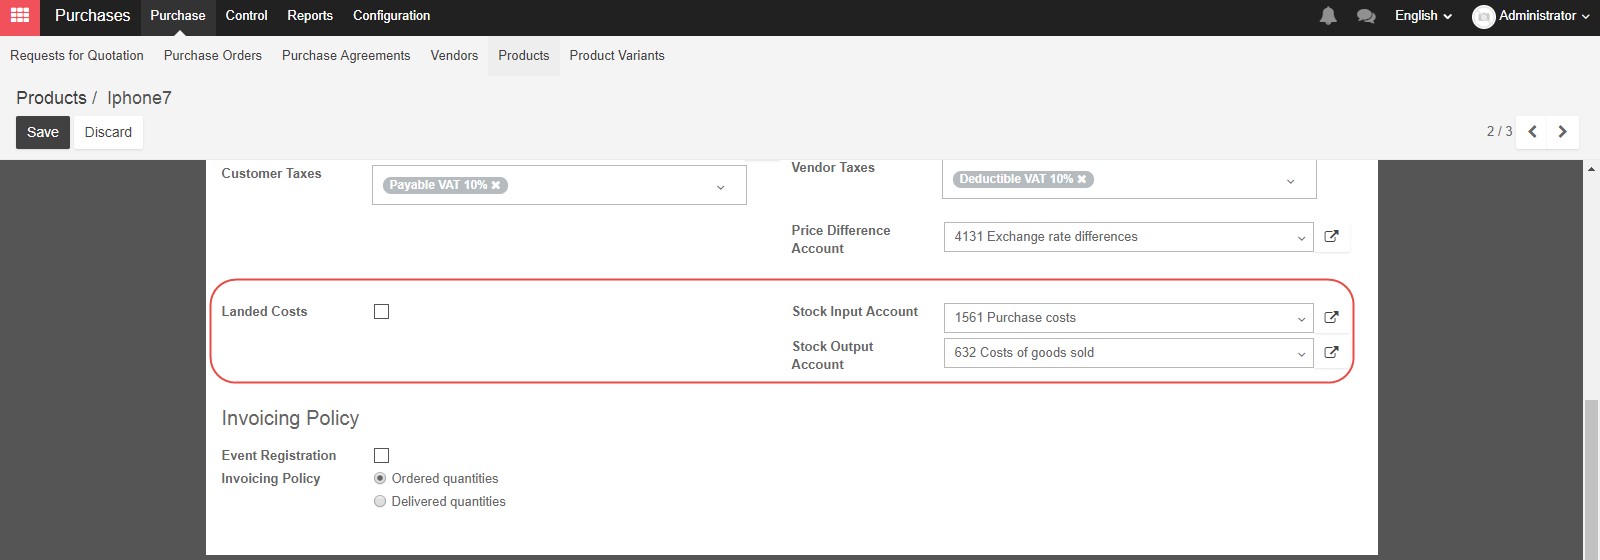
Stock Input Account and Stock Output Account are used to track the real time inventory valuation. Incoming stock is tracked in the first account, and outgoing stock in the second. If you leave these fields blank, the category values will apply.
Landed Costs are all costs above the purchase price of the product, to get the product delivered to your warehouse. If you check this box, you can define one of several methods by which the landed costs on products in a shipment should be divided. How to set up and allocate landed costs will be elaborated in the Inventory session.
In the Invoicing Policy section, if you see the check box for Event Registration you can check it if this product will be related to the ticketing of an event. This is a feature enabled when you use the Events module in Kiu BMP. You can choose to bill your customer before the delivery step, “On Ordered Quantity” or after delivery “On Delivered Quantity” using the “Invoicing Policy” radio buttons.

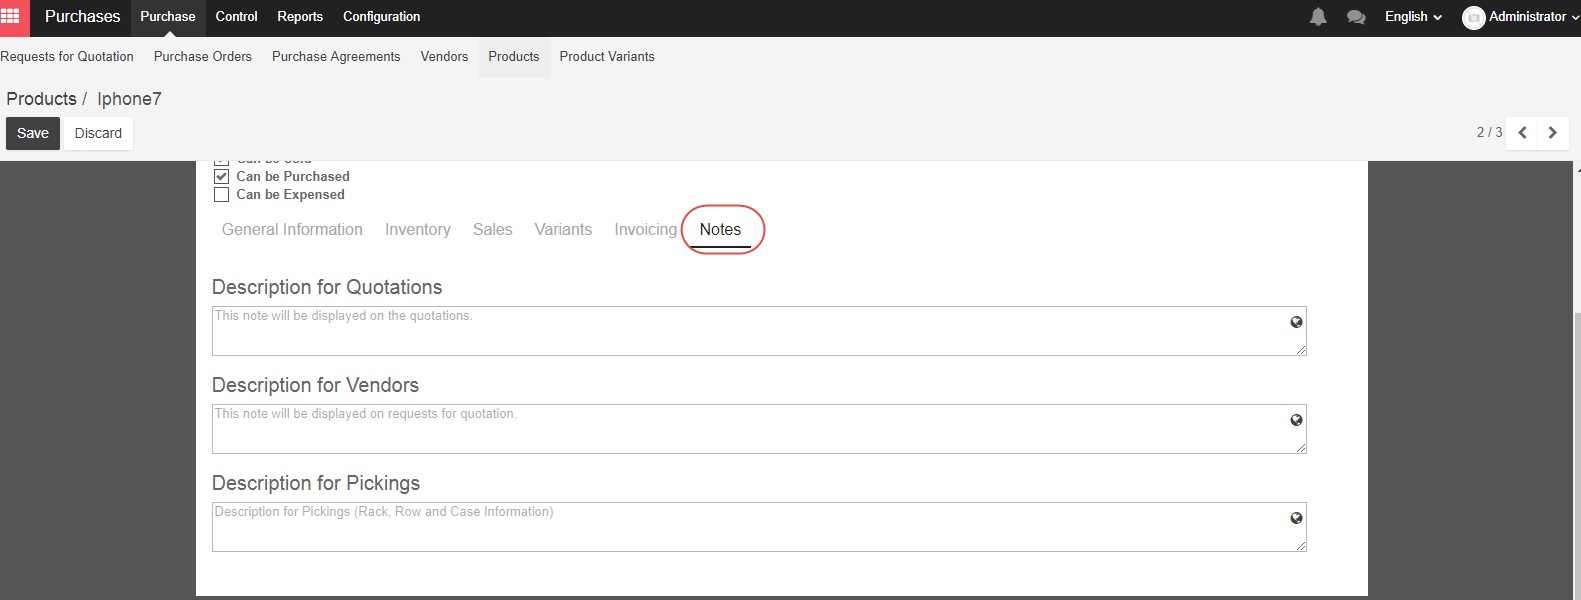
On the Notes tab, you can add descriptions to be displayed on your quotations or request for quotation for this product.
And finally, you can add photos or graphics associated with your products in the image icon in the top right hand side
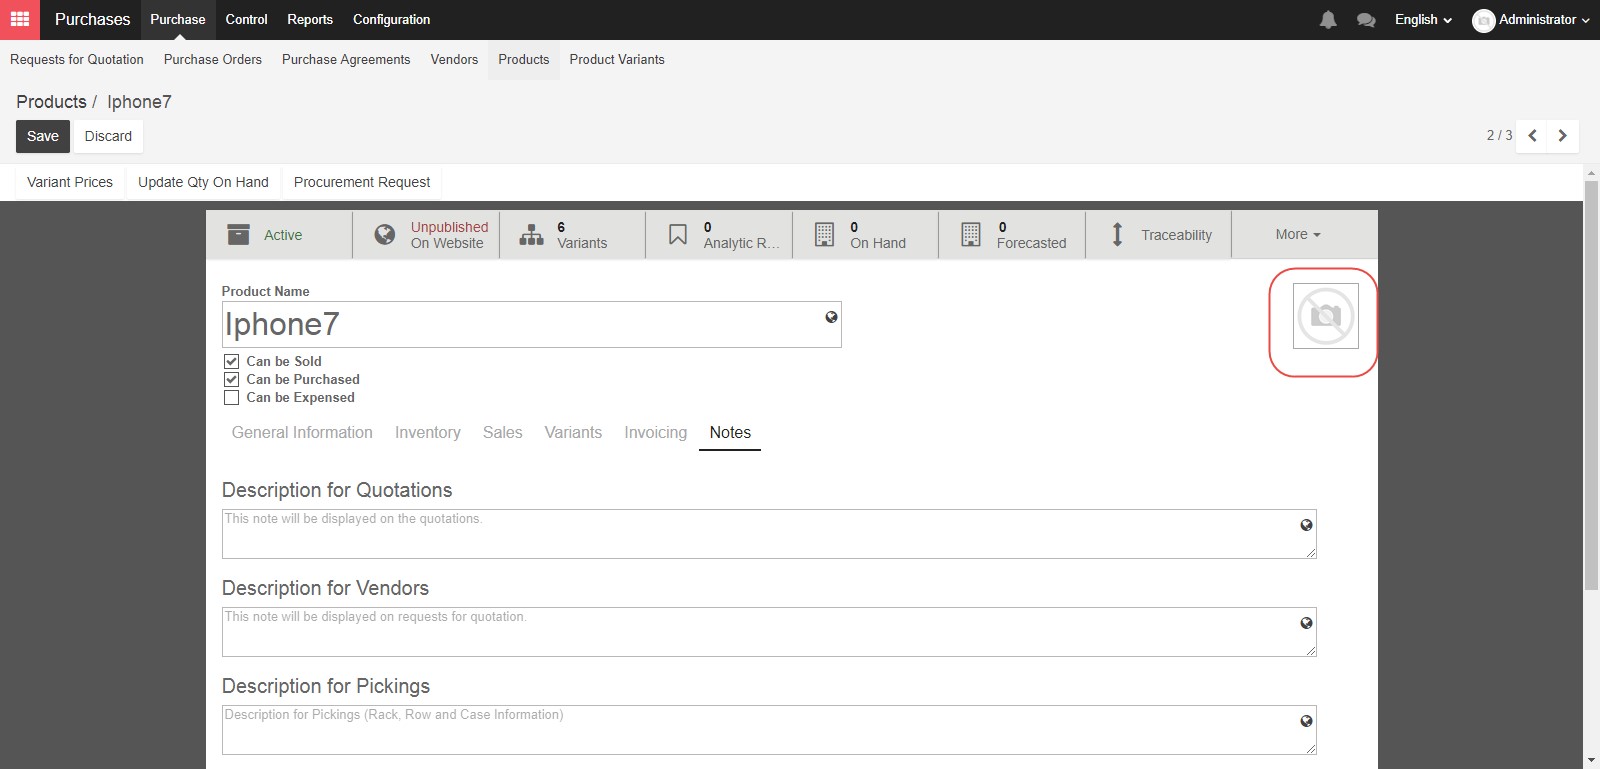
When you have completed filling in all of the information across all of the tabs, you can click the Save button at the top of the screen to create your product.
Before proceeding to the first step of purchasing process, we will start with the Configuration in order to set up the general settings used for the Purchase module . There are 3 main fields needed to be set up in the configuration of the Purchase module: Logistics, Purchase order, Location & Warehouse.


After the companies determine their business needs for acquiring products or services, the purchasing process in Kiu BMP can be initiated. The detailed process for Purchasing is as following:
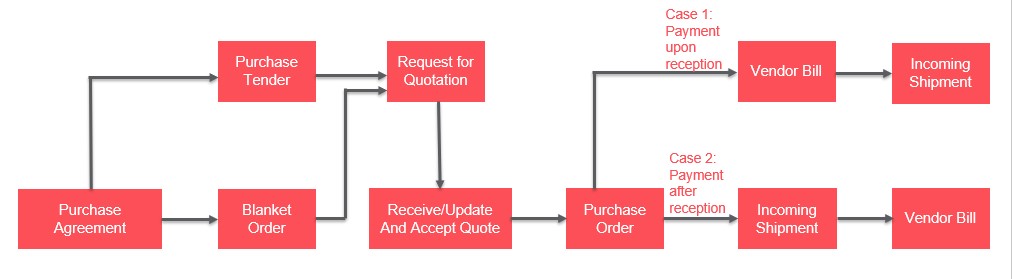
– Firstly, after the companies identify their requirements, they need to consider which vendors can provide the most reasonable price for the products/ services. Therefore the workflow of sales must begin with negotiating specific conditions relating to suppliers and orders in the quotation by choosing Purchase Agreement. There are 2 default tenders of Purchase Agreement namely Purchase tender and Blanket Order.
For a Purchase tender, you can receive quotations from many suppliers then you can choose which suppliers can provide the best offers for a list of products or services.
For a “Blanket Order”, the company can order multiple times without creating new additional requests for quotation or other renegotiations, with one supplier for a specific time period, for instance one year.
– Secondly, after the company has identified the most suitable price for products/ services from many different suppliers by using Purchase agreement, they can officially confirm the price with the most suitable supplier by sending the Request for Quotation to this supplier.
The “Request for Quotation” is used to send your list of desired products to your supplier and is a type of procurement solicitation in which your company invites a supplier to bid on providing specific products or services. Once your supplier has answered your request for quotation with a specific price and other payment terms, you can choose to proceed to official purchase order or to turn down the offer.
A “Request for Quotation” is used to establish a price for goods or services between your company, and a single supplier. Once the company have confirmed their price and purchasing from a “Request for Quotation”, a “Purchase Tender”, or a “Blanket Order”, they can proceed to issue a “Purchase Order”.
– The “Purchase Order” is the official order that the company place to the selected supplier, either through Request For Quotation, Purchase Tender, or Blanket Order or when the company proceeding directly to a Purchase Order when the company knows the supplier and price in advance, and don’t need to request any quotations.
– Based on the contract with the vendor, you can choose to pay for the purchase before delivery of the goods (Case 1: Payment upon reception), or receive the goods delivered after payment (Case 2: Payment after reception).
– Case 1: Payment upon reception: In KIU BMP system, after Purchase order has been confirmed, you can receive an invoice from your supplier,called a “Vendor Bill”, then register payment before your supplier deliver the products.
– Case 2: Payment after reception: After you had created and confirmed the Purchase Orders, your supplier will deliver your products as agreed. Within the Kiu BMP system, this creates an “Incoming Shipment”. Along with the Incoming Shipment you will receive a “Vendor Bill”. When you receive an Incoming Shipment, compare it to the Vendor Bill to validate that you have received the products you will pay for.