2. How to create new Supplier

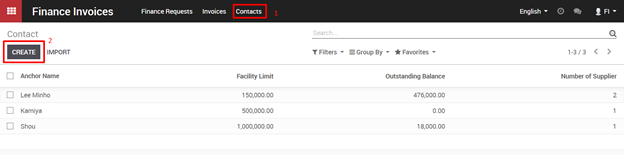
FI Manager goes to Finance Invoice Dashboard > Contacts > Choose Anchor on Anchor list > Edit.

On Supplier list tab > Click on the “Add an item” button, FI Manager can add a new Borrower in the list

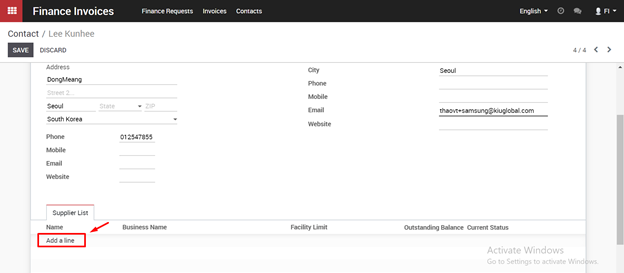
New pop up will be shown

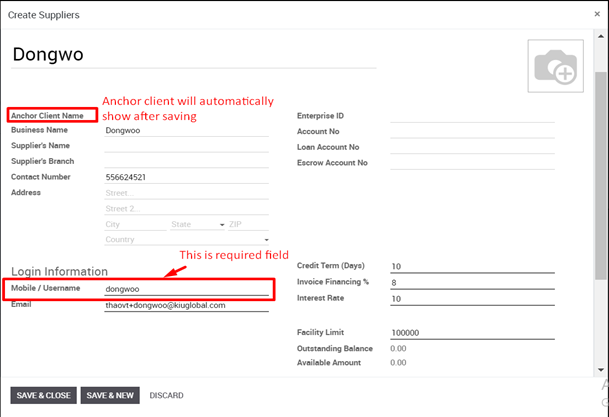
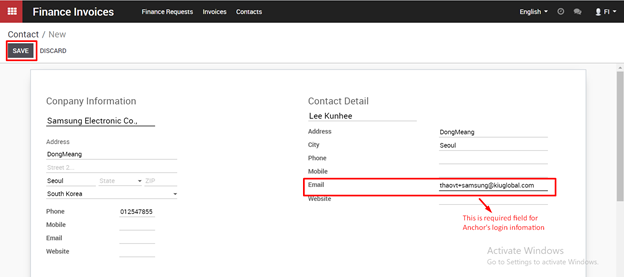
– In Login Information:

+ Mobile / Username is the username that a user will use to login in the App and web-version.

+ Email: is the email address of the Supplier, if the supplier doesn’t have an email address – put

Mobile / Username in there.

– Credit Term (Days): is used to calculate Loan Due Date.

– Invoicing Financing %: is for FI Manager to key in.

– Interest Rate: is used to calculate Due Amount of the Invoices.

– Facility Limit: is the Facility Limit of the Supplier.

– Outstanding Balance: is the Outstanding Balance of the Supplier

Outstanding Balance = Total of Financed Amount of Invoices in (Requested, Disbursed, Repayment Request) status.

– Available Amount = Facility Limit – Outstanding Balance.

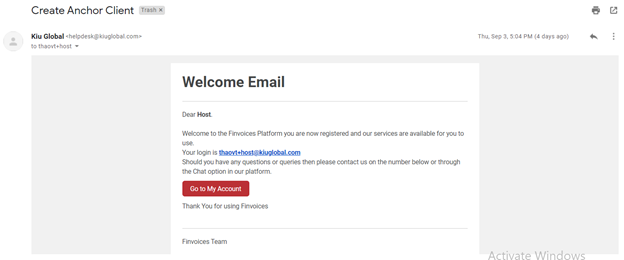
Click “Save” and an user is created automatically. Username of this User is the field “Mobile/Username” on contact detail, the default password is “1”. Supplier will receive welcome email automatically sent from the system.

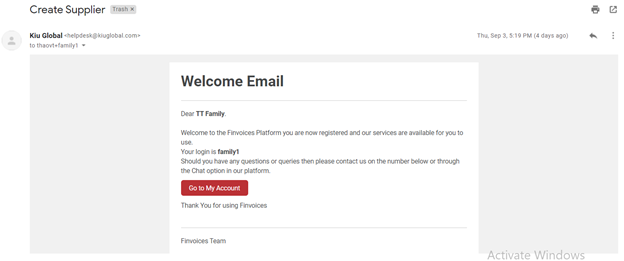
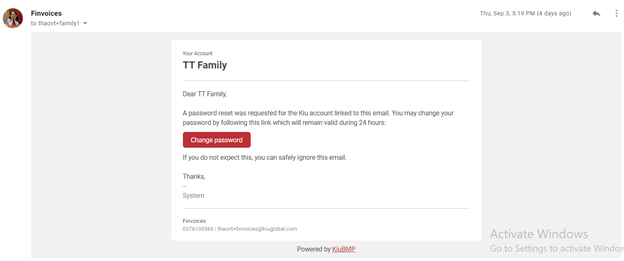
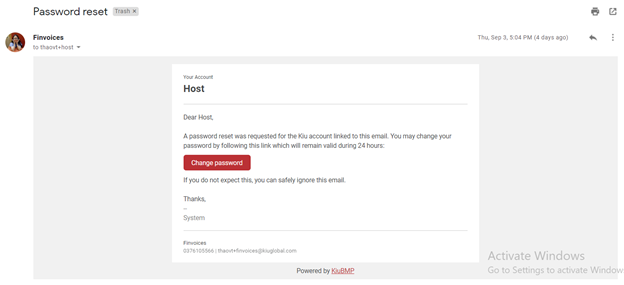
Another email about “Password reset” will be sent at the same time. Supplier user has responsibility for updating new password by clicking link under email.

1. How to create new Anchor

FI Manager goes to Finance Invoice Dashboard > Contacts > Create

Fill in Anchor information. The left side is Anchor company information and the right side is Anchor user login information.

*Note that Email: is the email address of the Anchor client, this is the email address to receive email notification from FI that Finance Request is sent to Buyer for verification & confirmation as well as login username.

Click “Save” and an user is created automatically. Username of this User is the field “Email” on contact detail, the default password is “1”. Anchor will receive welcome email automatically sent from the system.

Another email about “Password reset” will be sent at the same time. Anchor user has responsibility for updating his new password by clicking the link under email.

5. IOU Recipient

This group user is created by Suppliers or other existing IOU recipients in the system who can log in and check IOU assigned.

This user can access only the IOU menu.

4. Supplier

This is the group for people who use both Finvoice App and web-version to record Invoices on the system.

This user is created automatically when the FI Manager creates a new Supplier.

  • By default, username of this User is the field “Mobile / Username”, the default password is “1”

This user accesses the Invoices menu to submit Invoices to Anchor confirmation, choose loan products and submit for Finance Requests.

This user can create new contact as “IOU recipient”.

This user also can access the Finance Requests menu to check FR status and loan information.

Supplier is inherited from App users and IOU recipient users.

3. Anchor

This is the user for people from Anchor client of Finance Invoices.

This user is created automatically when FI Manager creates a new Anchor on Contact menu.

  • By default, username of this User is the field “Email” on contact detail, the default password is “1”

This user can only access the Invoices menu to verify/reject “Validate” Invoices submitted from Supplier.

2. FI User

This is the user from Finance Invoices.

This user can access all menus in Finvoices included: Invoices and Finance Requests, IOU

FI User is inherited from Anchor and Supplier, IOU recipient users.

1. FI Manager

This is the user managing Finvoices Dashboard from Finance Invoices.

This user can access all menu in Finvoices included: Contact, Invoices and Finance Requests, IOU

Only this user can Create and Edit Anchor clients, Supplier, IOU recipient in Contact menu

FI Manager is inherited from FI User, Anchor and Supplier user, IOU recipient.

I. User Configuration

There are 5 user role involved in Finvoices:

  • FI Manager
  • FI User
  • Anchor
  • Supplier
  • IOU Recipient

6. ‘Menu’ Screen

‘Edit Profile’

Edit profile allows the following functionality:

  • Adding user’s picture.
  • Changing first and last name.
  • Changing date of birth.
  • Changing gender.
  • Changing contact phone (be careful, this is phone used for subscription and update purposes).
  • Changing physical address.
  • Changing email address.
‘Update Password’ Allows the user to change user password for myKitabu app.
‘Configuration’

Allows user to customize the app by:

  • Adding more advanced features
  • Adding the unit of measure when buying or selling a product.
‘Logout’ Allows the user to logout from the app. App will require password on next login.
‘Subscribe Now’ Allows the user to go through MPESA-based subscription service.
‘Expiration’ Shows the user current subscription expiry date.
‘User Manual’ Location where this manual and all its updated versions is available for download in a PDF format.
‘AKL T&Cs’ Afri Kash Limited terms and conditions related to myKitabu applications use.