5.2.1. How to open a session

Link: Point of Sale ‣ Dashboard

  • For Cashier role

Begin your session by clicking on New Session.

Set Opening Balance to specify different types and the number of banknotes in your cash-drawer at the beginning of your session and Open Session.

Here is an example for setting opening balance.

After confirmation, choose Continue Selling to access to the POS interface and start your session in parallel with the waiter’s.

  • For Waiter role

On the dashboard, you can see your point of sales, click on New session and start your first order.


5.1.6. Hardware setup for POS

→ POSBox Setup Guide

–‣  Prerequisites

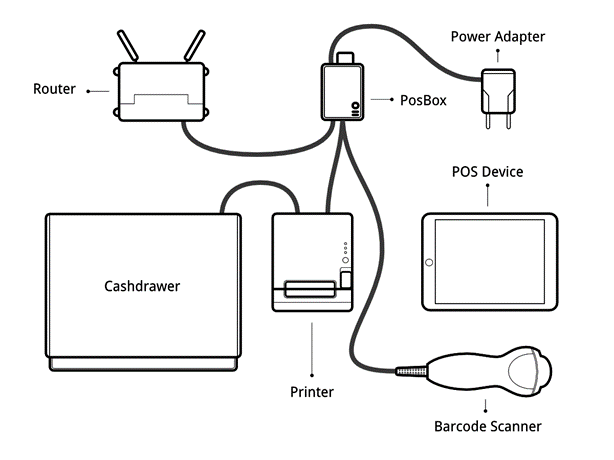
Before you start setting up your POSBox make sure you have everything. You will need :

  • The POSBox
  • A 2A Power adapter
  • A computer or tablet with an up-to-date web browser
  • A running SaaS or KiuBMP instance with the Point of Sale installed
  • A local network set up with DHCP (this is the default setting)
  • An RJ45 Ethernet Cable or a Linux compatible USB Wi-Fi adapter
  • An Epson USB TM-T20 Printer or another ESC/POS compatible printer
  • A Honeywell Eclipse USB Barcode Scanner or another compatible scanner
  • An Epson compatible cash drawer

–‣  Step By Step Setup Guide

Current version of the POSBox (since 2015)

Old version of the POSBox (before 2015)

Connect peripheral devices

Officially supported hardware is listed on the POS Hardware page, but other hardware might work as well.

    • Printer: Connect an ESC/POS printer to a USB port and power it on.
    • Cash drawer: The cash drawer should be connected to the printer with an RJ25 cable.
    • Barcode scanner: Connect your barcode scanner. In order for your barcode scanner to be compatible it must behave as a keyboard and must be configured in US QWERTY. It also must end barcodes with an Enter character (keycode 28). This is most likely the default configuration of your barcode scanner.
  • Scale: Connect your scale and power it on.
  • Ethernet: If you do not wish to use Wi-Fi, plug in the Ethernet cable. Make sure this will connect the POSBox to the same network as your POS device.
  • Wi-Fi: If you do not wish to use Ethernet, plug in a Linux compatible USB Wi-Fi adapter. Most commercially available Wi-Fi adapters are Linux compatible. Officially supported are Wi-Fi adapters with a Ralink 5370 chipset. Make sure not to plug in an Ethernet cable, because all Wi-Fi functionality will be bypassed when a wired network connection is available.
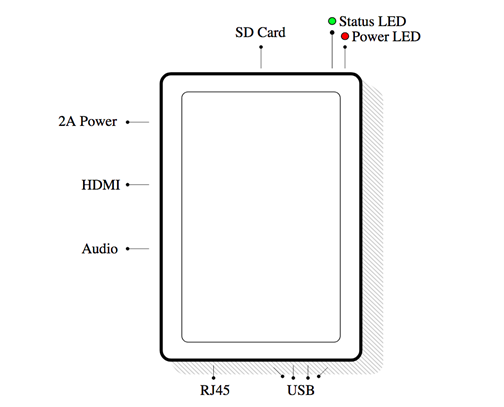
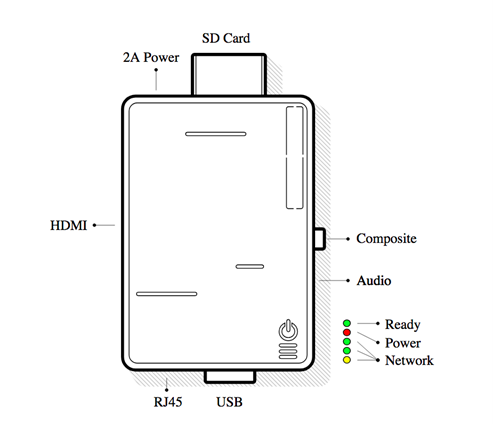
Power the POSBox

Plug the power adapter into the POSBox, a bright red status led should light up.

Make sure the POSBox is ready

Once powered, The POSBox needs a while to boot. Once the POSBox is ready, it should print a status receipt with its IP address. Also the status LED, just next to the red power LED, should be permanently lit green.

Setup the Point of Sale

To setup the POSBox in the Point of Sale go to Point of Sale ‣ Configuration ‣ Settings and select your Point of Sale. Scroll down to the Hardware Proxy / POSBox section and activate the options for the hardware you want to use through the POSBox. Specifying the IP of the POSBox is recommended (it is printed on the receipt that gets printed after booting up the POSBox). When the IP is not specified the Point of Sale will attempt to find it on the local network.

If you are running multiple Point of Sales on the same POSBox, make sure that only one of them has Remote Scanning/Barcode Scanner activated.

It might be a good idea to make sure the POSBox IP never changes in your network. Refer to your router documentation on how to achieve this.

Launch the Point of Sale

If you didn’t specify the POSBox’s IP address in the configuration, the POS will need some time to perform a network scan to find the POSBox. This is only done once.

The Point of Sale is now connected to the POSBox and your hardware should be ready to use.

Wi-Fi configuration

The POSBox is Wi-Fi-capable. In order to use it you’ll need a Linux compatible USB Wi-Fi adapter. Most commercially available Wi-Fi adapters are Linux compatible. Officially supported are Wi-Fi adapters with a Ralink 5370 chipset.

Make sure not to plug in an Ethernet cable, as all Wi-Fi related functionality will be disabled when a wired network connection is available.

When the POSBox boots with a Wi-Fi adapter it will start its own Wi-Fi Access Point called “Posbox” you can connect to. The receipt that gets printed when the POSBox starts will reflect this. In order to make the POSBox connect to an already existing Wi-Fi network, go to the homepage of the POSBox (indicated on the receipt) and go to the Wi-Fi configuration page. On there you can choose a network to connect to. Note that we only support open and WPA(2)-PSK networks. When connecting to a WPA-secured network, fill in the password field. The POSBox will attempt to connect to the specified network and will print a new POSBox status receipt after it has connected.

If you plan on permanently setting up the POSBox with Wi-Fi, you can use the “persistent” checkbox on the Wi-Fi configuration page when connecting to a network. This will make the network choice persist across reboots. This means that instead of starting up its own “Posbox” network it will always attempt to connect to the specified network after it boots.

When the POSBox fails to connect to a network it will fall back to starting it’s own “Posbox” Access Point. If connection is lost with a Wi-Fi network after connecting to it, the POSBox will attempt to re-establish connection automatically.

Multi-POS Configuration

The advised way to setup a multi Point of Sale shop is to have one POSBox per Point of Sale. In this case it is mandatory to manually specify the IP address of each POSBox in each Point of Sale. You must also configure your network to make sure the POSBox’s IP addresses don’t change. Please refer to your router documentation.

→ POSBoxless Guide (advanced)

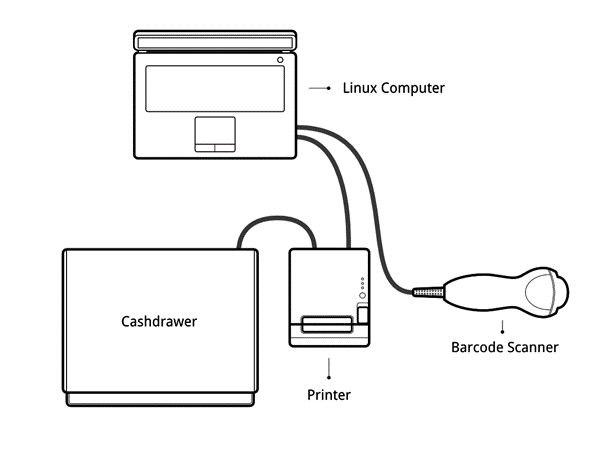
f you are running your Point of Sale on a Debian-based Linux distribution, you do not need the POSBox as you can run its software locally. However the installation process is not foolproof. You’ll need at least to know how to install and run KiuBMP. You may also run into issues specific to your distribution or to your particular setup and hardware configuration.

Drivers for the various types of supported hardware are provided as KiuBMP modules. In fact, the POSBox runs an instance of KiuBMP that the Point of Sale communicates with. The instance of KiuBMP running on the POSBox is very different from a ‘real’ KiuBMP instance however. It does not handle any business data (eg. POS orders), but only serves as a gateway between the Point of Sale and the hardware.

The goal of this section will be to set up a local KiuBMP instance that behaves like the KiuBMP instance running on the POSBox.

→ How to configure products on the order bills for each printer

  1. Make sure you are using a user with access right as POS manager.
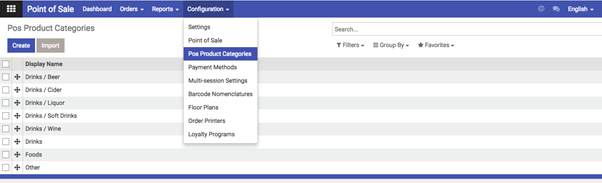
  2. Configure Categories for POS products:

POS Module ‣ Configuration ‣ POS product Categories ‣ Create categories as you need to

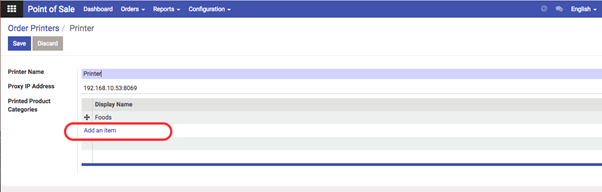
  1. Configure POS product Categories for each printer

POS Module ‣ Configuration ‣ Order Printer

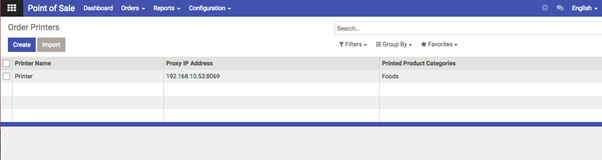
Add as many POS product Categories as you need to each printer

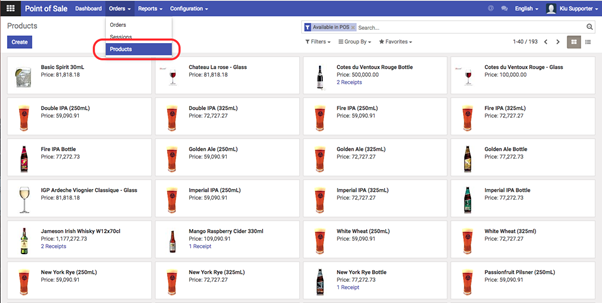
  1. Classify POS products belong to which POS categories

POS Module ‣ Order ‣ Products ‣ Choose product you need to set ‣ Click Sale tab on Product form ‣ Choose POS categories as you need ‣ Save

(A product can belong to more than one POS category)

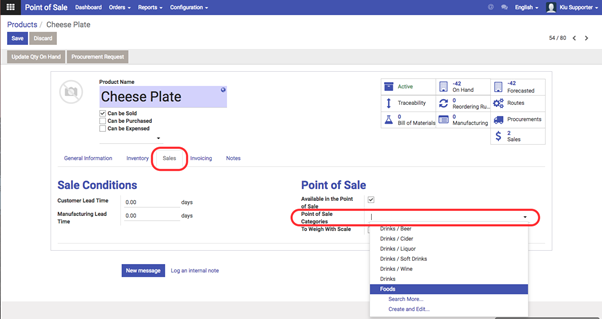
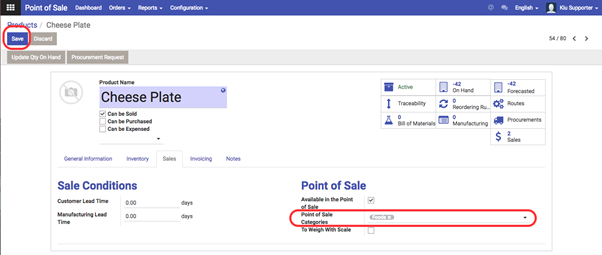
Then every time you print bill orders, each printer will print the products that you set up.

5.1.5. Which hardwares are compatible with Kiu POS

→ Devices

There are 3 ways to set up your Point of Sales:

Desktop PC & Laptop

Running your shop in your browser on your PC or Laptop is the cheapest and most flexible option. Usb barcode scanners are natively supported. Receipts can be printed on any thermal or inkjet printer compatible with your web browser.

Extra hardware such as weighing scales or ESC/POS printers can be used with the PosBox.

Industrial Touchscreen

Hard to break and steal, industrial touch-screens are the perfect solution for shops and restaurants with a high volume of staff and customers. KiuBMP POS on industrial touchscreen is compatible with the same peripherals as Laptops & PCs.

Tablet (iOS and Android)

Tablets take a lot less space, their touchscreens are a joy to use. And they are light enough to be freely moved around your shop. Or you can put them in a nice stand and secure them on your front desk.

→ Kiu POS web base can run smoothly on all above devices. Moreover, Kiu POS mobile app is developed to run effectively on any mobile (iOS & Android). Although you can also use Kiu POS mobile app on ipad or tablet, you should use your phone for the best experience.

→ Printer

On PC

KiuBMP POS can print on any web-browser compatible printer. This includes most inkjet, laser and thermal printers, connected by USB or via network. We recommend using the PosBox for easier setup and faster printing.

With the PosBox

The PosBox is compatible with popular thermal printers such as the EPSON TM-T20, the EPSON TM-T70, the EPSON TM-T88 and the Star TSP650II.

Other printers that support the ESC/POS protocol natively (not via software emulation) will often be supported too.

Support for other printers can be added on a case by case basis.

→ The POSBox’s Hardware 

It is based on a Raspberry Pi 2, a popular single-board computer. The Raspberry Pi 2 is powered with a 2A micro-usb power adapter. 2A is needed to give enough power to the barcode scanners. The Software is installed on a 8Gb Class 10 or Higher SD Card. All this hardware is easily available worldwide from independent vendors.

 →   Scanner

+ If you use POS web base: you can use this following app to scan by your own mobile. Your phone will become like a physical USB barcode scanner.

Kinoni Barcode Reader – Wireless Barcode Scanner for PC and Mac by Kinoni

https://appsto.re/vn/7-4JD.i

+ If  you use POS mobile app: you can also scan by Kiu POS app.

5.1.4. How to design a table plan

In Point of Sale ‣ Dashboard, start a New Session to open the POS drawing, which includes the toolbar for the purpose of designing your table plan.

No Tool Description
1. Add new table
2. Duplicate a table
3. Edit text (name of table, …)
4. Capacity of the table (number of seats)
5.

Edit shape of table (square, round)

6. Change table color (e.g. table for 2 people is green, table for 4 people is purple, etc. The rule of table color is up to you)
7. Delete a table
8. Show/Hide toolbar

After creating a new table, use the expanding tool symbolized as 4 quadrants within the shape of a table to adjust its size.

You may need less than 5 minutes to complete your drawing by exploiting these simple tools. When you finish, click on the pencil to Exit edit mode and place an order for each table by clicking on its symbol.

5.1.3. How to configure POS for waiter

Going to Point of Sale ‣ Configuration ‣ Point of Sale to create a POS access point on waiter’s device.

No Field Description
Header
1. Point of Sale Name An internal identification of the point of sale
2. Sale Journal Accounting journal used to post sales entries, usually POS Sales, which can be created in Accounting ‣ Configuration ‣ Journals.
3. Group Journal Items Check this if you want to group the Journal Items by Product while closing a Session
4. Stock Location

The location where goods are taken from.

5. Price list The pricing strategy, which can be created in Sales ‣ Configuration ‣ Price list
6. Invoice Journal Accounting journal used to create invoices
7. Active

Status of the POS

8. (Line) Available Payment Methods Leave empty. The waiter is not involved in payment or invoicing process
(Line) Features
1. Virtual Keyboard

Don’t turn this option on if you take orders on smartphones or tablets.

Such devices already benefit from a native keyboard

2. Invoicing Leave empty. The waiter is not involved in payment or invoicing process
3. Prefill Cash Payment Leave empty. The waiter is not involved in payment or invoicing process.
4. Start Category The point of sale will display this product category by default. If no category is specified, all available products will be shown
5. Tip Product Leave empty. The waiter is not involved in payment or invoicing process
6. Include Taxes in Prices Optional. The displayed prices will always include all taxes, even if the taxes have been set up differently
7. Large Scrollbars Used for imprecise industrial touchscreens
8. Automatic Receipt Printing Leave empty. The waiter is not involved in payment or invoicing process
9. Display Category Picture The product categories will be displayed with pictures
(Line) Multi-session
1. Multi-session

Set this field the same value for POSes where orders should be synced. Leave it empty if this POS should not use syncing. To update this field you need to close running session.

The value of this field is created at Point of Sale ‣ Configuration ‣ Multi-session Settings
2. Accept incoming orders Yes
3. Replace empty order Yes
(Line) Cash Control
1. Cash Control Check the amount of the cashbox at opening and closing
(Line) Receipt
1. Header A short text that will be inserted as a header in the printed receipt
2. Footer A short text that will be inserted as a footer in the printed receipt
3. Reprinting Leave empty. The waiter is not involved in payment or invoicing process
(Line) Loyalty Program
1. Loyalty Program The loyalty program used by this point of sales, can be created at Point of Sale ‣ Configuration ‣ Loyalty Programs
(Line) Discounts
1. Order Discounts Allow the cashier to give discounts on the whole order
2. Discount Product The product used to model the discount
3. Discount Percentage The default percentage when a discount is given in cashier’s screen
(Line) Bar & Restaurant
1. Bill Splitting Yes
2. Bill Printing Yes
3. Orderline Note Allow custom notes on order lines
4. Restaurant Floors Add the floor(s) served by this point of sales

5.1.2. How to configure POS for cashier

Going to Point of Sale ‣ Configuration ‣ Point of Sale to create a POS board on cashier’s device.

No Field Description
Header
1. Point of Sale Name An internal identification of the point of sale
2. Sale Journal Accounting journal used to post sales entries, usually POS Sales, which is created in Accounting ‣ Configuration ‣ Journals.
3. Group Journal Items Check this if you want to group the Journal Items by Product while closing a Session
4. Stock Location The location where goods are taken from.
5. Price list The pricing strategy, which can be created in Sales ‣ Configuration ‣ Price list
6. Invoice Journal Accounting journal used to create invoices
7. Active Status of the POS
(Line) Available Payment Methods Add the payment methods allowed in POS (Cash, Bank, etc…)
(Line) Features
1. Virtual Keyboard

Don’t turn this option on if you take orders on smartphones or tablets.

Such devices already benefit from a native keyboard

2. Invoicing Enables invoice generation from the Point of Sale
3. Prefill Cash Payment The payment input will behave similarly to bank payment input, and will be prefilled with the exact due amount
4. Start Category The point of sale will display this product category by default. If no category is specified, all available products will be shown
5. Tip Product The product used to encode customer code tip. Leave it empty if you do not accept tips
6. Include Taxes in Prices The displayed prices will always include all taxes, even if the taxes have been set up differently
7. Large Scrollbars Used for imprecise industrial touchscreens
8. Automatic Receipt Printing The receipt will automatically be printed at the end of each order
9. Display Category Picture The product categories will be displayed with pictures
10. Skip Receipt Screen The receipt screen will be skipped if the receipt can be printed automatically
(Line) Multi-session
1. Multi-session

Set this field the same value for POSes where orders should be synced. Leave it empty if this POS should not use syncing. To update it you need to close running session.

The value of this field is created at Point of Sale ‣ Configuration ‣ Multi-session Settings
2. Accept incoming orders Yes
3. Replace empty order Yes
(Line) Cash Control
1. Cash Control Check the amount of the cashbox at opening and closing
(Line) Receipt
1. Header A short text that will be inserted as a header in the printed receipt
2. Footer A short text that will be inserted as a footer in the printed receipt
3. Reprinting This feature allows you to reprint a previously printed receipt
(Line) Loyalty Program
1. Loyalty Program The loyalty program used by this point of sales, can be created at Point of Sale ‣ Configuration ‣ Loyalty Programs
(Line) Discounts
1. Order Discounts Allow the cashier to give discounts on the whole order
2. Discount Product The product used to model the discount
3. Discount Percentage The default percentage when a discount is given in cashier’s screen
(Line) Bar & Restaurant
1. Bill Splitting Yes
2. Bill Printing Yes
3. Restaurant Floors Add the floor(s) served by this point of sales

5.1.1. How to set access rights for each level of users on POS (Manager, Cashier, Waiters)

Link: System ‣ Users ‣ Users ‣ Create a user

  • Access right for Manager

In (Tab) Access Rights, the values of  Sales, Inventory, Accounting & Finance, and Point Of Sales are Manager.

In (Tab) Point of Sales, the manager will be granted with full access rights as illustrated in the picture below.

  • Access rights for Cashier

In (Tab) Access Rights, the role of cashier in terms of operating in Sales, Inventory, and Point of Sale is limited as a normal User, but obtains “Billing” rights in Accounting.

In (Tab) Point of Sale, cashier should be granted with functions involving payment only. However, it is up to your business regulation that a cashier can obtain more rights, which may include the rights to create/edit order lines, etc.

  • Access rights for waiter

In (Tab) Access Rights the role of a waiter in term of operating in Sales, and Point of Sale is restricted to be a normal user, which is illustrated in the following picture.

In (Tab) Point of Sale, a waiter role obtains the use of order-related functions.