
This module allows employee users to record expenses paid fully by theirselves or by company. It’s different from Employee Advance Module which allows employee users to records expenses paid by advanced cash.
8.6. How to create cost allocations
- Cost of operations include cost of electricity, labor or any other additional costs directly or indirectly incurred to complete manufacturing operation.
- The costing method, which is applied on raw material and finished products, must be real price.
8.3. How to manage manufacturing in Kiu
- There are two ways to manage manufacturing in Kiu: Manage production by manufacturing orders and manage production by work orders
7.8. Asset
The “Assets” module allows you to keep track of your fixed assets like machinery, land and building. The module allows you to generate monthly depreciation entries automatically, get depreciation board, sell or dispose assets and perform reports on your company assets.
As an example, you may buy a car for 3,600,000,000 VND (gross value) and you plan to amortize it over 36 months (3 years). Every months (periodicity), KIU will create a depreciation entry automatically reducing your assets value by 100,000,000VND and passing 100,000,000VND as an expense. After 3 years, this assets accounts for 0 VND (salvage value) in your balance sheet.
The different types of assets are grouped into “Assets Types” that describe how to deprecate an asset. Here are two examples of assets types:
- Building: 10 years, yearly linear depreciation
- Car: 5 years, monthly linear depreciation
7.2.8. Fiscal Position configuration
Define the taxes that should be applied for a specific customer/vendor or invoice. Example: If some customers benefit from specific taxes (government, construction companies, EU companies that are VAT subjected,…), you can assign a fiscal position to them and the right tax will be selected according to the products they buy.
6.4.4. How to process delivery orders in three steps (pick + pack + ship)?
When an order goes to the shipping department for final delivery, Kiu BMP is set up by default on a one-step operation: once all goods are available, they can be shipped in bulk in a single delivery order. However, that process may not reflect the reality and your company may require more steps before shipping.
With the three steps process (Pick + Pack + Ship), the items are transferred to a packing area, where they will be assembled by area of destination, and then set to outbound trucks for final delivery to the customers.
A few configuration steps are necessary in order to accomplish Pick + Pack + Ship in Kiu BMP. These steps create some additional locations, which by default are called Output and Packing Zone. So, if your warehouse’s code is WH, this configuration will create a location called WH/Output and another one called WH/Packing zone
Goods will move from WH/Stock to WH/Packing Zone in the first step. Then move from WH/Packing Zone to WH/Output. Then finally it will be delivered from WH/Output to its final destination.
- Configuration:
- Allow managing routes :
Kiu BMP configures movement of delivery orders via routes. Routes provide a mechanism to link different actions together. In this case, we will link the picking step to the shipping step.
To allow management of routes, go to Configuration ‣ Settings
Under Location & Warehouse ‣ Routes, activate the radio button Advanced routing of products using rules. Make sure that the option Manage several warehouses,each one composed by several stock locations is activated as well.

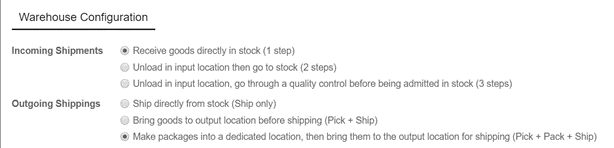
- Configure the warehouse for Pick + Pack +Ship
Go to Configuration ‣ Warehouses and edit the warehouse that will be used.
For outgoing shipping, set the option to Make packages into a dedicated location, bring them to the output location for shipping (Pick + Pack + Ship).
- Create a sale order:
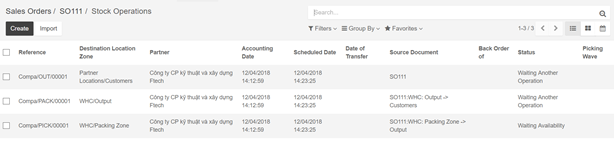
From the Sale module, create a sales order with some products to deliver. Notice that we now see 3 transfers associated with this sales order in the Delivery button above the sales order.
![]()
If you click the button, you should now see three different pickings:
- The first with a reference PICK to designate the picking process
- The second one with the reference PACK that is the packing process
- The last with a reference OUT to designate the shipping process.
Process a delivery
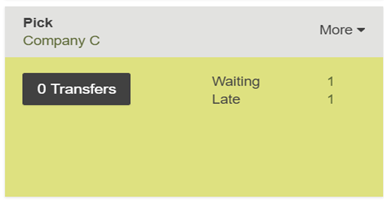
- How to process the picking step?
Ensure that you have enough product in stock and Go to Inventory and click on the Waiting link under the Pick kanban card.
Click on the picking that you want to process. Click on Reserve to reserve the products if they are available. Click on Validate to complete the move from WH/Stock to WH/Packing Zone.
This has completed the picking Step and the WH/PICK should now show Done in the status column at the top of the page. The product has been moved from WH/Stock to WH/Packing Zone location, which makes the product available for the next step (Packing).
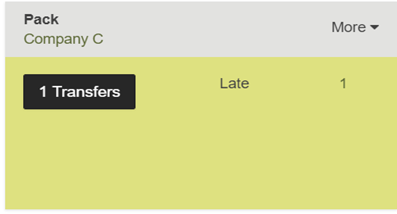
- How to process the packing step?
Go to Inventory and click on the Transfer link under the Pack kanban card.
Click on the picking that you want to process. Click on Validate to complete the move from WH/Packing Zone to WH/Output.
This has completed the packing step and the WH/PACK should now show Done in the status column at the top of the page. The product has been moved from WH/Packing Zone to WH/Output location, which makes the product available for the next step (Shipping).
- How to process the shipping step?
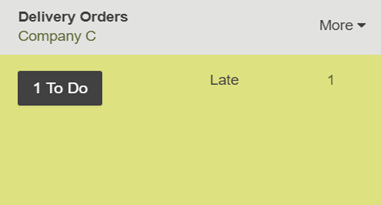
Go to Inventory and click on the To Do link under the Delivery Orders kanban card.
Click on the picking that you want to process. Click on Validate to complete the move from WH/Output to the customer (Click Apply to assign the quantities based on the quantities listed in the To Do column).
This has completed the shipping step and the WH/OUT should now show Done in the status column at the top of the page. The product has been shipped to the customer.
10.7. How to plan and track employees’ assignments?
Following and planning your employees’ assignments can be a heavy challenge especially when you manage several people. Luckily, using Kiu Project, you can handle it in only a couple of clicks.
Configuration
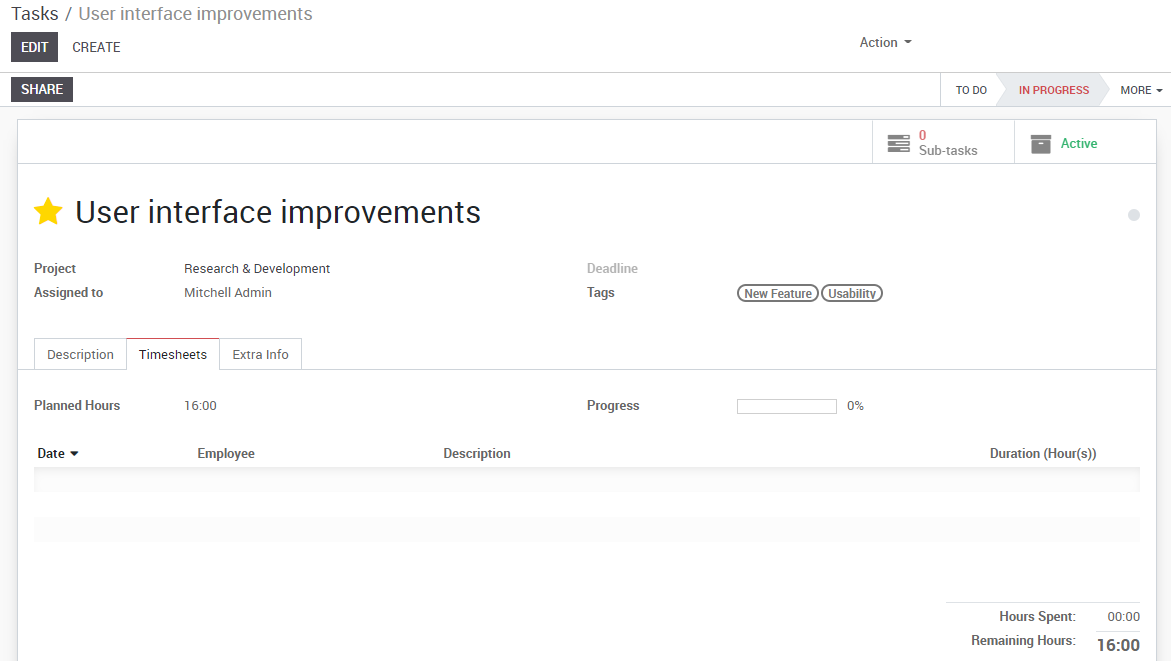
If you wish to manage time estimation, you will need to enable timesheets on tasks. From the Project application, go to Configuration ‣ Settings in the dropdown menu. Then, under Time Work Estimation, select the manage time estimation on tasks option. Do not forget to apply your changes.

This feature will create a progress bar in the form view of your tasks. Every time your salesperson will add working time in his timesheet, the bar will be updated accordingly, based on the initially planned hours.
Manage tasks with views
You can have an overview of your different task thanks to the multiple views available with KiuBMP. Three main views will help you to plan and follow up on your employees’ tasks: the kanban view, the list view (using timesheets) and the calendar view.
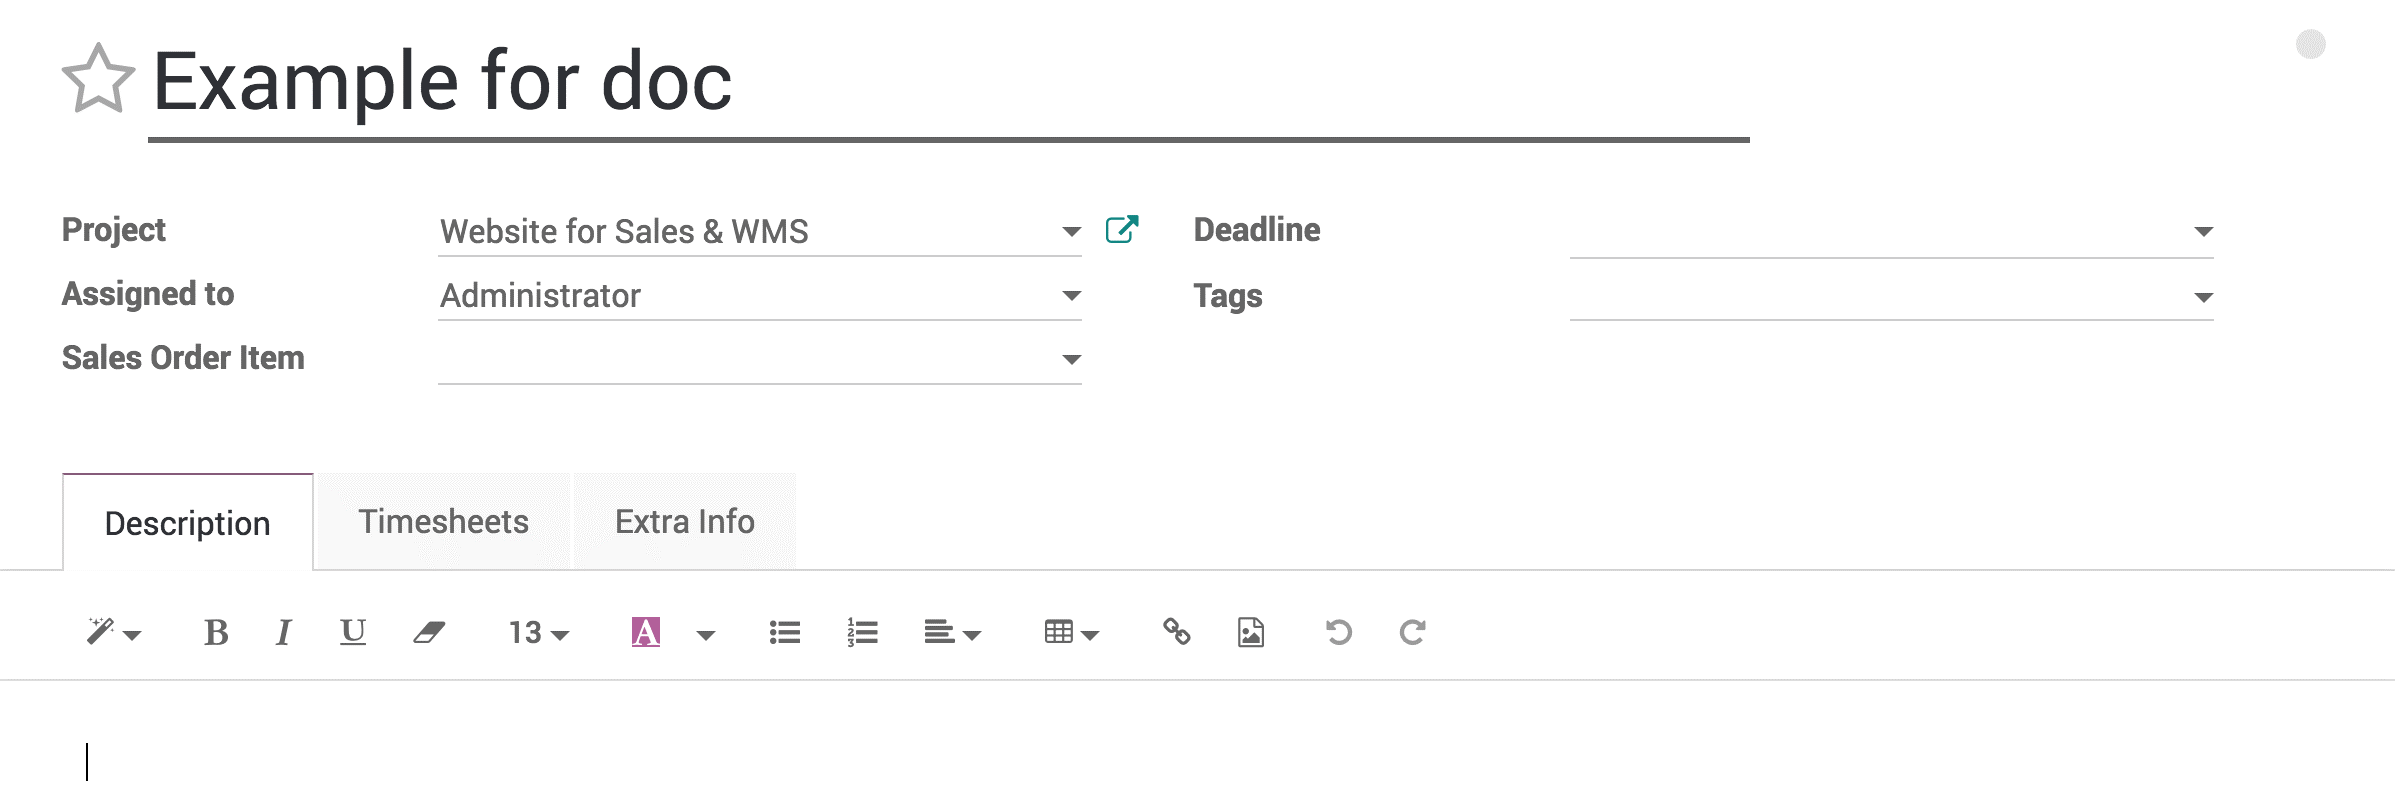
Create and edit tasks in order to fill up your pipeline. Don’t forget to fill in a responsible person and an estimated time if you have one.
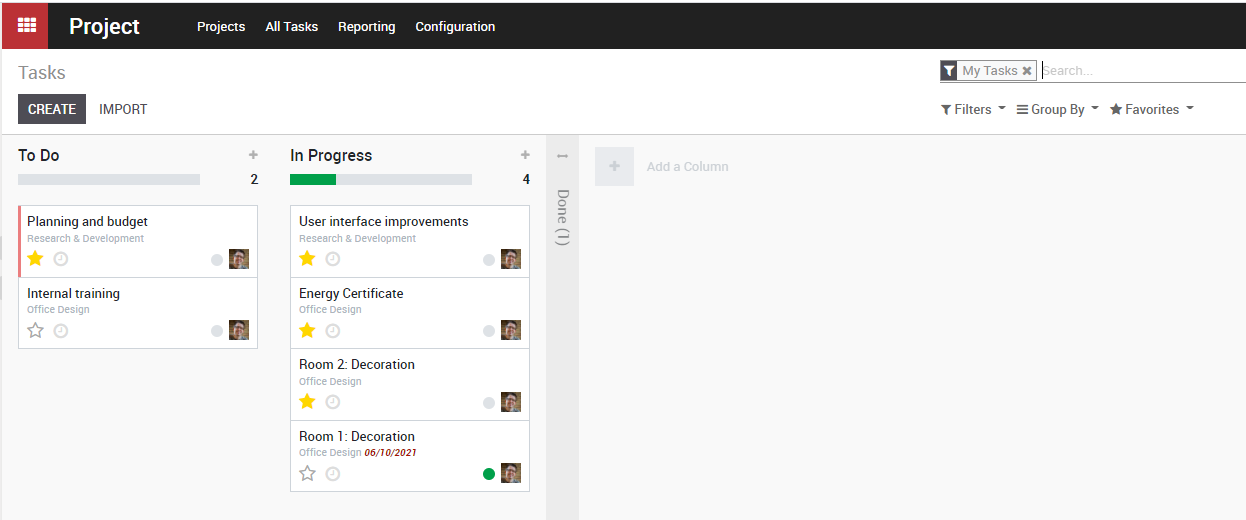
Get an overview of activities with the kanban view
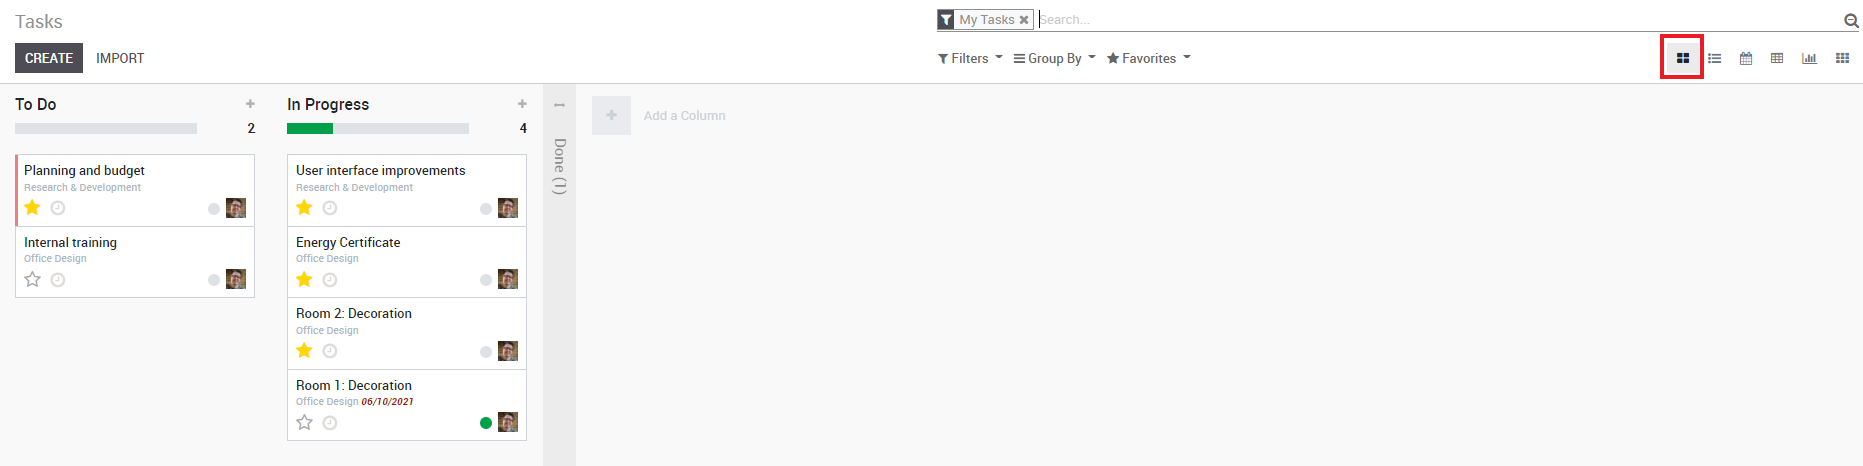
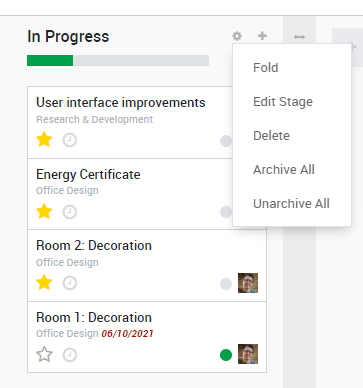
The Kanban view is a post-it like view, divided in different stages. It enables you to have a clear view on the stages your tasks are in and the ones having the higher priorities.
The Kanban view is the default view when accessing a project, but if you are on another view, you can go back to it any time by clicking the kanban view logo in the upper right corner
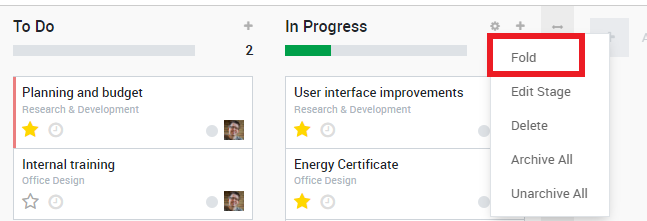
Add/rearrange stages
You can easily personalize your project to suit your business needs by creating new columns. From the Kanban view of your project, you can add stages by clicking on Add new column (see image below). If you want to rearrange the order of your stages, you can easily do so by dragging and dropping the column you want to move to the desired location. You can also fold or unfold your stages by using the setting icon on your desired stage.
Tip
Create one column per stage in your working process. For example, in a development project, stages might be: Specifications, Development, Test, Done.
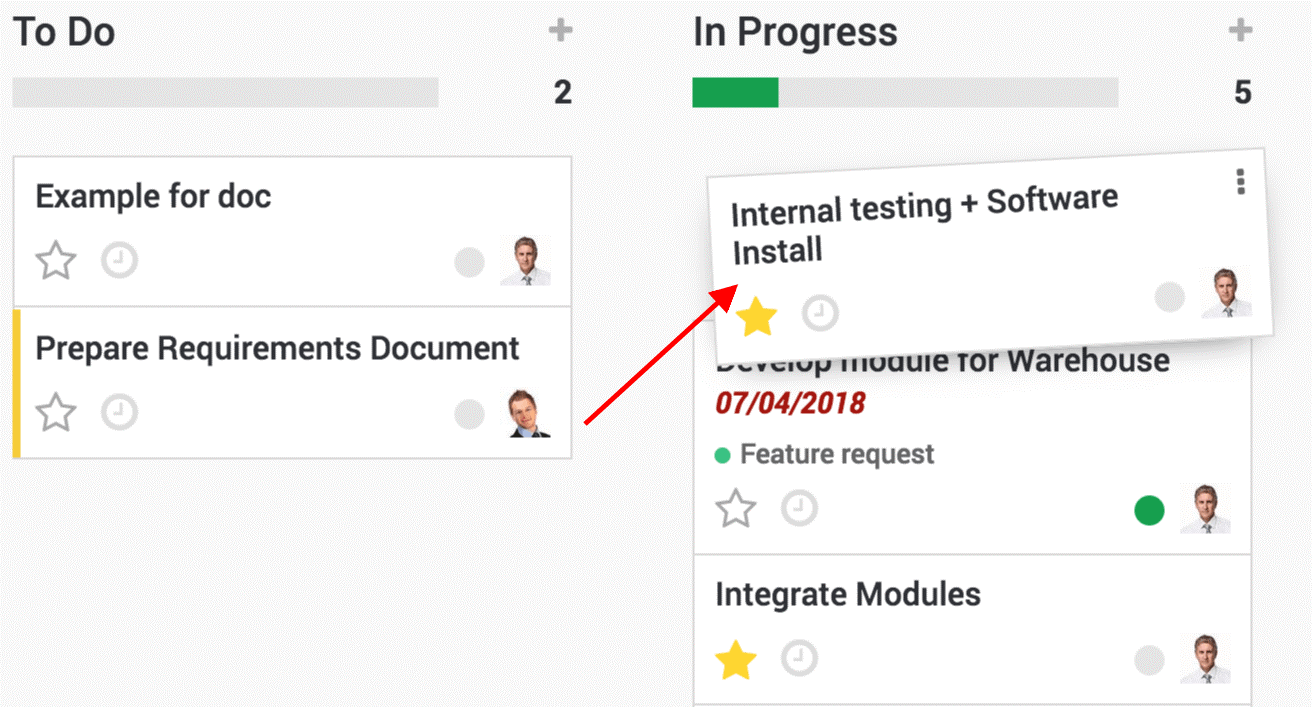
Sort tasks by priority
On each one of your columns, you have the ability to sort your tasks by priority. Tasks with a higher priority will automatically be moved to the top of the column. From the Kanban view, click on the star in the bottom left of a task to tag it as high priority. For the tasks that are not tagged, KiuBMP will automatically classify them according to their deadlines.
Note that dates that passed their deadlines will appear in red( in the list view too) so you can easily follow up the progression of different tasks.
Tip
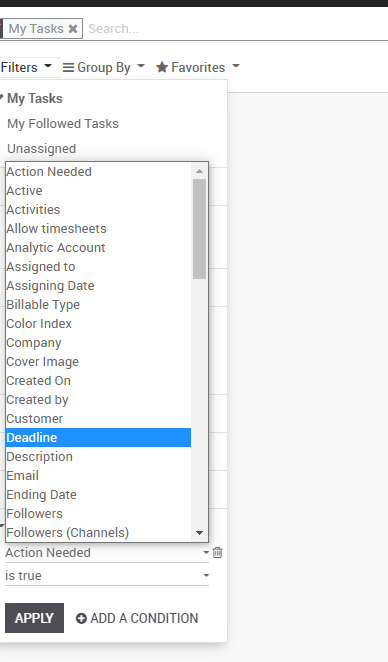
Don’t forget you can filter your tasks with the filter menu.
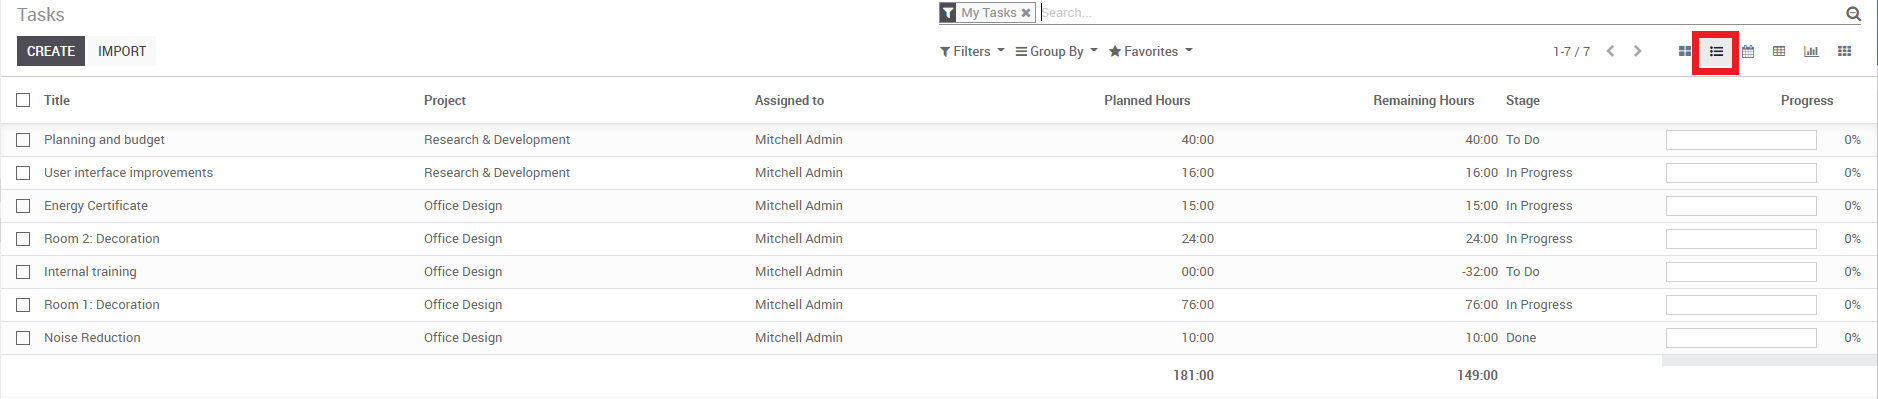
Track the progress of each task with the list view
If you enabled the Manage Time Estimation on Tasks, your employees will be able to log their activities on tasks under the Timesheets sub-menu along with their duration. The Working Time Progress bar will be updated each time the employee will add an activity.
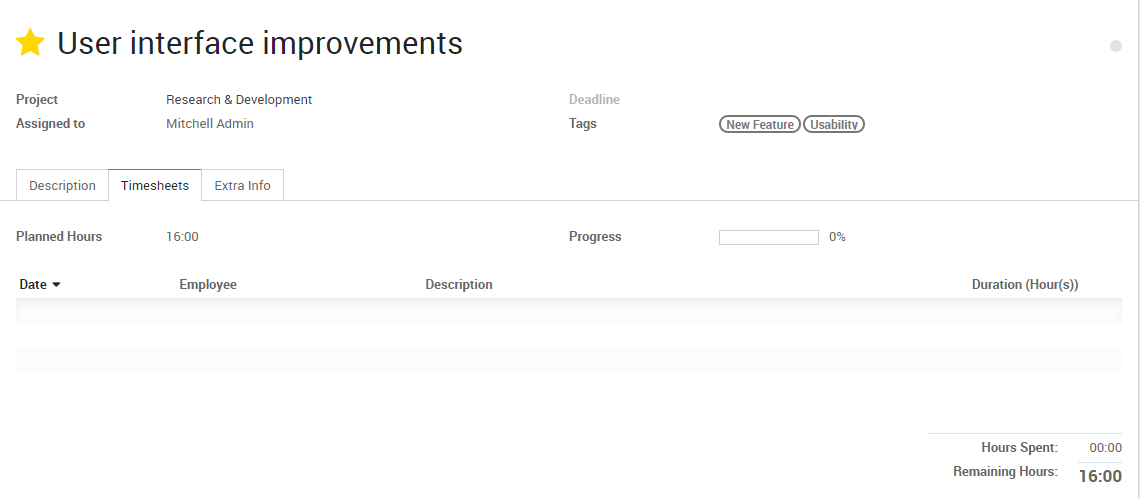
As a manager, you can easily overview the time spent on tasks for all employees by using the list view. To do so, access the project of your choice and click on the List view icon (see below). The last column will show you the progression of each task.
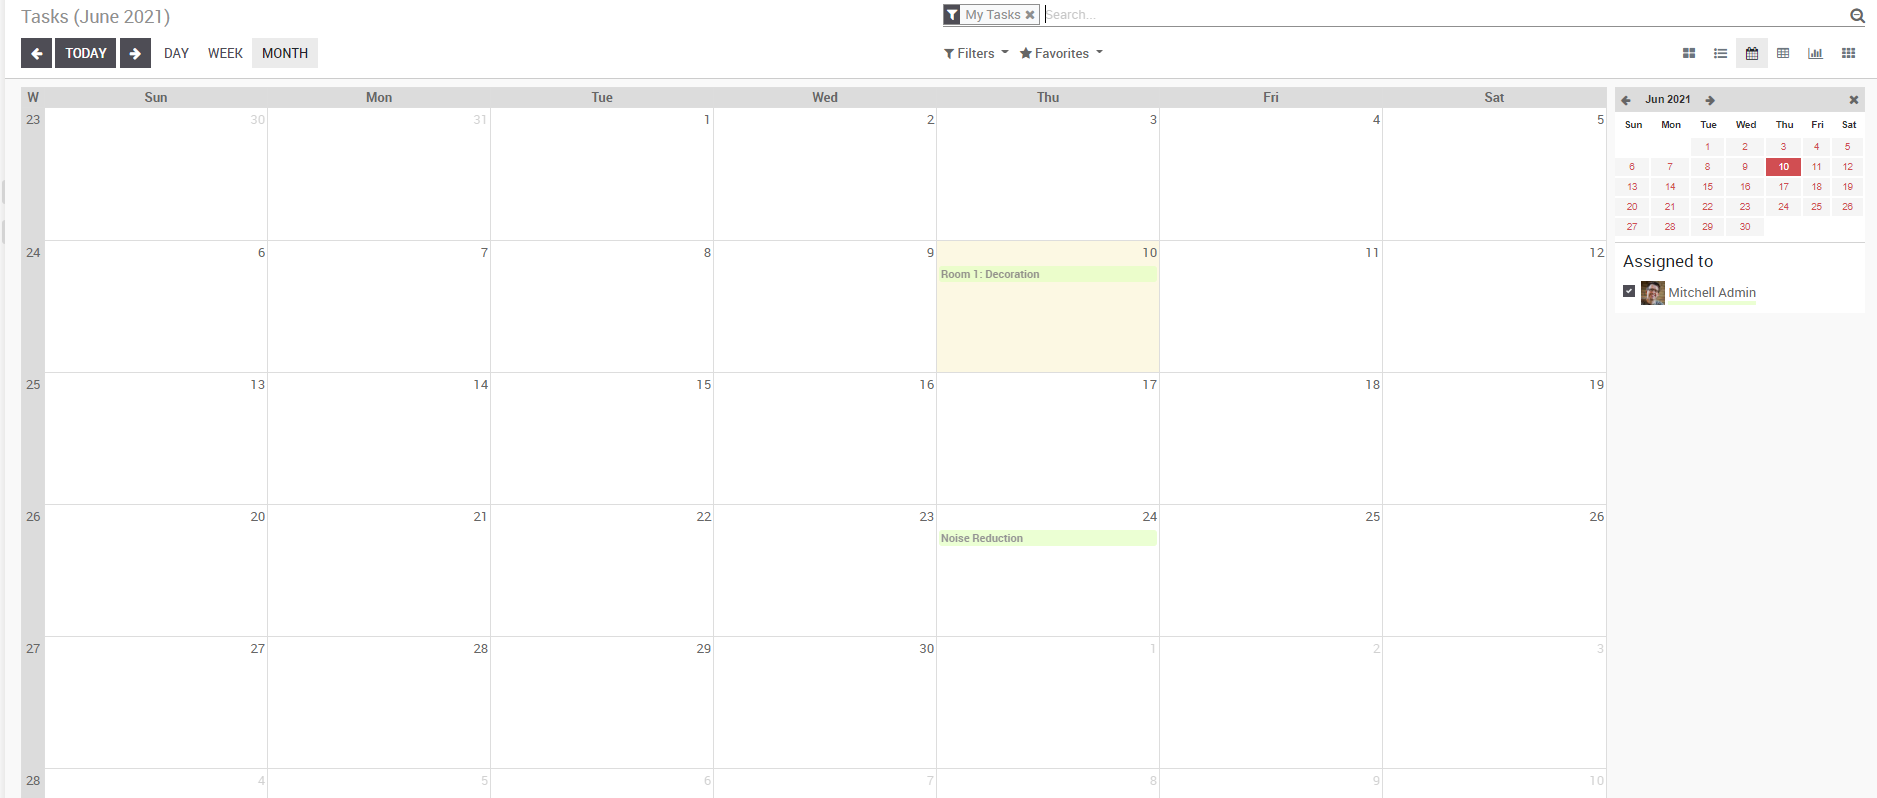
Keep an eye on deadlines with the Calendar view
If you add a deadline in your task, they will appear in the calendar view. As a manager, this view enables you to keep an eye on all deadlines in a single window.
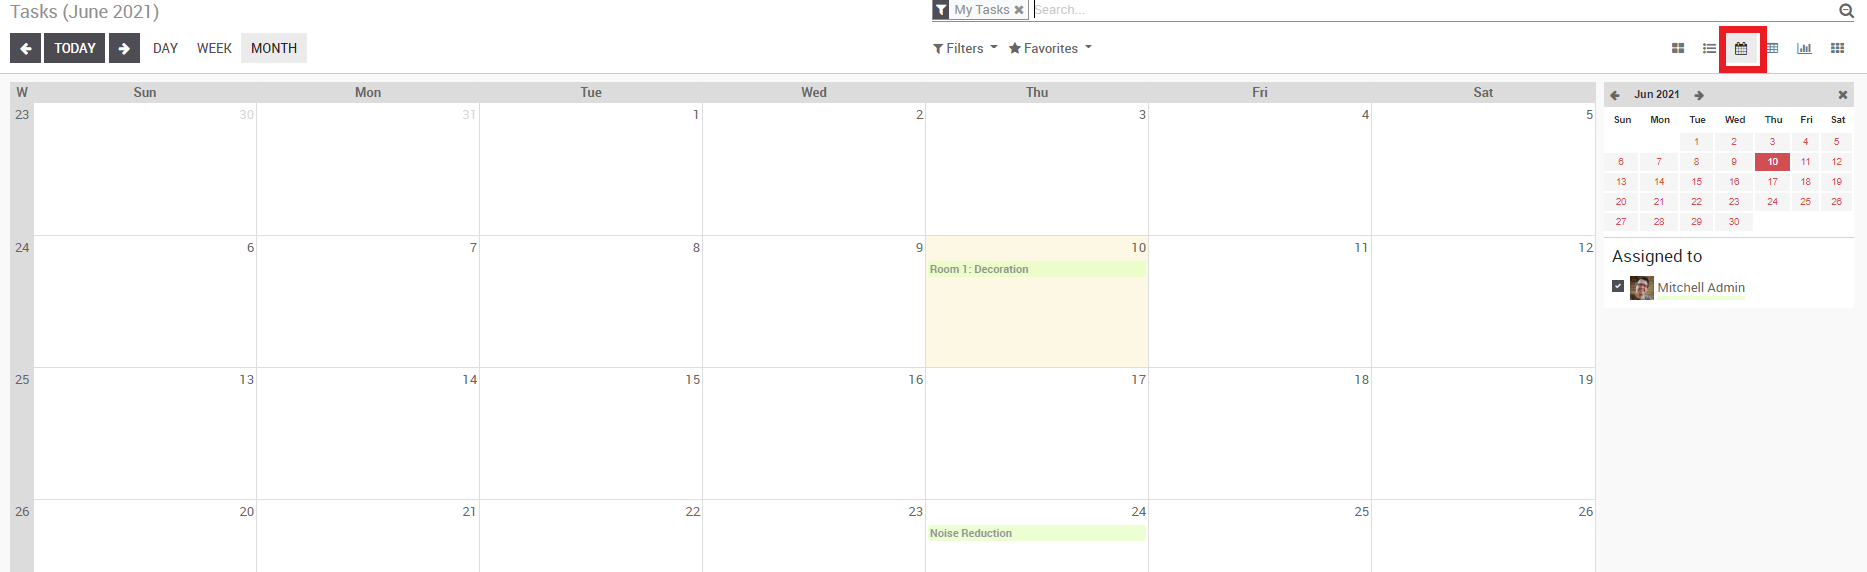
All the tasks are tagged with a color corresponding to the employee assigned to them. You can easily filter the deadlines by employees by ticking the related boxes on the right of the calendar view.
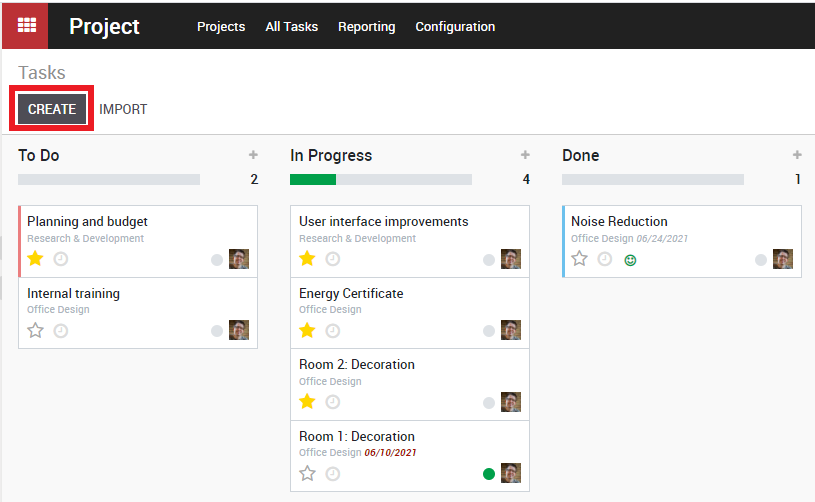
10.6. Visualize a project’s tasks
In day to day business, your company might struggle due to the important amount of tasks to fulfill. Those tasks already are complex enough. Having to remember them all and follow up on them can be a burden. Luckily, KiuBMP enables you to efficiently visualize and organize the different tasks you have to cope with.
Create a task
While in the project app, select an existing project or create a new one.
In the project, create a new task.
In that task you can then assigned it to the right person, add tags, a deadline, descriptions… and anything else you might need for that task.
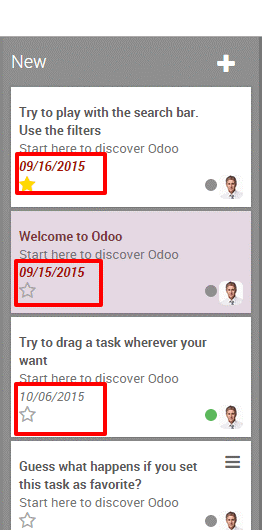
View your tasks with the Kanban view
Once you created several tasks, they can be managed and followed up thanks to the Kanban view.
The Kanban view is a post-it like view, divided in different stages. It enables you to have a clear view on the stages your tasks are in and which one have the higher priorities.
The Kanban view is the default view when accessing a project, but if you are on another view, you can go back to it any time by clicking the kanban view logo in the upper right corner
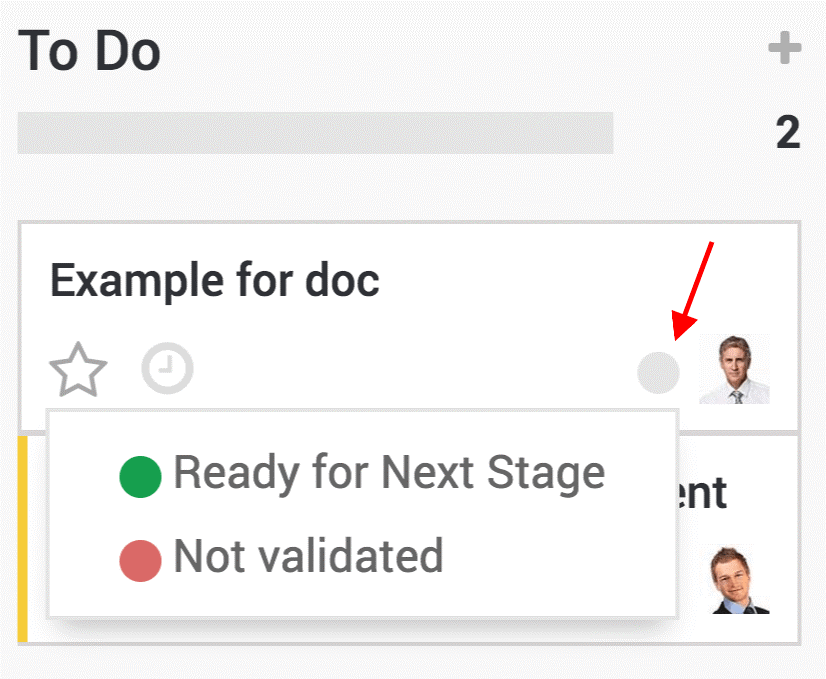
You can also notify your colleagues about the status of a task right from the Kanban view by using the little dot, it will notify follower of the task and indicate if the task is ready.
Sort tasks in your Kanban view
Tasks are ordered by priority, which you can give by clicking on the star next to the clock and then by sequence, meaning if you manually move them using drag & drop, they will be in that order and finally by their ID linked to their creation date.
Tasks that are past their deadline will appear in red in your Kanban view.
Note
If you put a low priority task on top, when you go back to your dashboard the next time, it will have moved back below the high priority tasks.
Manage deadlines with the Calendar view
You also have the option to switch from a Kanban view to a calendar view, allowing you to see every deadline for every task that has a deadline set easily in a single window.
Tasks are color coded to the employee they are assigned to and you can filter deadlines by employees by selecting who’s deadline you wish to see.
10.3. How to set up & configure a project?
Overview
Kiu Project allows you to manage a project together with your whole team, and to communicate with any member for each project and task.
It works with projects containing tasks following customizable stages. A project can be internal or customer-oriented. A task is something to perform as part of a project. You will be able to give different tasks to several employees working on this project.
Creating a new project
Open the Project application, and click on Create. From this window, you can specify the name of the project and set up the privacy of the project.
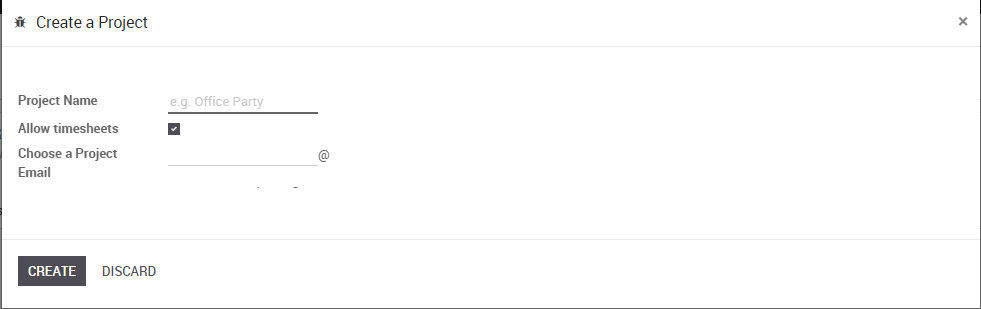
When you have entered all the required details, click on Create.
Manage your project’s stages
Add your project’s stages
On your project’s dashboard. Click on All Tasks.
In the new window, add a new column and name it according to the first stage of your project, then add as many columns as there are stages in your project.
For each stage, there are markers for the status of tasks within a stage, that you can personalize to fit your needs.
Drag your mouse pointer over a stage name, and click on the appearing bearing, and on the opening menu, click on Edit Stage.

A new window will open. The color dots and star icon correspond to customizable markers applied on tasks, making it easier to know what task requires attention. You can give them any signification you like.
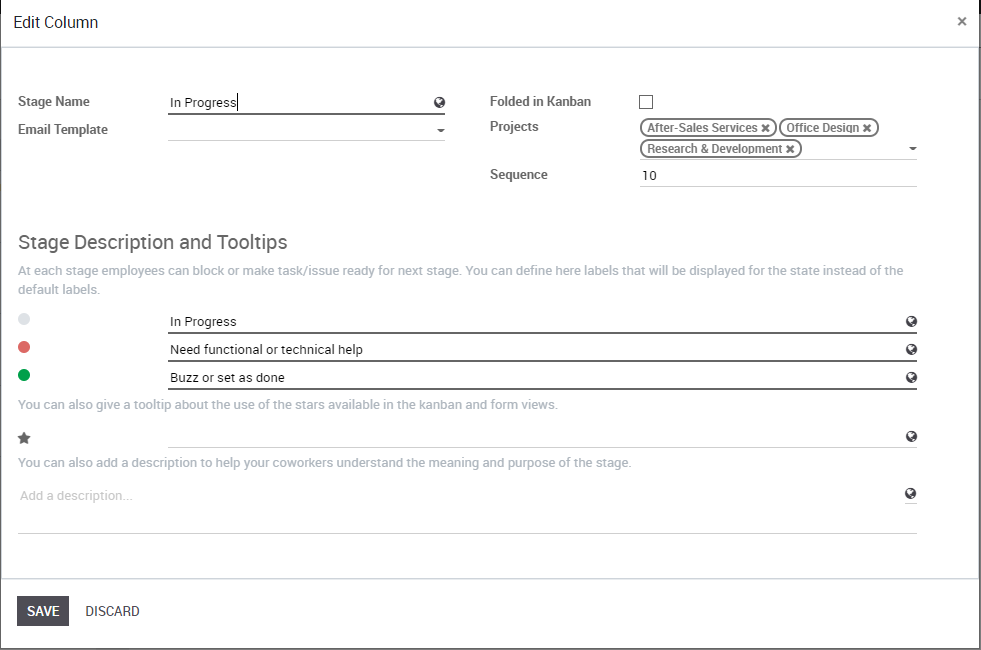
Click on Save when you are done.
Rearrange stages
You can easily personalize this view to better suit your business needs by creating new columns. From the Kanban view of your project, you can add stages by clicking on Add new column. If you want to rearrange the order of your stages, you can easily do so by dragging and dropping the column you want to move to the desired location. You can also fold or unfold your stages by using the Setting icon on your desired stage.
10.1. Introduction to Kiu BMP project
As a business manager, I have a varied job involving multiple stakeholders. To manage every task seamlessly, KIU BMP Projects is of great help.
With KIU BMP Projects, our project team members can easily plan and execute the launching of a new product line in Canada. I organized this project by creating different stages. It allows us to clearly identify the status of any task at any time, and for any user. It is convenient for any other project manager too.
These well-structured project stages are fully customizable. Here I identify one missing stage, I can easily add it in just a click. In our project management process, I proceed to a final review, so I add this stage. KIU BMP projects is designed to work for any kind of business.
Once a task is done, each colleague can highlight it by changing its status. That will help the project manager to review the task before changing the stage with a simple drag and drop. Easy, right?
We can also organize the different tasks by adapting the view. Here, I select the list view, which shows other information such as the working time progress. If I click on my task, I land on the form view where I can edit the planned hours and enter my timesheets. This is a great tool for any project manager. Controlling the working time progress and the time spent for each team member is essential. I set the time for the sales team training to 24 hours. Today, I prepared the material, so I will log 4 hours in the timesheet. The working time progress updates automatically. Thanks to this timesheet integration, the project manager has a thorough follow-up on the progress of each task.
Another great feature in KIU BMP projects is the forecast tool. When it is activated, I can plan resources per project and the workload. Therefore, the time allocation for other projects is much easier. For this project, I have to train members of the sales team. It will require 50% of my time until the end of the week. As project manager, I can do this resource allocation for any user and adapt it according to their other projects. This will prevent any form of time overlap. I can reassign a task or adapt the deadline. KIU BMP projects is the perfect app for strategic and executive planning.
Plus, every aspect of any project can be analyzed, thanks to the reports. For example, We can have a report of effective hours spent in comparison with the planned hours. I can assess the profitability of any project, any task, or any team member. I can also look at the number of hours assigned to each team member.
Another element of an excellent project management is communication. This is a key factor for the success of any project. While dealing with multiple stakeholders, being able to share documents directly in the task is very helpful. With KIU BMP projects, I can discuss through the chat feature that is always one-click away. I can also start a new conversation with anyone in my team.
In addition to being a powerful app for managing projects seamlessy, KIU BMP projects is also an effective customer service or after-sales app. With it, I can follow any customer issue, even create a dedicated support project. The app also automatically creates an invoice of time spent on tasks or issues.
KIU BMP projects is a powerful, yet easy-to-use app. At first, I used the planner to clearly state my objectives and set up the project app. Get this app, it will help you get started quickly too.