Some suppliers can sometimes offer you to store and sell products without having to buy those items: this technique is called consignee stock. Consignee stock is a great way for manufacturers and suppliers to launch new products. As resellers may be reluctant to buying a product that they are not sure to be able to sell, consignee stock will allow them to propose an item to check its market without having to pay for it in the first place. Kiu BMP has the ability to manage consignee stocks through the advanced settings.
Go to Inventory -> Configuration -> Settings and in the Product Owners section, select Manage consignee stocks (advanced), then click on Apply.
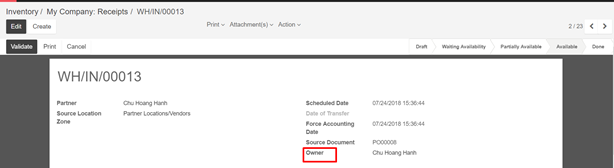
In the Inventory’s Dashboard, open the Receipts and create a new reception. You can see that in the right side of the page, a new Owner line has appeared. You can specify the partner which owns the stock or leave it blank if you are the owner.
Scrap means waste that either has no economic value or only the value of its basic material content recoverable through recycling. In your warehouse you sometimes find products that are damaged or that are unusable due to expiry or for some other reason. You often notice this during picking or physical inventory. Since you cannot normally sell or store these products, you have to scrap product. When goods are scrapped they are not reflected in the system as a part of the inventory. The scrapped material will be physically moved to scrap area.
Configuration
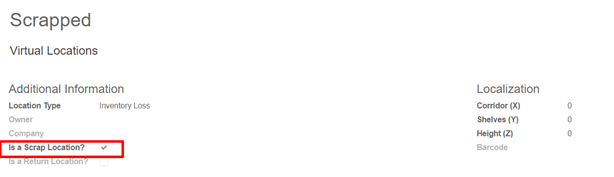
When you install inventory management, the system automatically creates one default scrap location, namely Virtual location/Scrapped.
To create an extra scrap location, Go to Inventory ‣ Configuration ‣ Settings and check Manage several warehouse, each one composed by several stock locations, then click on Apply.
Then you can create a new scrap location in Configuration ‣ Warehouse Management ‣ Locations. To define a scrap location, you have to check Is a scrap location? on location form view.
Different ways to scrap product
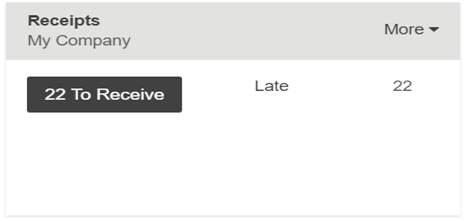
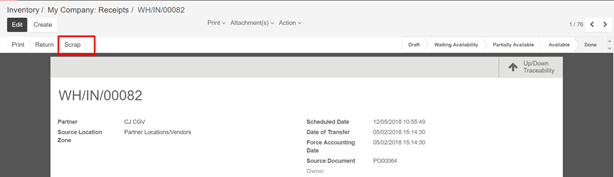
Scrap from Receipt : To scrap product from incoming shipment , go to Inventory -> Dashboard -> Receipts
Open the incoming shipment and click on the Scrap button
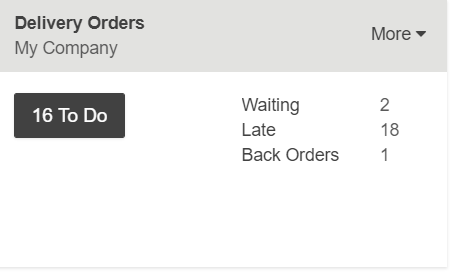
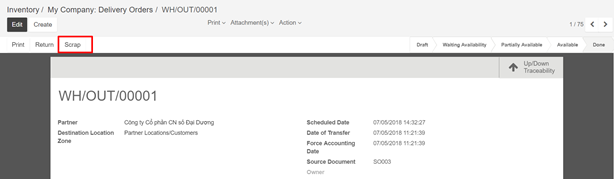
Scrap from delivery order : To scrap product from outgoing shipment, go to Inventory -> Dashboard -> Delivery orders
Open the outgoing shipment and click on the Scarp button
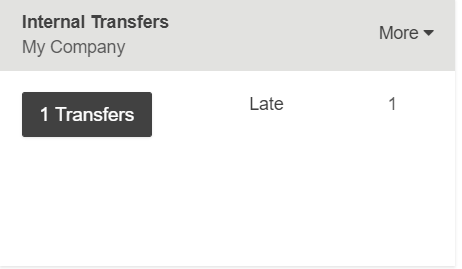
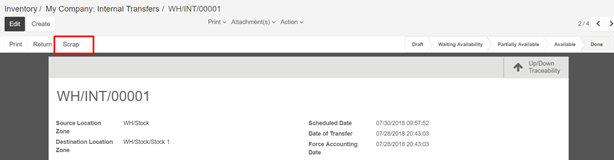
Scrap from internal transfer : Go to Inventory -> Dashboard -> Internal transfer
Open the internal transfer and click on the Scarp button
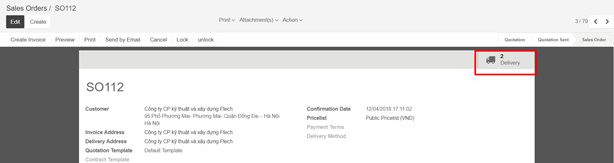
Kiu BMP gives you the possibility to cancel a delivery method whether it has been validated to fast, it needs to be modified or for any other reason. Some carriers are more flexible than others, so make sure to cancel your delivery order as fast as possible if it needs to be done so you don’t have any bad surprise.
Go to Sales -> Sales -> Sales order. Then click on the sale order you want to cancel. Click on the Delivery button, in the upper right corner of the sale order.
Click “Cancel” button to cancel delivery
To make sure that your delivery is cancelled, check in the history, you will receive the confirmation of the cancellation.
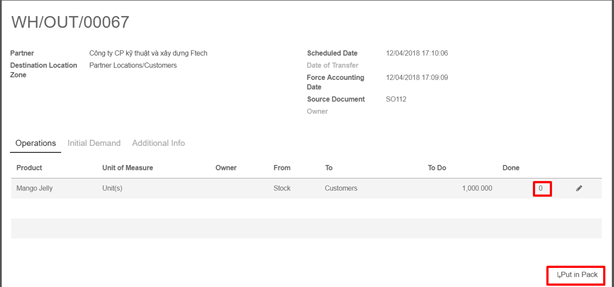
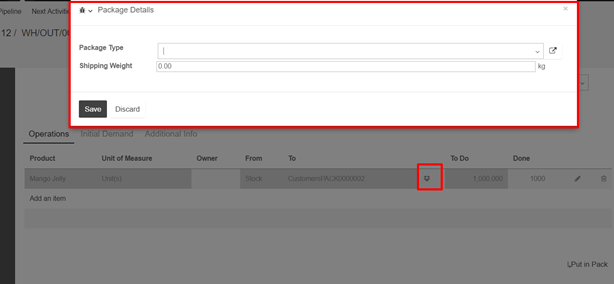
Kiu BMP gives you the possibility to change the default packaging type and adapt the packaging the way you want it, depending on the weight of the order.
Go to Inventory -> Configuration -> Setting -> Traceability -> Packages. Choose Record packages used on packing
In the Sales module, go to Sales and click on Sale Order. Create your new Sale Order, and Confirm the Sale.
Once you’ve confirmed the Sale, you need to click on Delivery, to be redirected to the Delivery order. Click on Edit, and you can now change the packaging.
In the Operations tab, in the last column, change the 0 and put the number of products that you want to pack together. Then click on Put in Pack.
Choose the type of packaging that you want. You can also see that the weight has been adapted to your package, and you can change it manually if you want it to be more precise. Then click on Save. Repeat the operation until all the products are put in pack.
Finally, click on Validate to confirm the delivery.
Configuring lead times is a first essential move in order to compute scheduled dates. Lead times are the delays (in term of delivery, manufacturing, …) promised to your different partners and/or clients.
Configuration of the different lead times are made as follows:
At a product level
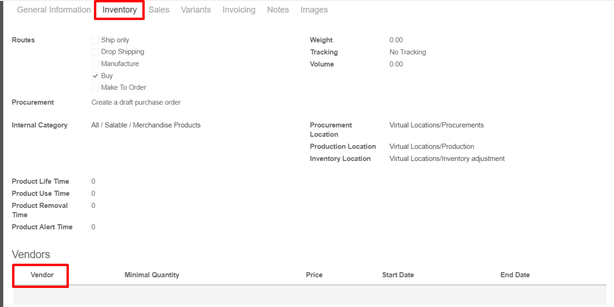
Supplier lead time:
Is the time needed for the supplier to deliver your purchased product. To configure the supplier lead time select a product, and go in the Inventory tab. You will have to add a vendor to your product in order to select a supplier lead time.
Note: Do not forget that it’s possible to add different vendor and thus different delivery lead times depending on the vendor
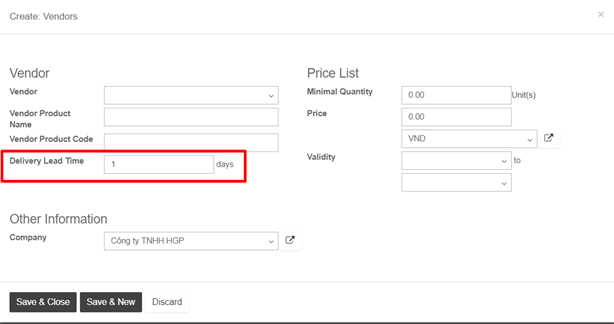
Once a vendor is selected, just open its form and fill its Delivery lead time. In this case security days have no influence, the scheduled delivery days will be equal to: Date of the purchase order + Delivery Lead Time.
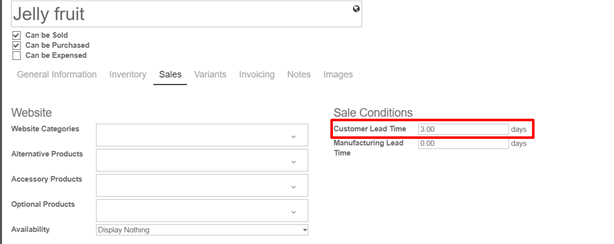
Customer lead time:
Customer lead time is the time needed to get your product from your store / warehouse to your customer. It can be configured for any product. Simply select a product, go into the sales tab and indicate your Customer lead time.
Manufacturing lead time:
At the same page it is possible to configure the Manufacturing Lead Time as well. Manufacturing lead time is the time needed to manufacture the product.
Note: Don’t forget to tick the manufacturing box in inventory if you want to create manufacturing routes
At route level
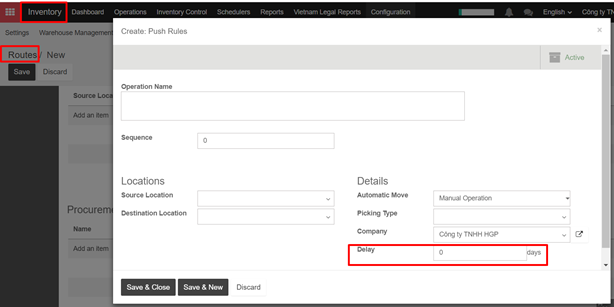
The internal transfers that a product might do due to the movement of stocks can also influence the computed date. The delays due to internal transfers can be specified in the Inventory app when creating a new push rule in a route.
Go to the push rules section on a route form to set a delay.
At sale order level:
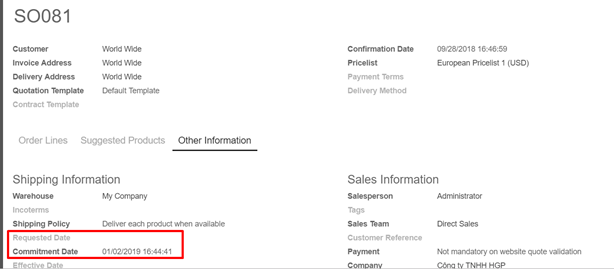
Requested date:
Kiu offers the possibility to select a requested date by the client by indicating the date in the other information tab of the sales order. If this date is earlier than the theoretically computed date, the system will automatically display a warning.
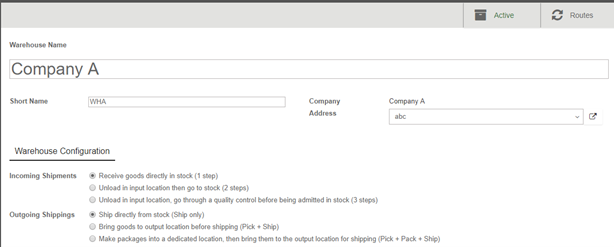
When an order goes to the shipping department for final delivery, Kiu BMP is set up by default on a one-step operation: once all goods are available, they can be shipped in bulk in a single delivery order. However, that process may not reflect the reality and your company may require more steps before shipping.
With the three steps process (Pick + Pack + Ship), the items are transferred to a packing area, where they will be assembled by area of destination, and then set to outbound trucks for final delivery to the customers.
A few configuration steps are necessary in order to accomplish Pick + Pack + Ship in Kiu BMP. These steps create some additional locations, which by default are called Output and Packing Zone. So, if your warehouse’s code is WH, this configuration will create a location called WH/Output and another one called WH/Packing zone
Goods will move from WH/Stock to WH/Packing Zone in the first step. Then move from WH/Packing Zone to WH/Output. Then finally it will be delivered from WH/Output to its final destination.
Configuration:
Allow managing routes :
Kiu BMP configures movement of delivery orders via routes. Routes provide a mechanism to link different actions together. In this case, we will link the picking step to the shipping step.
To allow management of routes, go to Configuration ‣ Settings
Under Location & Warehouse ‣ Routes, activate the radio button Advanced routing of products using rules. Make sure that the option Manage several warehouses, each one composed by several stock locations is activated as well.
Configure the warehouse for Pick + Pack +Ship
Go to Configuration ‣ Warehouses and edit the warehouse that will be used.
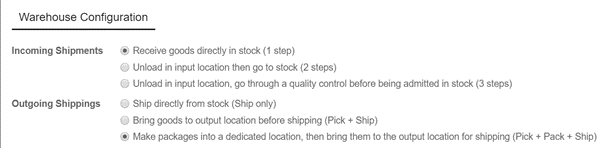
For outgoing shipping, set the option to Make packages into a dedicated location, bring them to the output location for shipping (Pick + Pack + Ship).
Create a sale order:
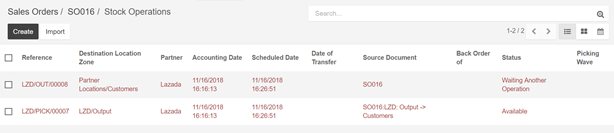
From the Sale module, create a sales order with some products to deliver. Notice that we now see 3 transfers associated with this sales order in the Delivery button above the sales order.
If you click the button, you should now see three different pickings:
The first with a reference PICK to designate the picking process
The second one with the reference PACK that is the packing process
The last with a reference OUT to designate the shipping process.
Process a delivery
How to process the picking step?
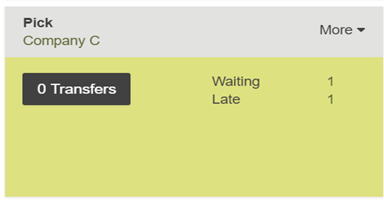
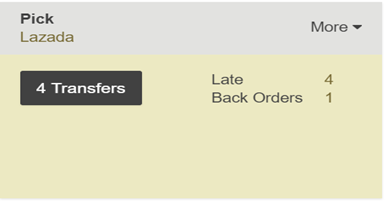
Ensure that you have enough product in stock and Go to Inventory and click on the Waiting link under the Pick kanban card.
Click on the picking that you want to process. Click on Reserve to reserve the products if they are available. Click on Validate to complete the move from WH/Stock to WH/Packing Zone.
This has completed the picking Step and the WH/PICK should now show Done in the status column at the top of the page. The product has been moved from WH/Stock to WH/Packing Zone location, which makes the product available for the next step (Packing).
How to process the packing step?
Go to Inventory and click on the Transfer link under the Pack kanban card.
Click on the picking that you want to process. Click on Validate to complete the move from WH/Packing Zone to WH/Output.
This has completed the packing step and the WH/PACK should now show Done in the status column at the top of the page. The product has been moved from WH/Packing Zone to WH/Output location, which makes the product available for the next step (Shipping).
How to process the shipping step?
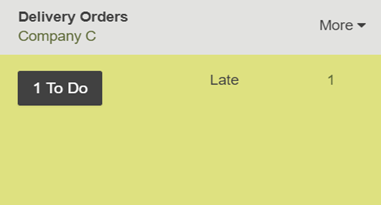
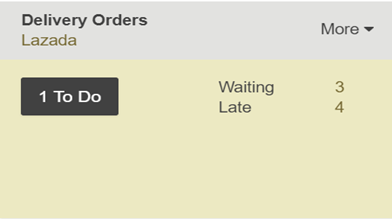
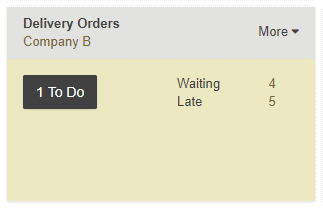
Go to Inventory and click on the To Do link under the Delivery Orders kanban card.
Click on the picking that you want to process. Click on Validate to complete the move from WH/Output to the customer (Click Apply to assign the quantities based on the quantities listed in the To Do column).
This has completed the shipping step and the WH/OUT should now show Done in the status column at the top of the page. The product has been shipped to the customer.
When an order goes to the shipping department for final delivery, Kiu BMP is set up by default to utilize a one-step operation: once all goods are available, they are able to be shipped in a single delivery order. However, your company’s business process may have one or more steps that happen before shipping. In the two steps process, the items in a delivery order are picked in the warehouse and brought to an output location for shipping. The goods are then shipped.
In order to accomplish a Pick + Ship delivery in Kiu BMP , there are a few necessary configuration steps. These steps create an additional location, which by default is called Output. So, if your warehouse’s code is WH this configuration will create a location called WH/ Output. Goods will move from WH/Stock to WH/Output in the first step (picking). Then, they move from WH/Output to WH/Customers (in the case of sales orders) in the second step (shipping).
Configuration:
Allow management of routes: Kiu BMP configures movement of delivery orders via the routes. Routes provide a mechanism to chain different actions together. In this case, we will chain the picking step to the shipping step.
To allow management of routes, go to Configuration ‣ Settings.
Ensure that the radio button Advanced routing of products using rules is checked.
Click on Apply at the top of the page to save changes (if you needed to check the radio button above).
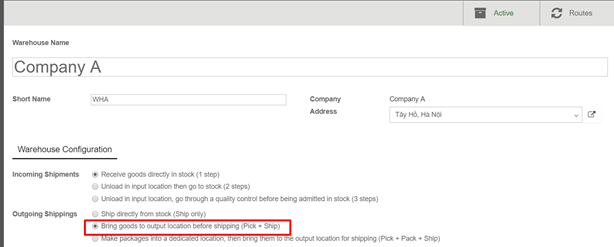
Configure warehouse for pick + ship:
To configure a Pick + Ship move, go to Configuration ‣ Warehouses and edit the warehouse that will be used.
For outgoing shipping , set the option to Bring goods to output location before shipping (Pick + Ship)
Create a sales order
Install the Sale if it is not the case, and create a sales order with some products to deliver.
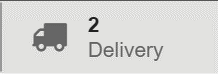
Notice that we now see 2 transfers associated with this sales order in the Delivery button above the sales order.
If you click on the 2 Transfers stat button, you should now see two different pickings, one with a reference PICK to designate the picking process and another with a reference OUT to designate the shipping process.
Process a delivery
How to process the picking step?
Ensure that you have enough product in stock, and go to Inventory and click on the Waiting link under the Pick card.
Click on the picking that you want to process. Click on Reserve to reserve the products if they are available. Click on Validate to complete the move from WH/Stock to WH/Output.
This has completed the picking step and the WH/PICK move should now show Done in the status column at the top of the page. The product has been moved from WH/Stock to WH/Output location, which makes the product available for the next step (Shipping).
How to process the shipping step?
Go to Inventory and click on the TO DO link under the Delivery Orders kanban card.
Click on the picking that you want to process. Click on Validate to complete the move from WH/Output to the customer (Click Apply to assign the quantities based on the quantities listed in the To Do column). This has completed the shipping step and the WH/OUT move should now show Done in the status column at the top of the page. The product has been shipped to the customer.
When an order goes to the shipping department for final delivery, Kiu BMP is set up by default to utilize a one-step operation: once all goods are available, they are able to be shipped in a single delivery order.
Configuration:
There is no configuration needed. The default outgoing shipments are configured to be directly delivered from the stock.
However, if advance routes is activated and you set another shipping configuration on your warehouse, you can set it back to the one-step delivery configuration. Go to Configuration ‣ Warehouses and edit the concerned warehouse.
Set the outgoing shipping the option to Ship directly from stock (Ship Only)
Create a sales order
Create a sales order (From quotation to sales order) with some products to deliver.
Notice that we now see 1 delivery associated with this sales order in the button above the sales order.
If you click on the 1 Delivery button, you should now see your picking.
Process a delivery
Go to Inventory and click on the TO DO link under the Delivery Orders card.
Click on the picking that you want to process. Click on Validate to complete the move from WH/Stock to the customer. This has completed the Shipping Step and the WH/OUT should now show Done in the status column at the top of the page, which means the product has been shipped to the customer.
Depending on factors such as the type of items you sell, the size of your warehouse, the number of orders you register everyday… the way you handle deliveries to your customers can vary a lot.
Kiu allows you to handle shipping from your warehouse in 3 different ways:
One step (shipping): Ship directly from stock
Two steps (pick + ship): Bring goods to output location before shipping
Three steps (pick + pack + ship): Make packages into a dedicated location, then bring them to the output location for shipping
For companies having a rather small warehouse and that do not require high stock of items or don’t sell perishable items, a one step shipping is the simplest solution, as it does not require a lot of configuration and allows to handle orders very quickly.
Using inventory methods such as FIFO and FEFO require to have at least two steps to handle a shipment. The picking method will be determined by the removal strategy, and the items removed will then be shipped to the customer. This method is also interesting if you hold larger stocks and especially when the items you stock are big in size.
The three steps system becomes useful in more specific situations, the main one being for handling very large stocks. The items are transferred to a packing area, where they will be assembled by area of destination, and then set to outbound trucks for final delivery to the customers.
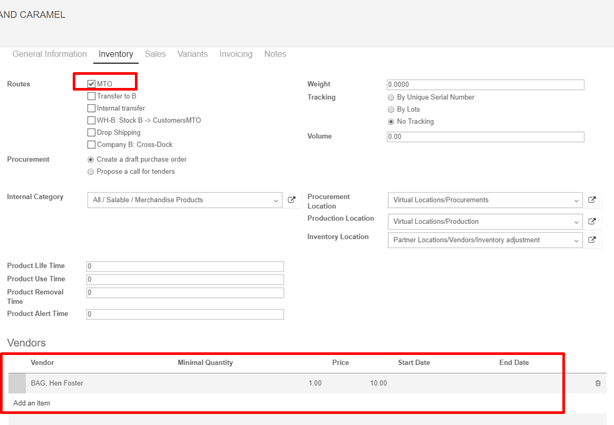
Minimum Stock rules and Make to Order have similar consequences but different rules. They should be used depending on your manufacturing and delivery strategies. The choice between the two options is thus dependent of your inventory strategy. If you prefer to have a buffer and always have at least a minimum amount, the minimum stock rule should be used. If you want to reorder your stocks only if your sale is confirmed it is better to use the Make to Order.
Terminology
Minimum Stock rules are used to ensure that you always have the minimum amount of a product in stock in order to manufacture your products and/or answer to your customer needs. When the stock level of a product reaches its minimum the system will automatically generate a procurement with the quantity needed to reach the maximum stock level.
The Make to Order function will trigger a Purchase Order of the amount of the Sales Order related to the product. The system will not check the current stock valuation. This means that a draft purchase order will be generated regardless of the quantity on hand of the product
Configuration
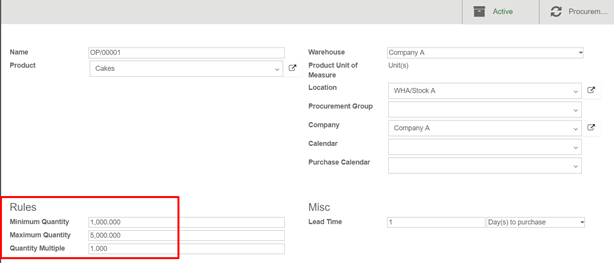
The Minimum Stock Rules configuration is available through the menu Inventory ‣ Inventory Control ‣ Reordering Rule in the drop down menu. There, click on Create to set minimum and maximum stock values for a given product.
Active: If the active field is set to False, it will allow you to hide the orderpoint without removing it. Product Unit of Measure: Default unit of measure used for all stock operations. Procurement Group: Moves created through this orderpoint will be put in this procurement group. If none is given, the moves generated by stock rules will be grouped into one big picking. Minimum Quantity: When the virtual stock goes below the Min Quantity specified for this field, Kiu BMP generates a procurement to bring the forecasted quantity to the Max Quantity. Maximum Quantity: When the virtual stock goes below the Min Quantity, Kiu BMP generates a procurement to bring the forecasted quantity to the Quantity specified as Max Quantity. Quantity Multiple: The procurement quantity will be rounded up to this multiple. If it is 0, the exact quantity will be used. Lead Time: Number of days after the orderpoint is triggered to receive the products or to order to the vendor
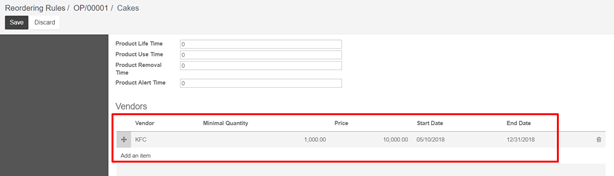
=> Then, click on your product to access the related product form and, on the Inventory submenu, do not forget to select a supplier.
Note: Don’t forget to select the right product type in the product form. A consumable can not be stocked and will thus not be accounted for in the stock valuation.
The Make to Order configuration is available on your product form through your Inventory module ‣ Inventory control ‣ Products (or any other module where products are available).
On the product form, under Inventory, click on Make To Order