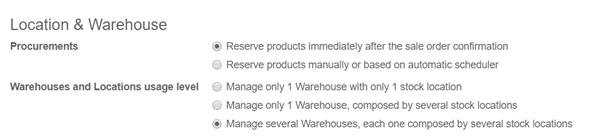
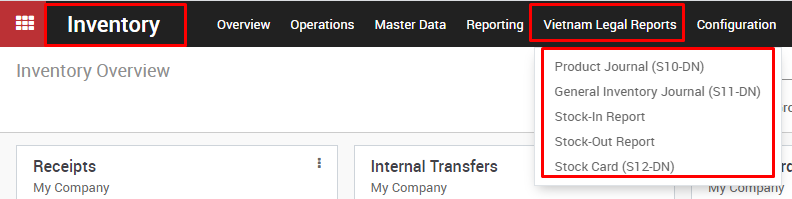
In order to be able to create new locations, you must allow the system to manage multiple locations. Go to Inventory -> Configuration -> Settings. In the Location & Warehouse section, tick the Manage several Warehouses, each one composed by several stock locations box, then click on Apply.
In the Inventory module, open Configuration ‣ Warehouse Management ‣ Locations In the Locations window, click on Create.
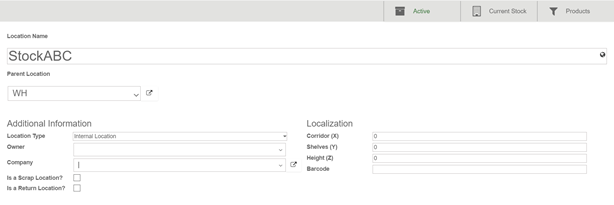
Type the name of the location in the Location Name field, and select the Parent Location in the list. The parent location can be a physical, partner or virtual location, and you can add as many sub-locations as needed to a location.
You can also fill in the Additional Information fields and add a note to describe your location.
=> When you are finished, click on Save.
Note: A warehouse also corresponds to a locations. As the locations are hierarchical, the system will create the parent location of the warehouse, containing all the sublocation in it.
In order to be able to create a new warehouse, you must allow the system to manage multiple locations. Go to Inventory -> Configuration -> Settings. In the Location & Warehouse section, tick the Manage several Warehouses, each one composed by several stock locations box, then click on apply
Open the menu Configuration ‣ Warehouse Management ‣ Warehouses
In the warehouses screen, click on Create. A new screen appears, with 3 fields :
In Warehouse Name, insert the full name of the warehouse.
In the Short Name field, insert a 5-characters code for your warehouse. Keep in mind that this code is the one that will appear in the lists, so make sure you choose a name that is easy to understand and easy to enter.
In the Address field, you can select an existing company or create one on-the-go. Therefore, the address of your warehouse will be the same as the one of the company you selected. You can also leave this field empty and edit it afterwards.
Click on Save to finish configuring your new warehouse.
Note: When you create a new warehouse, the system will create necessary picking type and main child location for this main location in the background
A Warehouse is the actual building/place in which your items are stocked. You can setup multiple warehouses and create moves between warehouses.
A Location, is a specific space within your warehouse. It can be considered as a sublocation of your warehouse, as a shelf, a floor, an aisle, etc. Therefore, a location is part of one warehouse only and it is not possible to link one location to multiple warehouses. You can configure as much locations as you need under one warehouse.
There are 3 types of locations:
The Physical Locations are internal locations that are part of the warehouses for which you are the owner. They can be the loading and unloading area of your warehouse, a shelf or a department, etc.
The Partner Locations are spaces within a customer and/or vendor’s warehouse. They work the same way as Physical Locations with the only difference being that you are not the owner of the warehouse.
The Virtual Locations are places that do not exist, but in which products can be placed when they are not physically in an inventory yet (or anymore). They come in handy when you want to place lost products out of your stock (in the Inventory loss), or when you want to take into account products that are on their way to your warehouse (Procurements).
In Kiu BMP, locations are structured hierarchically. You can structure your locations as a tree, dependent on a parent-child relationship. This gives you more detailed levels of analysis of your stock operations and the organization of your warehouse.
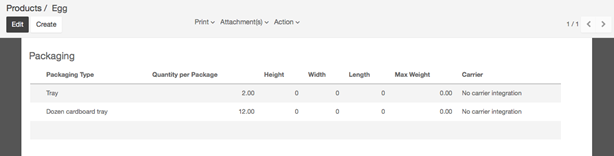
For example, you are selling eggs. In your warehouse, you manage the eggs individually. Lots of eggs are scrapped and you do it egg by egg. The unit of measure is Unit(s).
If you are selling eggs by the dozen, the selling unit of measure is the Dozen. You will set it on your sale order.
The cardboard trays that contains the dozen of eggs is the packaging.
When you are selling several trays, you might wrap all the trays into a box or in a plastic wrapping. It is the package.
Product variants are used to manage products having different variations, like size, color, etc. It allows managing the product at the template level (for all variations) and at the variant level (specific attributes).
As an example, a company selling T-Shirts may have the following product:
KIU T-Shirt:
Size: S, M, L, XL
Color: Black, Red, White
In this example, KIU T-Shirt is called the product template and KIU T-Shirt, S, Red is a variant. Sizes and color are attributes.
The above example has a total of 12 different products (4 sizes x 3 colors). Each one of these products has its own inventory, sales, etc.
→ Impact of variants
Barcode: the code and barcode is associated to a variant, not the template. Every variant may have its own barcode.
Price: every product variant has its own public price that is computed based on the template price (VND 100,000) with an optional extra for every variant (+VND 20,000 for color red). However, you can define pricelist rules that apply on the template or the variant.
Inventory: the inventory is managed by product variant. You don’t own t-shirts, you only own “T-shirts, S, Red”, or “T-Shirts, M, Black”. For information purpose, on the product template form, you get the inventory that is the sum of every variant.
Picture: the picture is related to the variant, every variation of a product may have its own primary picture.
Other fields: most of the other fields belongs to the product template. If you update them, it updates automatically all the variants. (example: Income Account, Taxes)
→ When should you use variants?
Using variants has the following impacts:
eCommerce: in your online shop, the customer will only see product templates in the catalog page. Once the visitor click on such a product, he will have options to choose amongst the variants (colors, sizes, …)
Manufacturing: Using variants allows to define only one bill of material for a product template and slight variations for some of the variants. Example: instead of creating a Bill of Material for “T-shirt, Red, S”, you create a bill of material for “T-shirt” and add some lines that are specific to the dimension S, and other lines specific to the color Red.
Pricing: The default price of a product is computed using the price of the product template and add the optional extra price on each dimension of the variant. This way, variant prices are easier to maintain since you don’t have to set the price for every variant. However, it’s possible to create pricelist rules to fix price per variants too.
→ When should you avoid using variants?
Using variants may add a level of complexity on the way you use Kiu ERP . You should consider using variants only if you need it to reduce the complexity of managing lots of products that are similar.
As an example, importing your initial product catalog is more complex if you use variants. You can’t just import a list of products, you must import product templates and all their related variations.
In addition to that, you should also carefully select the dimensions that you manage as separate product templates and those as variants. As an example, a company having these products:
Quality: T-Shirts, Polos, Shirts
Color: Red, Black, White
Size: S, M, L, XL
In such a use case, you could create 1 template with three dimensions of variants ( T-Shirts, Polos, Shirts). But, it’s recommended to create two different product templates as T-shirts may highly differ from polos or shirts and customer expect to see these as two different products in the e-Commerce:
Product Template: T-shirt
Color: Red, Black, White
Size: S, M, L, XL
Product Template: Polos
Color: Red, Black, White
Size: S, M, L, XL
→ Configuration:
Activate the variant feature: Before you can use product variants, you must first activate the product variants in the settings. To do so, you must go to the Sales app. In the menu Configuration ‣ Settings, locate the Products Variants line, and tick the option Products can have several attributes, then click on Apply
Create product with variant: Once you have activated the variant option, you can add variants to your products. To do so, go to the Sales module, Sales ‣ Products. It is also accessible from the Purchase and inventory modules.
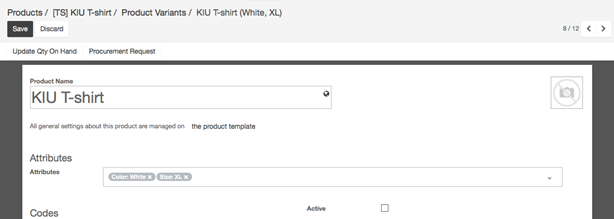
Now, click on the product you wish to add variants to.
In the product page, a new tab called Variants has appeared. The number written on top is the number of variants this product currently has. To add new variants, click on the tile. In the new window, click on
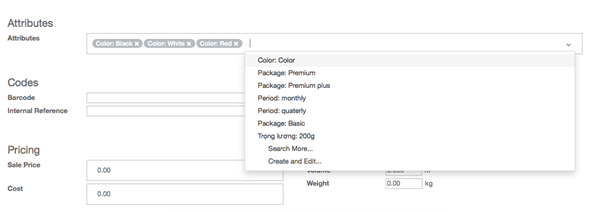
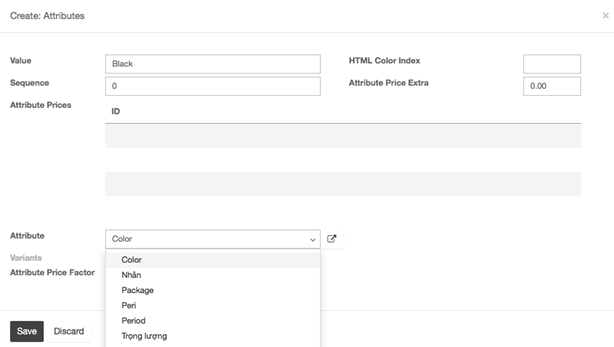
In Attributes, click on the roll down menu and select the type of variance you wish to add. If the variant does not yet exist, you can create it on the fly by clicking on Create and edit…
In the Attributes window, the Value field is the description of the attribute such as Black, White or Red . The Attribute field is the type of variant such as Color.
You can add a cost for the variant on the fly by adding it in the Attribute Price Extra field, or choose to modify it later. Click on Save.
You can also add a different barcode and internal reference to the variant.
When you have entered all the specifications of the variant, click on Save.
→ Managing product variants:
Managing combination possibilities: By default, with the above product (KIU T-shirt) template, you get 12 different products (3 colors, 4 sizes). If the XL size only exists for red and black t-shirts, you can deactivate the white product variant.
To do this, click on the Variants button, select the XL, White T-shirt. From the product form, uncheck the Activebox of the T-shirt White, XL
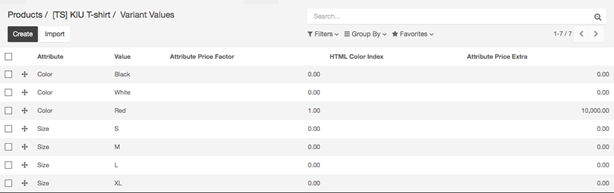
Setting a price per variant: You can add a cost over the main price for some of the variants of a product. Once you have activated the variant option, you can add variants to your products. To do so, go to the Sales module, open Sales ‣ Products and click on the product you want to modify. Click on the Variant Prices button to access the list of variant values.
Click on the variant name you wish to add a value to, to make the 3 fields editable. In the Attribute Price Extra field, add the cost of the variant that will be added to the original price.
When you have entered all the extra values, click on Save.
In some cases, handling products in different unit of measures (UoM) is necessary. For example, if you buy products in a country where the metric system is of module and sell the in a country where the imperial system is used, you will need to convert the units.
You can set up KIU BMP to work with different units of measure for one product.
Note:For each product, you only can set multi-UoM which belong to one UoM category, you can’t set different UoM of different UoM categories.
Configuration: In the Inventory Module, go to Configuration ‣ Settings. In the Products section, select “Some products may be sold/purchased in different units of measure (advanced)”, then click on Apply
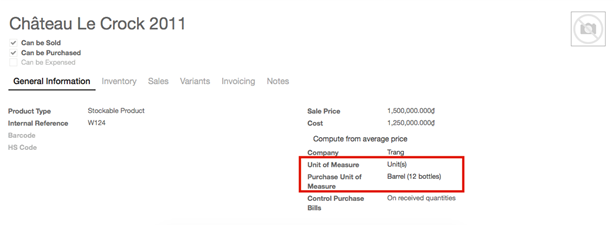
Set up units on your product: In Inventory Control ‣ Products, open the product which you would like to change the purchase/sale unit of measure, and click on Edit.
In the Unit of Measure section, select the unit in which the product will be sold and in which internal transfers will be done.
In the Purchase Unit of Measure section, select the unit in which you purchase the product. When you’re done, click on Save.
Transfer from one unit to another: When doing inter-unit transfers, the rounding is automatically done by KIU BMP. The unit of measure can be changed throughout the whole process. The only condition is that the unit of measure is part of the same category.
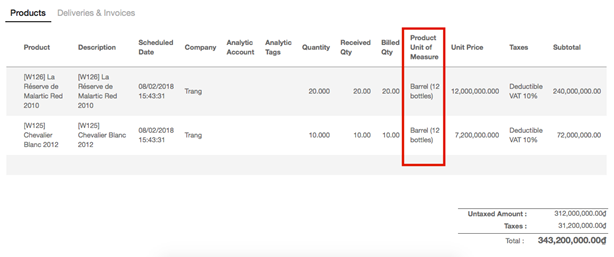
In this example, we are in the beverage merchandise business (Please see image attached above)
Purchase: When doing your purchase order, you can still change the unit of measure
Receiving: The quantity control is managed by “Unit” . Therefore, the quantity check is done by unit
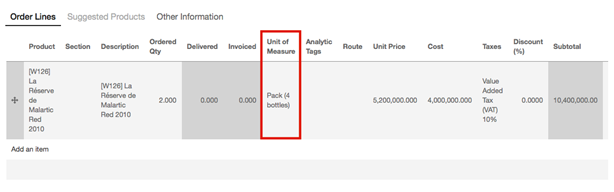
Sales: The liquor are sold by pack of 4 bottles as per customer’s requirement. You can choose the unit of measure on the sale order document. When doing it, the price is automatically computed from the unit to pack
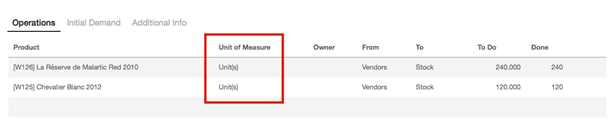
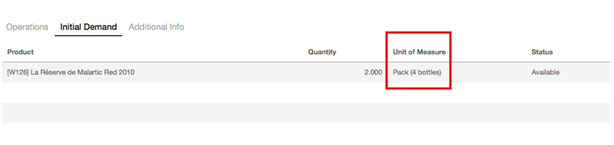
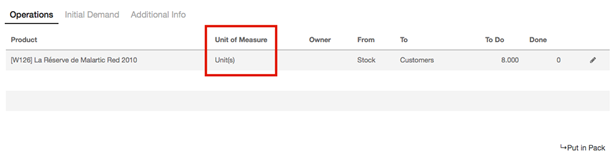
In the delivery order, the initial demand is done in the sales order unit of measure:
But the transfer is done in the product unit of measure. Everything is converted automatically:
Input opening balance for account except Inventory Valuation account
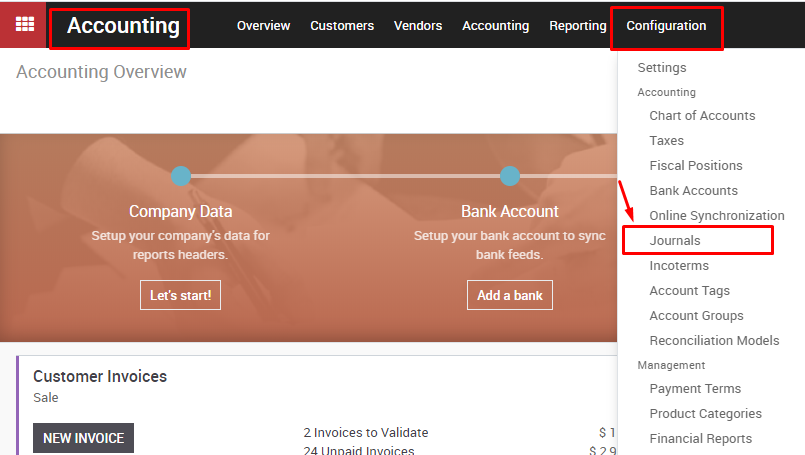
Create an Initial balance journal ( If the journal hasn’t been created). In the Accounting module, go to Configuration (Accounting) -> Journal
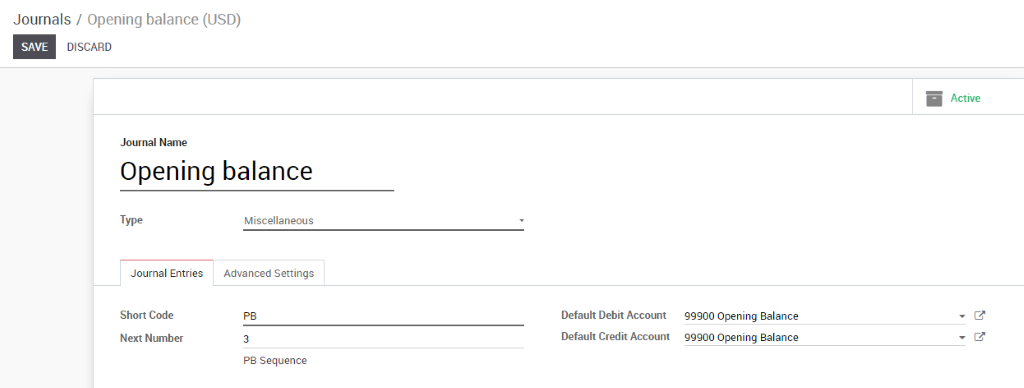
Click on Create button to create a new journal with the following information:
Journal name: Opening balance( optional)
Type: Miscellaneous
Short code: PB (optional)
Click Save when finished
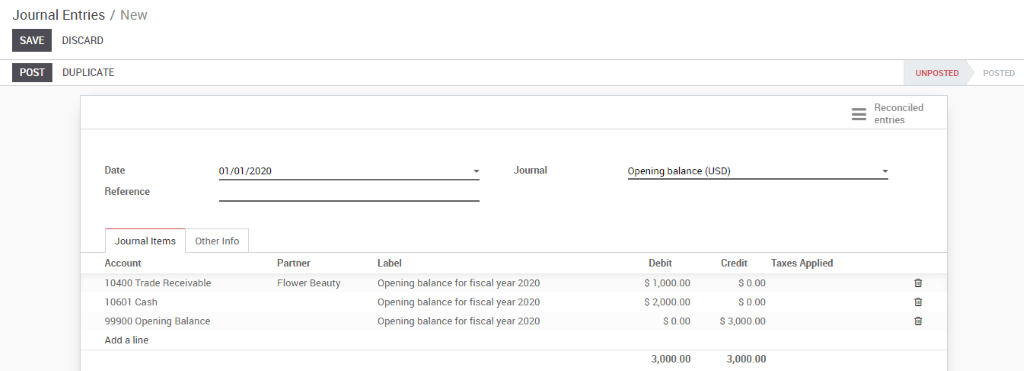
Input the Opening balance: In the Accounting module, go to Adviser-> Journal entries. Click on Create button on the top-left screen to create a new journal entry
Journal: select the Opening Balance journal.
Date: choose the first date of your fiscal year.
Reference: if any
In the Journal Items section, select the desired account and input the initial balance in the Debit or Credit column. Select Partner (if any), and annotate Label for the entry.
Click on Add an item and select Opening Balance as the counterpart account, and input the Debit and Credit. The total Debit and Credit need to be balanced.
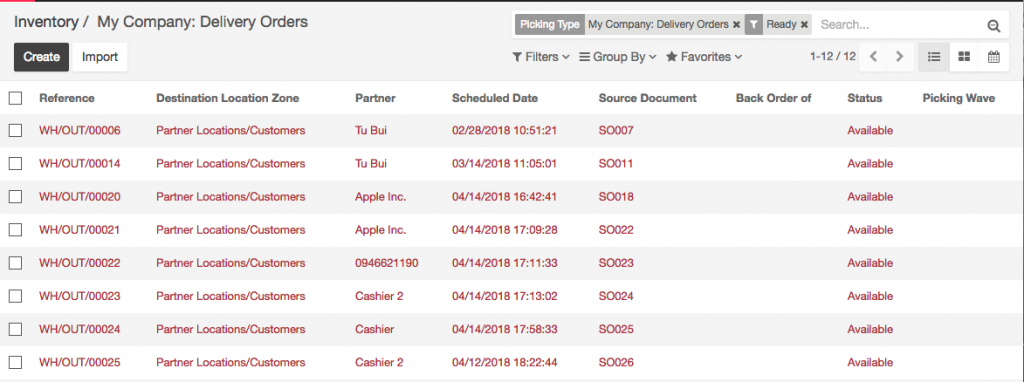
Same as receipt process above, you can retrieve the delivery order in 2 ways:
→ From the sale order:
On the top right of your sale order, you will see a button with the related Delivery:
Click on it to see the Transfer order.
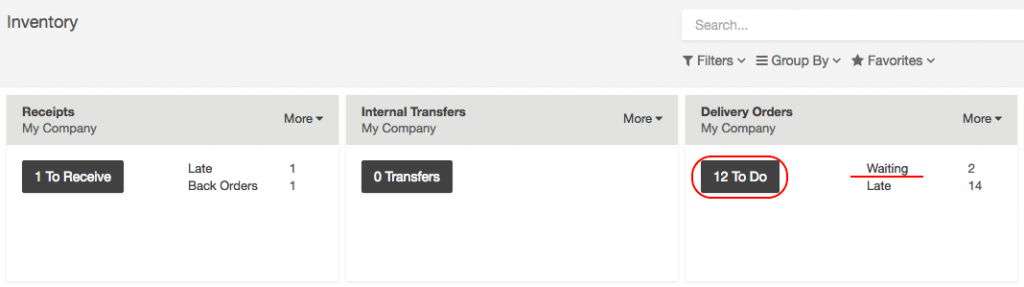
→ From the Inventory Dashboard:
When opening the Inventory Module, click on # to do to see the list of your receipts to process.
Note: If the product is not in stock, the sales order will be listed as Waiting on your dashboard.
To process the stock transfer. Simply click on Validate to complete the transfer. A message will appear asking if you want to process the whole order, accept it by clicking on Apply.