3.5.6. How to manage prices for B2B (tax excluded) and B2C (tax included)?

When working with consumers, prices are usually expressed with taxes included in the price (e.g., in most eCommerce). But, when you work in a B2B environment, companies usually negotiate prices with taxes excluded.

KIU BMP manages both use cases easily, as long as you register your prices on the product with taxes excluded or included, but not both together. If you manage all your prices with tax included (or excluded) only, you can still easily do sales order with a price having taxes excluded (or included): that’s easy.

This documentation is only for the specific use case where you need to have two references for the price (tax included or excluded), for the same product. The reason of the complexity is that there is not a symmetrical relationship with prices included and prices excluded, as shown in this use case, in belgium with a tax of 21%:

  • Your eCommerce has a product at 10€ (taxes included)
  • This would do 8.26€ (taxes excluded) and a tax of 1.74€

But for the same use case, if you register the price without taxes on the product form (8.26€), you get a price with tax included at 9.99€, because:

  • 8.26€ * 1.21 = 9.99€

So, depending on how you register your prices on the product form, you will have different results for the price including taxes and the price excluding taxes:

  • Taxes Excluded: 8.26€ & 10.00€
  • Taxes Included: 8.26€ & 9.99€

Note

If you buy 100 pieces at 10€ taxes included, it gets even more tricky. You will get: 1000€ (taxes included) = 826.45€ (price) + 173.55€ (taxes) Which is very different from a price per piece at 8.26€ tax excluded.

This documentation explains how to handle the very specific use case where you need to handle the two prices (tax excluded and included) on the product form within the same company.

Note

In terms of finance, you have no more revenues selling your product at 10€ instead of 9.99€ (for a 21% tax), because your revenue will be exactly the same at 9.99€, only the tax is 0.01€ higher. So, if you run an eCommerce in Belgium, make your customer a favor and set your price at 9.99€ instead of 10€. Please note that this does not apply to 20€ or 30€, or other tax rates, or a quantity >1. You will also make you a favor since you can manage everything tax excluded, which is less error prone and easier for your salespeople.

Configuration

Introduction

The best way to avoid this complexity is to choose only one way of managing your prices and stick to it: price without taxes or price with taxes included. Define which one is the default stored on the product form (on the default tax related to the product), and let KIU BMP compute the other one automatically, based on the pricelist and fiscal position. Negotiate your contracts with customers accordingly. This perfectly works out-of-the-box and you have no specific configuration to do.

If you can not do that and if you really negotiate some prices with tax excluded and, for other customers, others prices with tax included, you must:

  1. always store the default price TAX EXCLUDED on the product form, and apply a tax (price included on the product form)
  2. create a pricelist with prices in TAX INCLUDED, for specific customers
  3. create a fiscal position that switches the tax excluded to a tax included
  4. assign both the pricelist and the fiscal position to customers who want to benefit to this pricelist and fiscal position

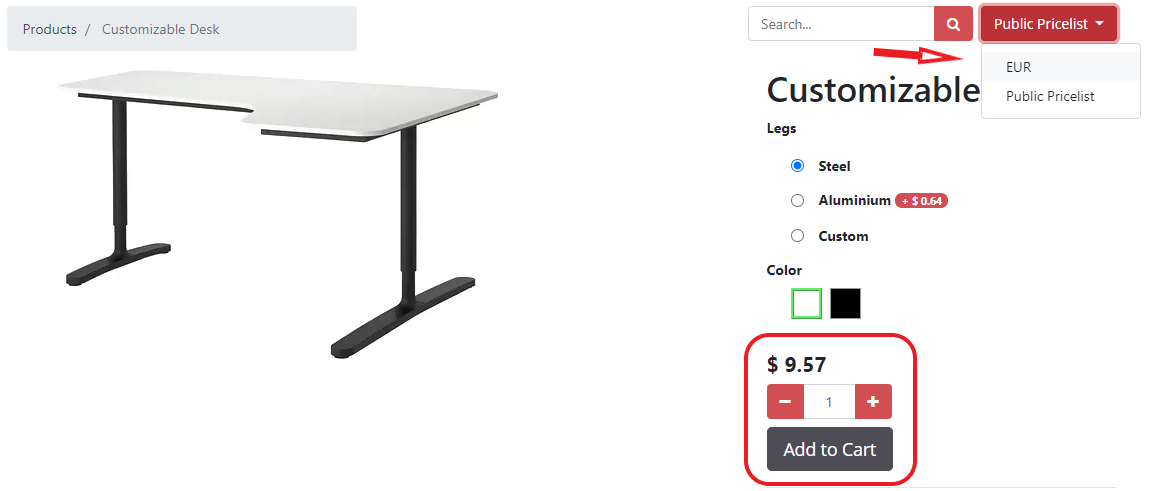
For the purpose of this documentation, we will use the above use case:

  • your product default sale price is 8.26€ tax excluded
  • but we want to sell it at 10€, tax included, in our shops or eCommerce website

Setting your products

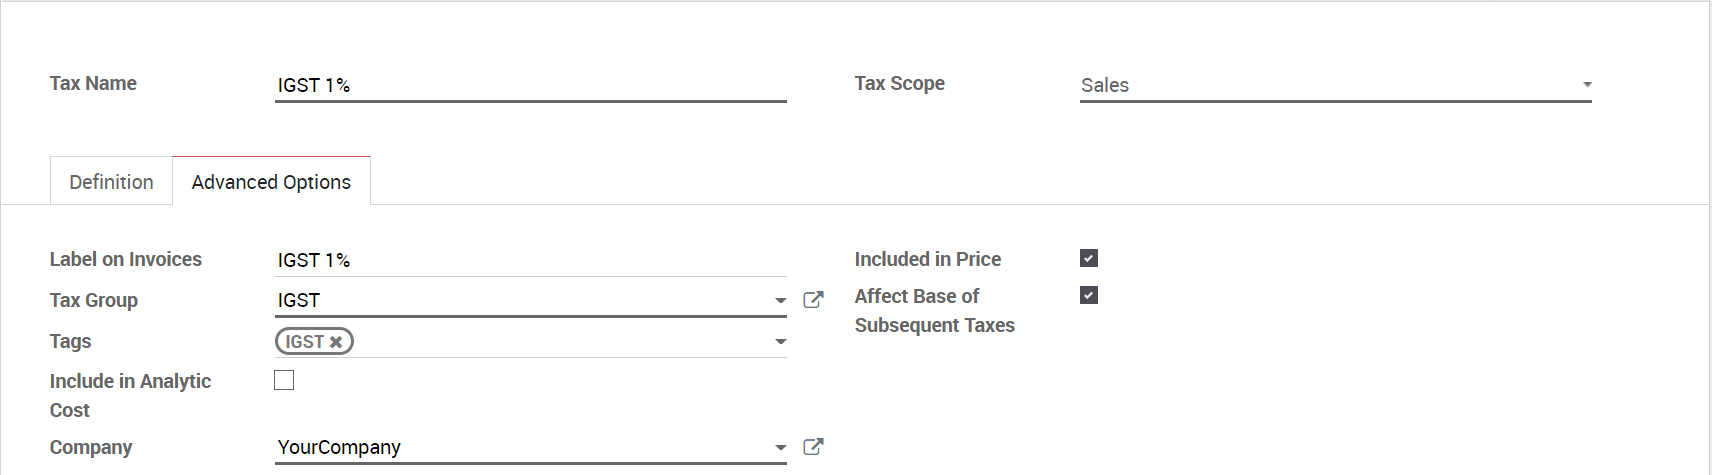
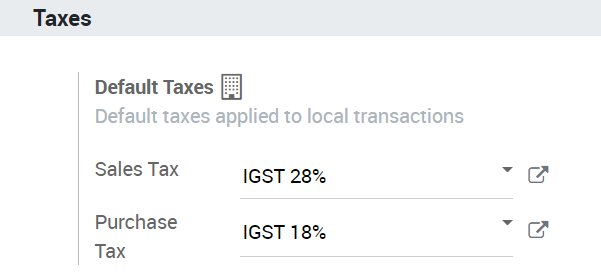
Your company must be configured with tax excluded by default. This is usually the default configuration, but you can check your Default Sale Tax from the menu Configuration ‣ Settings of the Accounting application.

Once done, you can create a B2C pricelist. You can activate the pricelist feature per customer from the menu: Configuration ‣ Settings of the Sale application. Choose the option different prices per customer segment.

Once done, create a B2C pricelist from the menu Configuration ‣ Pricelists. It’s also good to rename the default pricelist into B2B to avoid confusion.

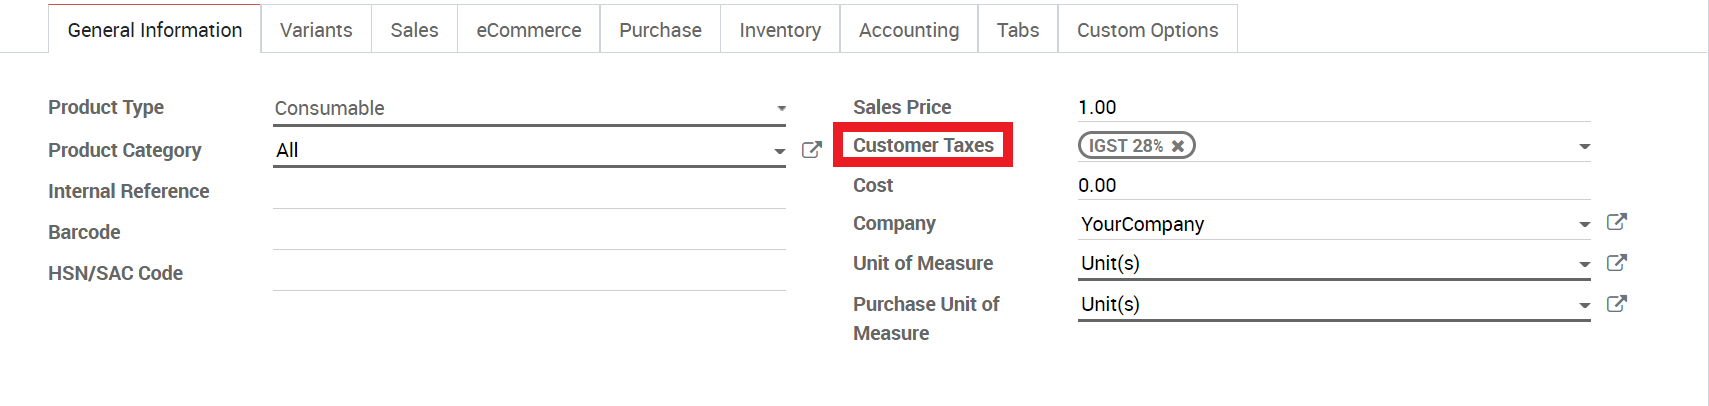
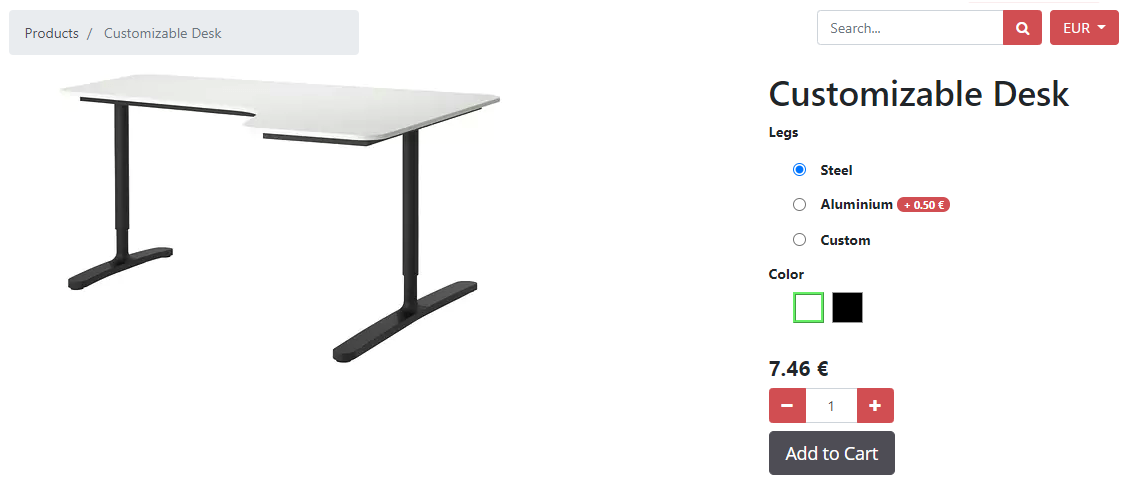
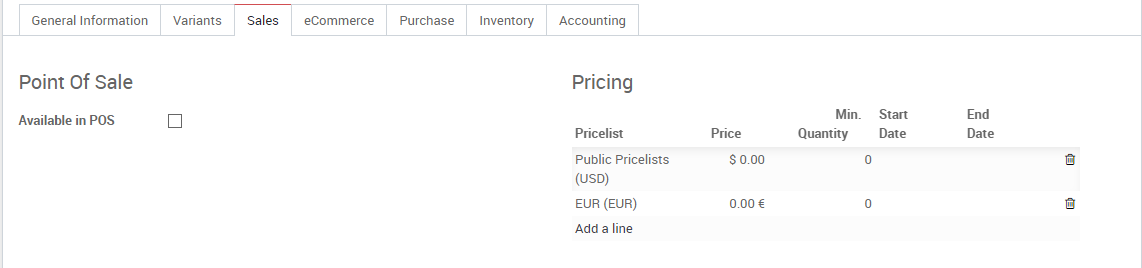
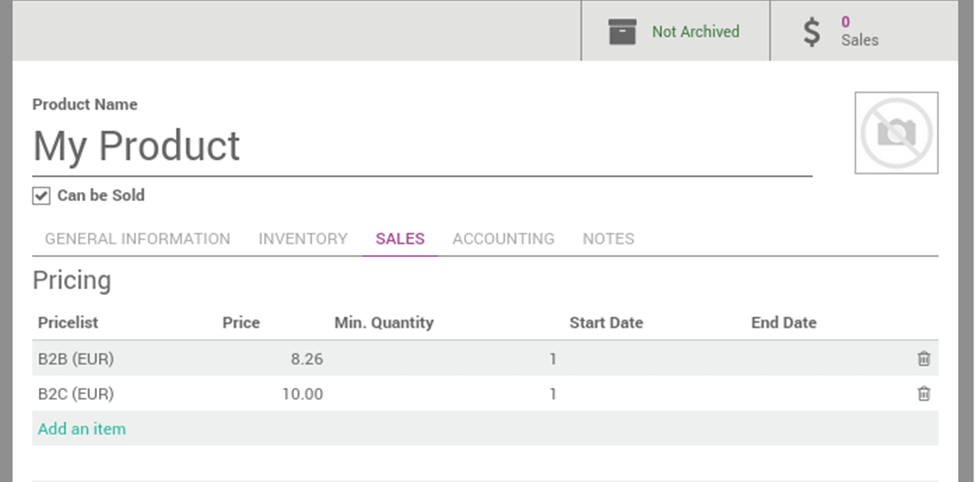
Then, create a product at 8.26€, with a tax of 21% (defined as tax not included in price) and set a price on this product for B2C customers at 10€, from the Sales ‣ Products menu of the Sales application:

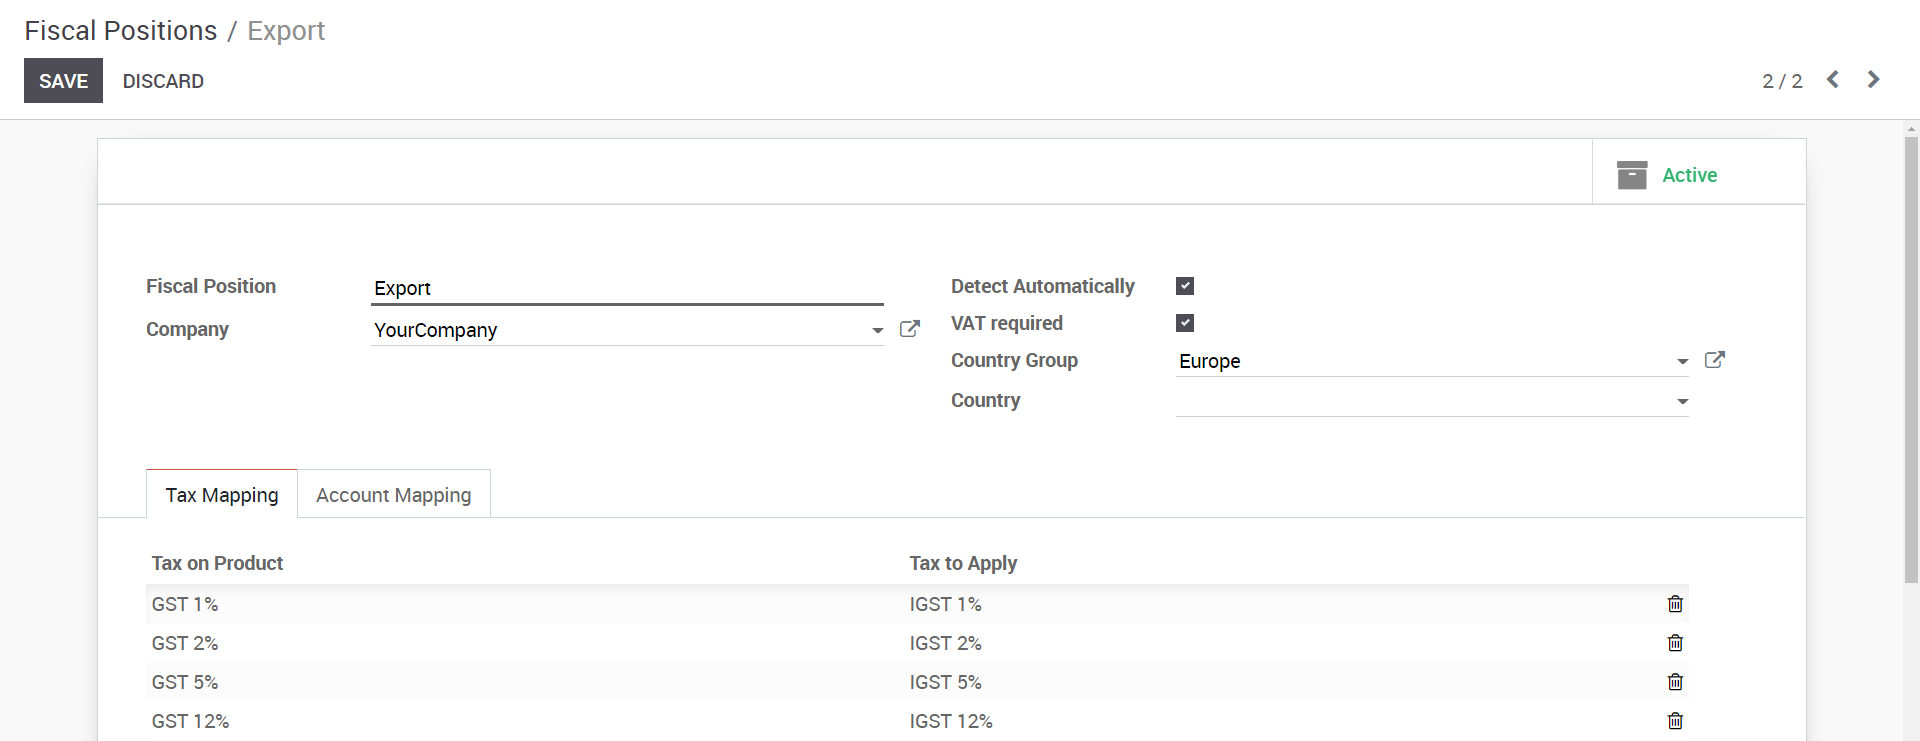
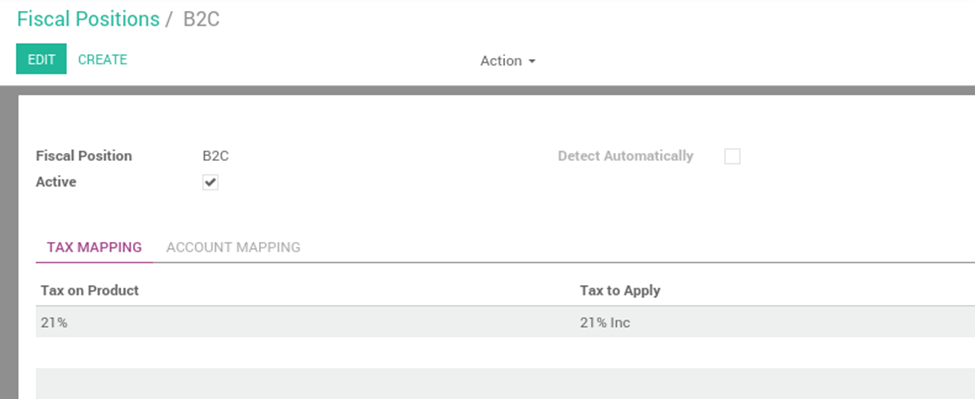
Setting the B2C fiscal position

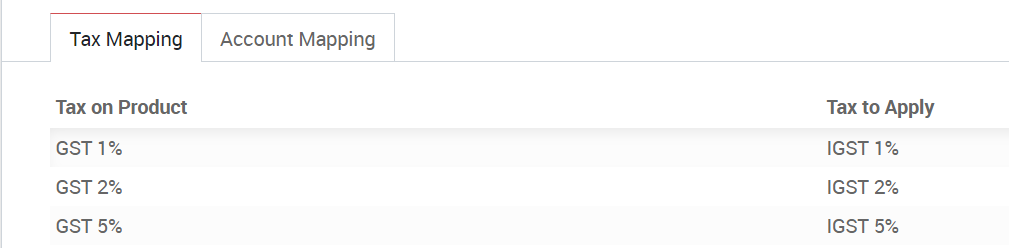
From the accounting application, create a B2C fiscal position from this menu: Configuration ‣ Fiscal Positions. This fiscal position should map the VAT 21% (tax excluded of price) with a VAT 21% (tax included in price)

Test by creating a quotation

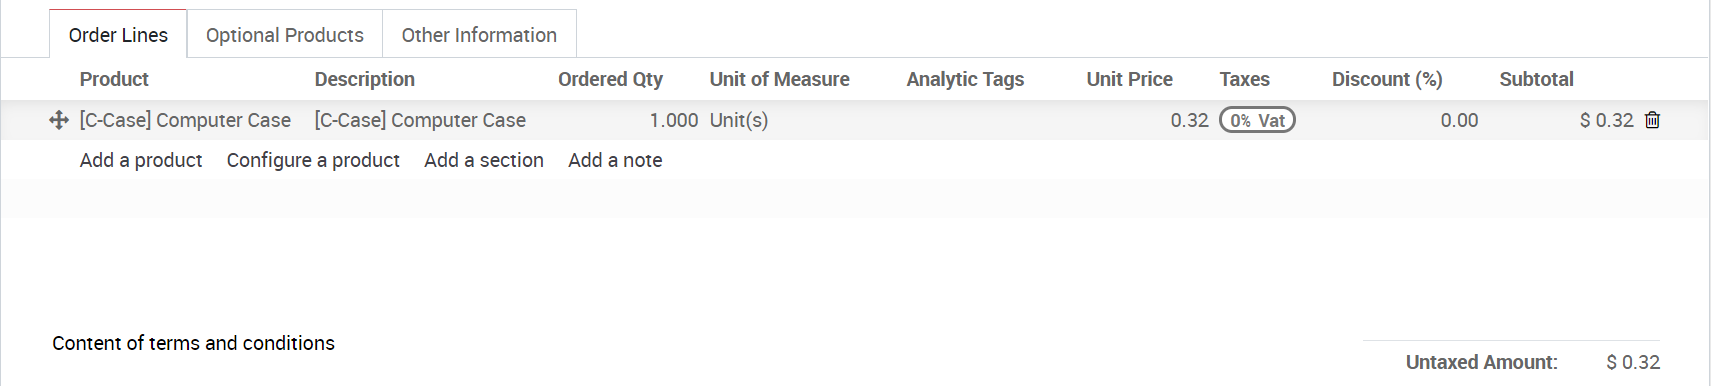
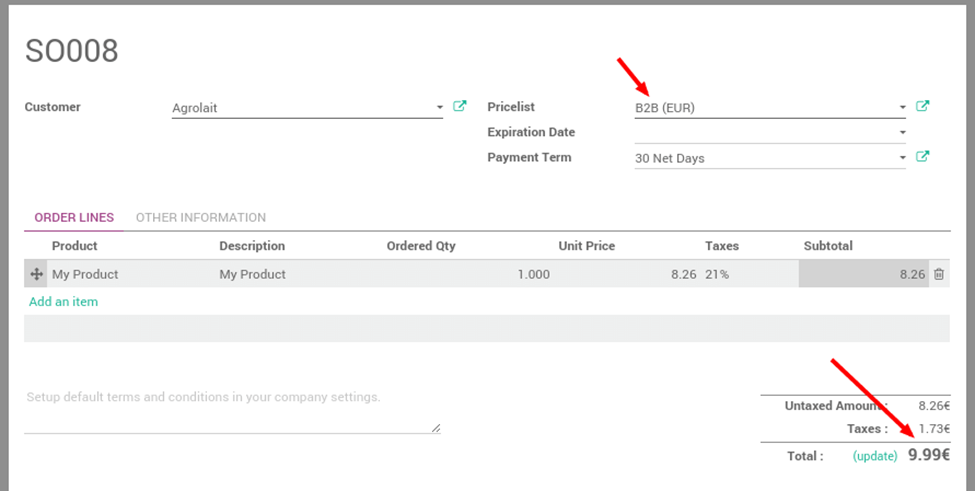
Create a quotation from the Sale application, using the Sales ‣ Quotations menu. You should have the following result: 8.26€ + 1.73€ = 9.99€.

Then, create a quotation but change the pricelist to B2C and the fiscal position to B2C on the quotation, before adding your product. You should have the expected result, which is a total price of 10€ for the customer: 8.26€ + 1.74€ = 10.00€.

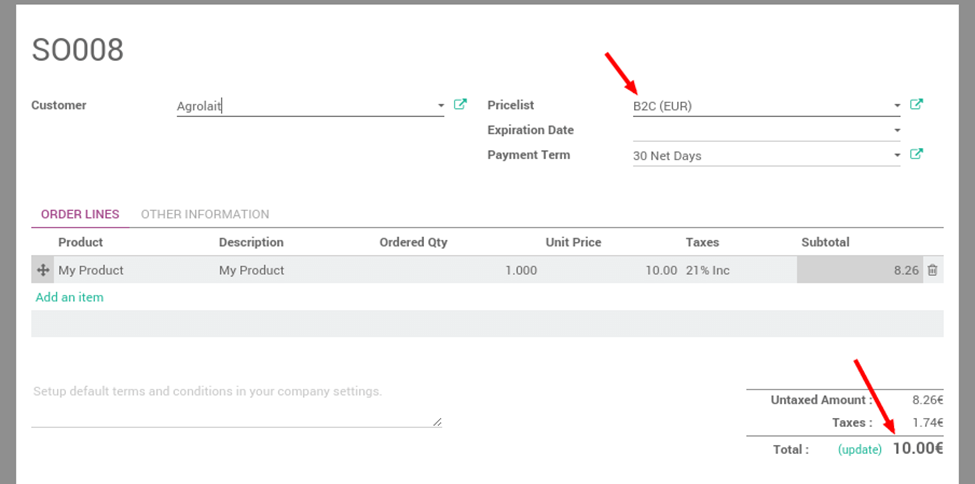
This is the expected behavior for a customer of your shop.

Avoid changing every sale order

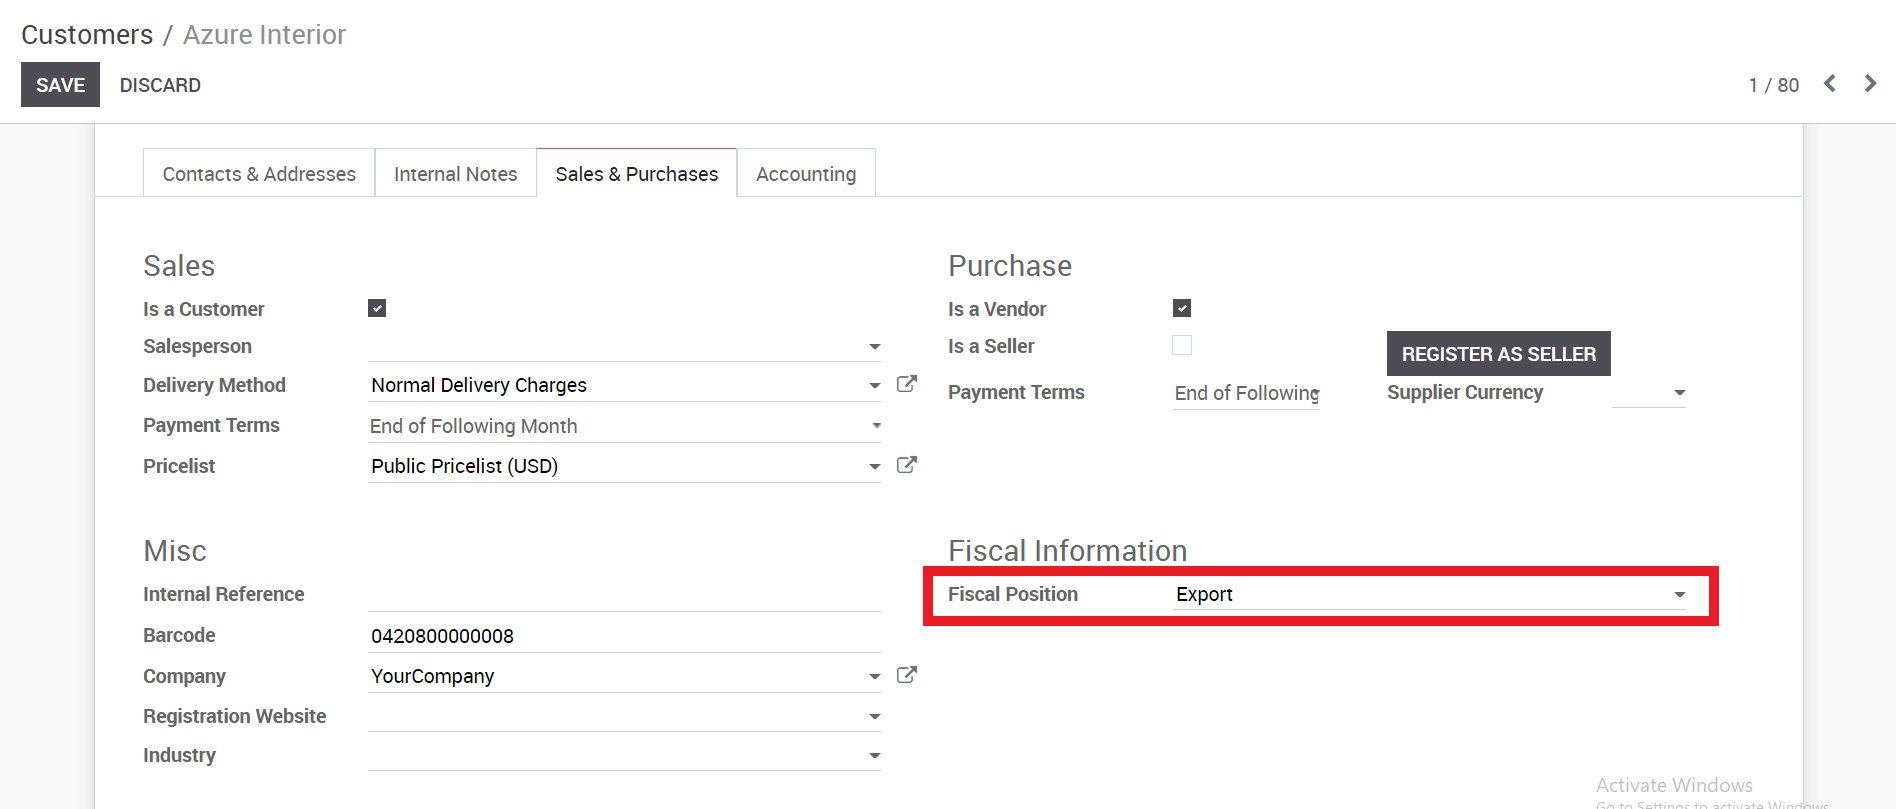
If you negotiate a contract with a customer, whether you negotiate tax included or tax excluded, you can set the pricelist and the fiscal position on the customer form so that it will be applied automatically at every sale of this customer.

The pricelist is in the Sales & Purchases tab of the customer form, and the fiscal position is in the accounting tab.

Note that this is error prone: if you set a fiscal position with tax included in prices but use a pricelist that is not included, you might have wrong prices calculated for you. That’s why we usually recommend companies to only work with one price reference.


3.5.5. How to set tax-included prices

In most countries, B2C prices are tax-included. To do that in KiuBMP, check Included in Price for each of your sales taxes in Accounting Configuration Accounting Taxes.

This way the price set on the product form includes the tax. As an example, let’s say you have a product with a sales tax of 10%. The sales price on the product form is $100.

If the tax is not included in the price, you will get:

    • Price without tax: $100
    • Taxes: $10
    • Total to pay: $110

If the tax is included in the price:

      • Price without tax: 90.91
      • Taxes: $9.09
      • Total to pay: $100

You can rely on following documentation if you need both tax-included (B2C) and tax-excluded prices (B2B): How to manage prices for B2B (tax excluded) and B2C (tax included)?.

Show tax-included prices in eCommerce catalog

By default prices displayed in your eCommerce catalog are tax-excluded. To display it in tax-included, check Show line subtotals with taxes included (B2C) in Sales ‣ Configuration ‣ Settings (Tax Display).


3.5.4. How to adapt taxes to my customer status or localization

Most often sales tax rates depend on your customer status or localization. To map taxes, KIU BMP brings the so-called Fiscal Positions.

Create tax mapping

A fiscal position is just a set of rules that maps default taxes (as defined on product form) into other taxes. In the screenshot below, foreign customers get a 0% tax instead of the default 15%, for both sales and purchases.

The main fiscal positions are automatically created according to your localization. But you may have to create fiscal positions for specific use cases. To define fiscal positions, go to Invoicing/Accounting ‣ Configuration ‣ Fiscal Positions.

Note

If you use KIU BMP Accounting, you can also map the Income/Expense accounts according to the fiscal position. For example, in some countries, revenues from sales are not posted in the same account than revenues from sales in foreign countries.

Adapt taxes to your customer status

If a customer falls into a specific taxation rule, you need to apply a tax-mapping. To do so, create a fiscal position and assign it to your customers.

KIU BMP will use this specific fiscal position for any order/invoice recorded for the customer.

Note

If you set the fiscal position in the sales order or invoice manually, it will only apply to this document and not to future orders/invoices of the same customer.

Adapt taxes to your customer address (destination-based)

Depending on your localization, sales taxes may be origin-based or destination-based. Most states or countries require you to collect taxes at the rate of the destination (i.e. your buyer’s address) while some others require to collect them at the rate effective at the point of origin (i.e. your office or warehouse).

If you are under the destination-based rule, create one fiscal position per tax-mapping to apply.

  • Check the box Detect Automatically.
  • Select a country group, country, state or city to trigger the tax-mapping.

This way if no fiscal position is set on the customer, KIU BMP will choose the fiscal position matching the shipping address on creating an order.

Note

For eCommerce orders, the tax of the visitor’s cart will automatically update and apply the new tax after the visitor has logged in or filled in his shipping address.

Specific use cases

If, for some fiscal positions, you want to remove a tax, instead of replacing by another, just keep the Tax to Apply field empty.

If, for some fiscal positions, you want to replace a tax by two other taxes, just create two lines having the same Tax on Product.

Note

The fiscal positions are not applied on assets and deferred revenues.


3.5.3. How to set default taxes

Taxes applied in your country are installed automatically for most localizations.

Default taxes set in orders and invoices come from each product’s Invoicing tab. Such taxes are used when you sell to companies that are in the same country/state than you.

To change the default taxes set for any new product created go to Invoicing/Accounting Configuration Settings.

Tip

If you work in a multi-company environment, the sales and purchase taxes may have a different value according to the company you work for. You can login into two different companies and change this field for each company.


3.3.6. Add terms & conditions on orders

Specifying Terms and Conditions is essential to ensure a good relationship between customers and sellers. Every seller has to declare all the formal information which include products and company policy; allowing the customer to read all those terms everything before committing to anything.

KIU BMP lets you easily include your default terms and conditions on every quotation, sales order and invoice.

Set up your default terms and conditions

Go to SALES ‣ Configuration ‣ Settings and activate Default Terms & Conditions.

In that box you can add your default terms & conditions. They will then appear on every quotation, SO and invoice.


3.3.4. Stimulate customers with quotations deadline

As you send quotations, it is important to set a quotation deadline, both to entice your customer into action with the fear of missing out on an offer and to protect yourself. You don’t want to have to fulfill an order at a price that is no longer cost effective for you.

Set a deadline

On every Quotation or Sales order you can add an Validity (Expiry Date).

Use deadline in templates

You can also set a default deadline in a Quotation Template. Each time that template is used in a quotation, that deadline is applied. 

On your customer side, they will see this:

3.5.2. How to sell in foreign currencies

Pricelists can also be used to manage prices in foreign currencies.

  • Check Allow multi currencies in Invoicing/Accounting ‣ Settings. As admin, you need Adviser access rights on Invoicing/Accounting apps.
  • Create one pricelist per currency. A new Currency field shows up in pricelist setup form.

Tip

To activate a new currency, go to Accounting ‣ Configuration ‣ Currencies, select it in the list and press Activate in the top-right corner. Now it will show up in currencies drop-down lists.

Prices in foreign currencies can be defined in two fashions.

Automatic conversion from public price

The public price is in your company’s main currency (see Accounting ‣ Settings) and is set in product detail form.


The conversion rates can be found in Accounting ‣ Configuration ‣ Currencies. They can be updated from Yahoo or the European Central Bank at your convenience: manually, daily, weekly, etc. See Accounting ‣ Settings.

With original pricelist

After choosing EUR pricelist

Set your own prices

This is advised if you don’t want your pricing to change along with currency rates.


3.5.1. How to import Products with Categories and Variants

Import templates are provided in the Import Tool of the most common data to import (contacts, products, bank statements, etc.). You can open them with any spreadsheet software (Microsoft Office, OpenOffice, Google Drive, etc.).

How to customize the file

  • Remove columns you don’t need. However, we advise you to not remove the ID column (see why below).
  • Set a unique ID to every single record by dragging down the ID sequencing.
  • Don’t change the labels of columns you want to import. Otherwise, KIU BMP won’t recognize them anymore, and you will have to map them on your own in the import screen.
  • Feel free to add new columns, but the fields need to exist in KIU BMP. If KIU BMP fails in matching the column name with a field, you can match it manually when importing by browsing a list of available fields.

Why an “ID” column?

The ID is a truly unique identifier for the line item. Feel free to use one of your previous software to ease the transition into KIU BMP.

Setting an ID is not mandatory when importing, but it helps in many cases:

  • Update imports: you can import the same file several times without creating duplicates.
  • Import relation fields (see here below).

How to import relation fields

An KIU BMP object is always related to many other objects (e.g., a product is linked to product categories, attributes, vendors, etc.). To import those relations, you need to import the records of the related object first from their own list menu.

You can do this using the name of the related record or its ID. The ID is expected when two records have the same name. In such a case, add ” / ID” at the end of the column title (e.g., for product attributes: Product Attributes / Attribute / ID).


3.4.5. Sell subscriptions

Selling subscription products will give you predictable revenue, making planning ahead much easier.

Make a subscription from a sales order

From the sales app, create a quotation to the desired customer, and select the subscription product your previously created.

When you confirm the sale the subscription will be created automatically. You will see a direct link from the sales order to the Subscription in the upper right corner.

3.4.4. Re-invoice expenses to customers

It often happens that your employees have to spend their personal money while working on a project for your client. Let’s take the example of an consultant paying an hotel to work on the site of your client. As a company, you would like to be able to invoice that expense to your client.

Expenses configuration

To track & invoice expenses, you will need the expenses app. Go to Apps ‣ Expenses to install it.

You should also activate the analytic accounts feature to link expenses to the sales order, to do so, go to Invoicing ‣ Configuration ‣ Settings and activate Analytic Accounting.

Add expenses to your sales order

From the expense app, you or your consultant can create a new one, e.g. the hotel for the first week on the site of your customer.

You can then enter a relevant description and select an existing product or create a new one from right there.

Here, we are creating a Hotel product:

Under the invoicing tab, select Delivered quantities and either At cost or Sales price as well depending if you want to invoice the cost of your expense or a previously agreed on sales price.

To modify or create more products go to Expenses ‣ Configuration ‣ Expense products.

Back on the expense, add the original sale order in the expense to submit.

It can then be submitted to the manager, approved and finally posted.

It will then be in the sales order and ready to be invoiced.