7.2.2. What is an account type and how to configure it

→ What is an account type

An account type is a name or code given to an account that indicates the account’s purpose.
In KIU, Account Types are used for information purpose, to generate country-specific legal reports, set the rules to close a fiscal year and generate opening entries.
Basically Account types categorize general account with some specific category according to its behaviour or purpose.

→ Which are account types in KIU

KIU covers all accounting types. Therefore, you cannot create new account types. Just pick the one related to your account.

List of account types

Receivable

Payable

Bank and Cash

Current Assets

Non-current Assets

Prepayments

Fixed Assets

Current Liabilities

Non-current Liabilities

Equity

Current Year Earnings

Other Income

Income

Depreciation

Expenses

Direct Costs

→  How to configure accounts

Account types are automatically created when installing a chart of account. By default, KIU provides a lot of chart of accounts, just install the one related to your country.
It will install generic accounts. But if it does not cover all your cases, you can create your own accounts too.
To create a new accounts, go to the Accounting Module. Open the menu Adviser ‣ Chart of Accounts, the click on the Create button.
Type
Account Type is used for information purpose, to generate country-specific legal reports, and set the rules to close a fiscal year and generate opening entries.
Tags
Optional tags you may want to assign for custom reporting

Account Currency
Forces all moves for this account to have this account currency.
Type
The ‘Internal Type’ is used for features available on different types of accounts: liquidity type is for cash or bank accounts, payable/receivable is for vendor/customer accounts.
Allow Reconciliation
Check this box if this account allows invoices & payments matching of journal items.

7.2.1. General Setting

First of all, you should configure your accounting module through the following steps:

  • Chart of accounts: configure your company data
  • Fiscal year: Choose the Fiscal year last day and Lock entries. There are two levels of locking entries:
  • Lock Date for Non-Advisers: All users except advisers will be locked for editing accounts prior to and inclusive of this date.
  • Lock Date: No users, including advisers can edit accounts prior to and inclusive of this date.
  • Accounting & Finance: Company currency will be set as default at this configuration.
  • Bank & Cash
  • Multi Currencies
  • Invoicing & Payments: Set default sale tax and purchase tax, which will link directly in product form.  
  • Analytic accounting
  • Overdue payments: set the message content to be sent for overdue payment.

7.1.2. Accounting Definition in Kiu BMP

Journal

A journal is like a folder in which you record all transactions of the same type: all the statements of a bank account, all customer invoices, all supplier bills. It’s used to organize similar transactions together.

Payment Terms

Payment terms describe how and when a customer invoice (or supplier bill) should be paid over the period of time. Example: 30% direct payment, balance due in two months.

Bank Reconciliation

Bank reconciliation is the process of matching transactions from your bank records with existing journal items or creating new journal items on the fly. It is a process of verification to ensure that your bank and your records in Kiu BMP say the same thing.

Reconciliation

Journal items reconciliation is the process of linking several journal items together like an invoice and payment. This allows you to mark invoices as paid. It is also useful when comparing values of ‘goods received not invoiced’ and ‘goods shipped not billed’ accounts.

 Batch deposit

Batch deposit group several payment orders (usually checks) that are deposited together at the bank at the same time. This allows an easy reconciliation with the bank statement line if the line has one line per deposit.


Journal Entry

A journal entry is an accounting transaction, usually related to a financial document: invoice, payment, receipt, etc. A journal entry always consists of at least two lines, described here as journal items, which credit or debit specific accounts. The sum of the credits of all journal items of a journal entry must be equal to the sum of their debits for the entry to be valid.

Journal Item

A line of a journal entry, with a monetary debit or credit associated with a specific account.

Analytic Accounts

Sometimes called Cost Accounts, are accounts that are not part of the chart of accounts and that allow you to track costs and revenues. Analytic accounts are usually grouped by projects, departments, etc. for analysis of a company’s expenditures. Every journal item is posted in a regular account in the chart of account and can be posted to an analytic account for the purpose of reporting or analysis.

Analytic Entries

Costs or revenues posted to analytic accounts, usually related to journal entries.

Sales Receipt

A receipt or other slip of paper issued by a store or other vendor describing the details of a purchase (amount, date, department, etc.). Sales receipt are usually used instead of invoices if the sale is paid in cash in a store.

Fixed Assets

Property owned by the company, usually with a useful life greater than one reporting period. Kiu BMP Asset management is used to manage the depreciation / amortization of the asset over the period of time. Typical examples would be capital equipment, vehicles, and real estate.

Deferred Revenues

Are used to recognize revenues for sales of services that are provided over a long period of time. If you sell a 3 year maintenance contract, you can use the deferred revenue mechanism to recognize 1/36 of the revenue every month until the contract expires, rather than taking it all initially or at the end.

Fiscal Position

Define the taxes that should be applied for a specific customer/vendor or invoice. Example: If some customers benefit from specific taxes (government, construction companies, EU companies that are VAT subjected,…), you can assign a fiscal position to them and the right tax will be selected according to the products they buy.

7.1.1. The Accounting behind Kiu BMP

Double-entry bookkeeping

Kiu BMP automatically creates all the behind-the-scenes journal entries for each of your accounting transactions: customer invoices, point of sale order, expenses, inventory moves, etc.

Kiu BMP uses the rules of double-entry bookkeeping system: all journal entries are automatically balanced (sum of debits = sum of credits).

Accrual and Cash Basis Methods

Kiu BMP supports both accrual and cash basis reporting. This allows you to report income/ expense at the time transactions occur (i.e., accrual basis), or when payment is made or received (i.e., cash basis).

Multi-currencies

Every transaction is recorded in the default currency of the company. For transactions occurring in another currency, Kiu BMP stores both the value in the currency of the company and the value in the currency of the transaction. Kiu BMP can generate currencies gains and losses after the reconciliation of the journal items.

International Standards

Kiu BMP accounting supports more than 50 countries. The Kiu BMP core accounting implements accounting standards that are common to all countries. Specific modules exist per country for the specificities of the country like the chart of accounts, taxes, or bank interfaces.

In particular, Kiu BMP’s core accounting engine supports:

  • Anglo-Saxon Accounting (U.S., U.K., and other English-speaking countries including Ireland, Canada, Australia, and New Zealand) where cost of goods sold are reported when products are sold/delivered.
  • European accounting where expenses are accounted at the supplier bill.

Kiu BMP also have modules to comply with IFRS rules.

Accounts Receivable & Payable

By default, Kiu BMP uses a single account for all account receivable entries and one for all accounts payable entries. You can create separate accounts per customers/suppliers, but you do not need to.

As transactions are associated with customers or suppliers, you get reports to perform analysis per customer/supplier such as the customer statement, revenues per customers, aged receivables/payables, …

Wide range of financial reports

In Kiu BMP, you can generate financial reports in real time. Kiu BMP reports range from basic accounting reports to advanced management reports. Kiu BMP reports include:

  • Performance reports (such as Profit and Loss, Budget Variance)
  • Position reports (such as Balance Sheet, Aged Payables, Aged Receivables)
  • Cash reports (such as Bank Summary)
  • Detail reports (such as Trial Balance and General Ledger)
  • Management reports (such as Budgets, Executive Summary)

Kiu BMP’s also offers a service to customize your own report based on your own formula.

Import bank feeds automatically

Bank reconciliation is a process that matches your bank statement lines, as supplied by the bank, to your accounting transactions in the general ledger.

Kiu BMP speeds up bank reconciliation by matching most of your imported bank statement lines to your accounting transactions. Kiu BMP also remembers how you’ve treated other bank statement lines and provides suggested general ledger transactions.

Calculate the tax you owe your tax authority

Kiu BMP totals all your accounting transactions for your tax period and uses these totals to calculate your tax obligation. You can then check your sales tax by running Kiu BMP’s Tax Report.


Inventory Valuation

Kiu BMP support both periodic (manual) and perpetual (automated) inventory valuations. The available methods are standard price, average price, LIFO (for countries allowing it) and FIFO.

Easy retained earnings

Retained earnings are the portion of income retained by your business. Kiu BMP automatically calculates your current year earnings in real time so no year-end journal or rollover is required. This is calculated by reporting the profit and loss balance to your balance sheet report automatically.

7. ACCOUNTING

7.1. Overview & Workflows
7.1.1. The Accounting behind Kiu BMP
7.1.2. Accounting Definition in Kiu BMP

7.2. Configuration
7.2.1. General Setting
7.2.2. What is an account type and how to configure it
7.2.3. Journal configuration
7.2.4. Bank Account configuration
7.2.5. Taxes configuration
7.2.6. Payment Terms configuration
7.2.7. Analytic Accounts configuration
7.2.8. Fiscal Position configuration
7.2.9. Multi Currencies configuration

7.3. Purchase – Vendor Bills
7.3.1. How to record a Vendor Bills
7.3.2. How to register payment for Vendor Bill
7.3.3. How to manually match payment & bill/ invoice
7.3.4. Where to check Payable Ledger

7.4. Sales – Customer Invoices
7.4.1. How to issue a Customer Invoice
7.4.2. How to invoice a shipping cost to the customer
7.4.3. How to register payment for Customer Invoice
7.4.4. How to manually match payment & invoice
7.4.5. How to setup discount for early payment
7.4.6. How to modify a validated invoice
7.4.7. How to edit or refund an invoice
7.4.8. Where to check Receivable Ledger
7.4.9. How to automate Customer follow-up

7.5. Journal entry
7.5.1. How to create manual journal entries
7.5.2. How to input opening balance

7.6. How to reconcile Bank Statement and mass-booking your journal entries in Kiu BMP
7.6.1. Register you bank statements manually
7.6.2. Create Reconciliation Models
7.6.3. Register your payments based on the Reconciliation mode
7.6.4. Close Bank Statements
7.6.5. How to record & reconcile Internal transfer

7.7. Accounting for Inventory
7.7.1. Impact on the average price valuation when returning goods
7.7.2. How to do an inventory valuation? (Continental Accounting)
7.7.3. How to do an inventory valuation? (Anglo-Saxon Accounting)

7.8. Asset
7.8.1. Classify Asset Types
7.8.2. Set up a Product as an Asset
7.8.3. Purchasing Asset process
7.8.4. Depreciate an Asset
7.8.5. Sell or Dispose an Asset
7.8.6. Asset Report

7.9. Deferred Revenues
7.9.1. General & Configuration
7.9.2. Classify Deferred Revenue Types
7.9.3. Set up a Product as a Deferred Revenue
7.9.4. Selling Deferred Revenue process
7.9.5. Generate Deferred Revenue Journal Entries
7.9.6. Deferred Revenue Report

7.10. Budget

7.11. Analytic Account

7.12. Accounting Report
7.12.1. How to do a year end in Kiu BMP? (Close a fiscal year)
7.12.2. Instruction to read Kiu BMP Financial Reports effectively


6.10.2. How to integrate landed costs in the cost of the product?

  • Overview

Landed costs include all charges associated to a good transfer.

Landed cost includes = Cost of product + Shipping + Customs + Risk

All of these components might not be applicable in every shipment, but relevant components must be considered as a part of the landed cost. We have to identify landed cost to decide sale price of product because it will impact on company profits.

  • Configuration
  • Go to Inventory ‣ Configuration ‣ Setting. Check accounting option Include landed costs in product costing computation & Perpetual inventory valuation, then click on Apply to save changes.

Landed Cost Types: Start by creating specific products to indicate your various Landed Costs, such as freight, insurance or customs duties. Go to Inventory ‣ Configuration ‣ Landed Cost types.

  • Then go to the Purchase ‣ Configuration ‣ Setting. Choose costing method Use a ‘Fixed’, ‘Real’ or ‘Average’ price costing method, then click on Apply to save changes.

Note: Landed costs are only possible for product configured in real time valuation with real price costing method. The costing method is configured on the product category

  • Link landed costs to a transfer

To calculate landed costs, go to Inventory ‣ Inventory Control ‣ Landed Costs.

Click on the Create button and select the picking  you want to attribute landed costs. Select the account journal in which to post the landed costs. We recommend you to create a specific journal for landed costs. Therefore it will be easier to keep track of your postings.

Click the Compute button to see how the landed cost will be split across the picking lines. To confirm the landed cost attribution, click on the Validate button

6.10.1. How to process Raw Material to Manufacture

For a product, you can only choose Inventory Valuation Method between Perpetual (automated) or Periodic (manual)

If you want journal entries posted automatically, you should set Raw Material category as Perpetual (automated). You can also replace Stock Output Account by account Cost of Goods Sold if you want to skip allocation step.

Then the process in the system will be as follows:

  1. Create a BoM (Bill of Material): Manufacturing ‣ Master Data ‣ Bill of Material ‣ Create BoM

Coffee bean, Sugar and Milk are Stockable Products and belong to Raw Material category.

Milked coffee are Consumable Product and belong to Finished Product category.

  1. Purchase 3 raw materials that have been listed above (e.g: 10kg coffee bean, 10kg sugar, 10L milk)

Once you receive goods, the journal entries will be generated automatically.

  1. Sell 1 cup of Milked Coffee on POS ‣ Validate the payment ‣ The journal entries will be generated automatically after payment (If you set Stock Output as Cost of Goods Sold, the entries will be generated accordingly)

Inventory Valuation Report will be updated automatically according to BoM

4. When you close the session, the journal entries will be generated automatically as following:

  1. At the end of the month, you can check the Inventory Valuation in your warehouse and update the actual quantities if the theory data is different from the incurred data.

There are 2 ways to update it. One is manually updating one by one product. Second is using Import File.

Make sure that your products have been set Cost price already. (Cost price is set on your product form)
‣ See How to update Cost price of Product by import in 1.2.5. How to adapt an import template & How to import data into Kiu BMP

Go to Inventory Module ‣ Inventory Control ‣ Inventory Adjustment ‣ Create ‣ Choose to adjust all products/ product categories/ one product… ‣ Start Inventory

In this example, I choose one product “Milk” as below

Then Validate Inventory Adjustment form:

The journal entry will be generated as follows: (If you set Stock Output of Milk product as Cost of Goods Sold, the entries will be generated accordingly)

→ How to update cost price of product by import?

You can download and have a look at Update cost price template file here.

From Inventory Module ‣ Inventory Control ‣ Product ‣ Choose view type as List at the right top screen ‣ Choose products to export ‣ Action ‣ Export ‣ Choose excel format ‣ Choose these following fields: Name, Cost Price ‣ Save to file

Update cost price in the exported file ‣ Import the file into the system ‣ Choose “Don’t Import” column Name of product

Then Validate ‣ Import

→  How to import Inventory Adjustment?

Please download Inventory Adjustment Import Template here.

Step 1: Export Products. Fields are needed to export: Name, Internal Reference, Unit

Step 2: Fill data from exported file into Sheet named Product in Import Template

Step 3: Inventory Module ‣ Configuration ‣ Locations ‣ Export Location list to get Location ID

Step 4: Fill data from exported file into Sheet named Location in Import Template

Step 5: Fill data into Green column into Sheet named Inventory Adjustment in Import template.

The ID column in the sheet can be any value but you need to make sure that it’s unique for Inventory Adjustment. Or the data you input will be merged with other Inventory Adjustment.

After finishing, Delete the 1st Row in that sheet. Your file is ready to import now.

Step 6: Inventory Module ‣ Inventory Control ‣ Inventory Adjustments ‣ Import ‣ Load File ‣ Validate ‣ Import ‣ Start Inventory ‣ Validate Inventory

6.9.7. What is a removal strategy (FIFO, LIFO, and FEFO)?

  • Overview

Removal strategies are usually in picking operations to select the best products in order to optimize the distance for the worker, for quality control purposes or due to reason of product expiration.

When a product movement needs to be done, the system will find available products that can be assigned to shipping. The way Kiu BMP assign these products depend on the removal strategy that is defined on the product category or on the location.

  • Configuration

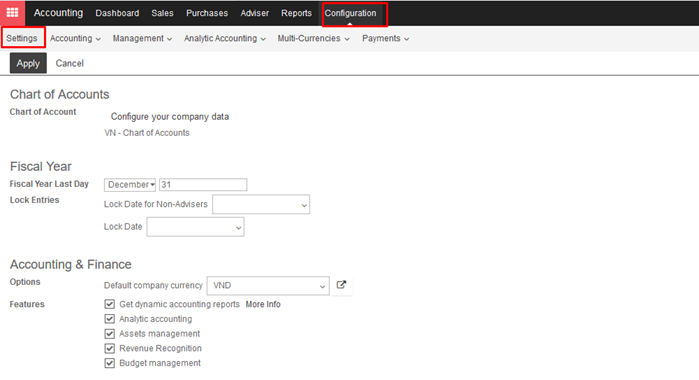
Go to Inventory -> Configuration -> Settings. Check Track lots or serial numbers, Manage several warehouses, each one composed by several by stock locations and Advanced routing of products using rules, then click on Apply.

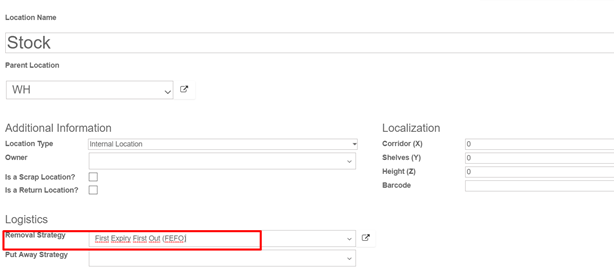
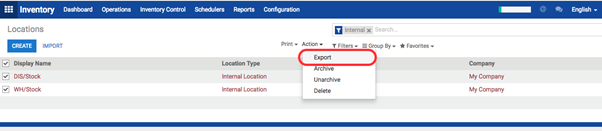
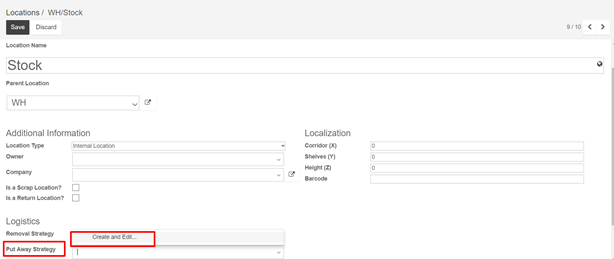
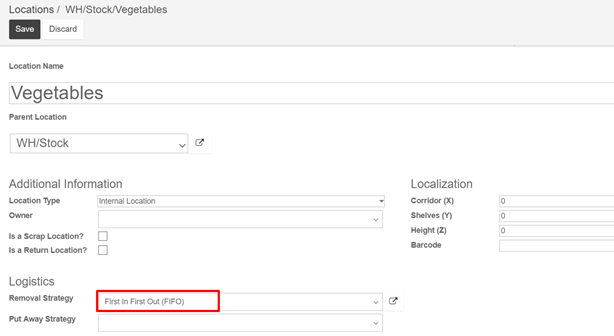
Then, open Configuration ‣ Locations and open the location on which you want to apply a removal strategy

  • Types of removal strategy

  • First In First Out (FIFO)

A First In First Out strategy implies that the products that were stocked first will move out first. Companies should use FIFO method if they are selling perishable goods. Companies selling products with relatively short demand cycles, such as clothes, also may have to pick FIFO to ensure they are not stuck with outdated styles in inventory.

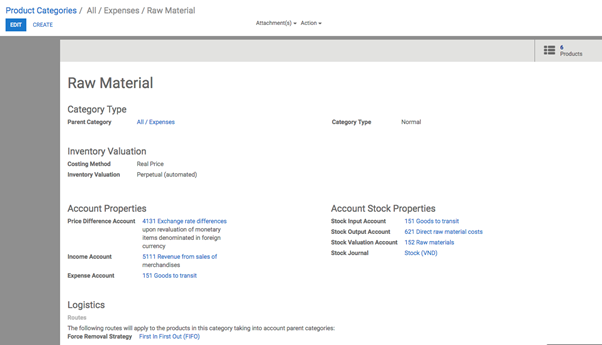
Go to Inventory ‣ Configuration ‣ Locations, open the stock location and set FIFO removal strategy.

Let’s take one example of FIFO removal strategy.

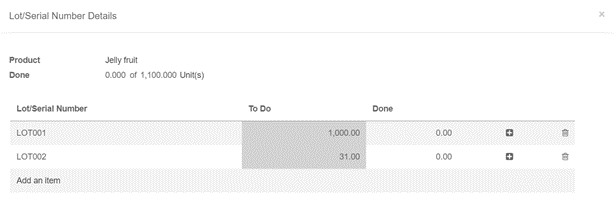
In your warehouse stock (WH/Stock) location, there are 2 lots of Jelly fruits availableYou can find details of available inventory in inventory valuation report.

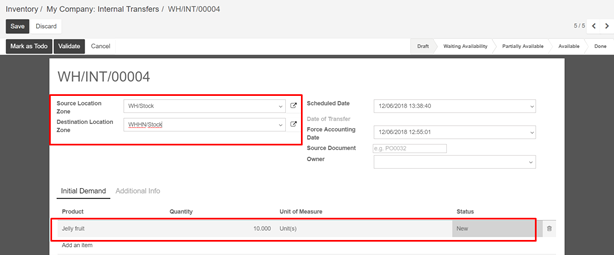
Create one sale order 1100 unit of Jelly fruit and confirm it. You can see in the outgoing shipment product that the Jelly fruit are assigned with the oldest lots, using the FIFO removal strategy.

  • First Expiry First Out (FEFO)

In FEFO warehouse management, the products are dispatched from the warehouse according to their expiration date.

Go to Inventory ‣ Configuration ‣ Setting. Check the option Define Expiration date on serial numbers. Then click on Apply to save changes.

This will allow you to set four expiration fields for each lot or serial number: best before date, end of life date, alert date and removal date. These dates can be set from Inventory Control ‣ Lots/ Serial Numbers.

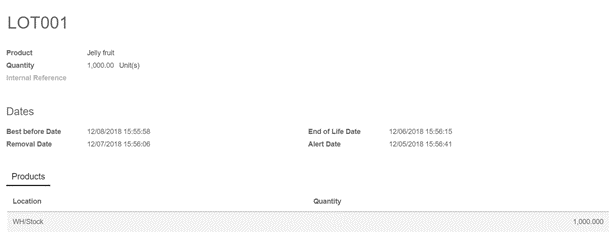
  • Best Before Date: This is the date on which the goods with this serial/lot number start deteriorating, without being dangerous yet.
  • End of Life Date: This is the date on which the goods with this serial/lot number may become dangerous and must not be consumed.
  • Removal Date: This is the date on which the goods with this serial/lot number should be removed from the stock. Using the FEFO removal strategy, goods are picked for delivery orders using this date.
  • Alert Date: This is the date on which an alert should be sent about the goods with this serial/lot number.

Lots will be picked based on their removal date, from earliest to latest. Lots without a removal date defined will be picked after lots with removal dates.

All dates except removal date are for informational and reporting purposes only. Lots that are past any or all of the above expiration dates may still be picked for delivery orders, and no alerts will be sent when lots pass their alert date.

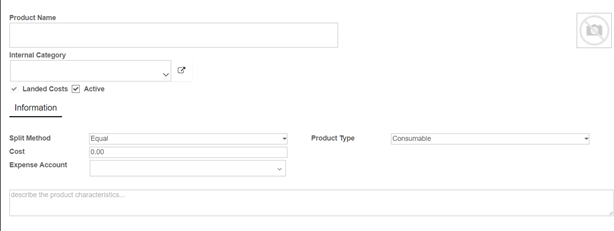
Expiration dates on lots can also be set automatically when goods are received into stock. After enabling expiration dates on serial numbers, four new fields will become available in the inventory tab of the product form: product life time, product using time, product removal time, and product alert time. When an integer is entered into one of these fields, the expiration date of a lot/serial of the product in question will be set to the creation date of the lot/serial number plus the number of days entered in the time increment field. If the time increment field is set to zero, then the expiration date of a lot/serial must be defined manually after the lot has been created.

Each of these time increment fields is used to generate one of the lot expiration date fields as follows:

Product Use Time –> Best Before Date

Product Removal Time –> Removal Date

Product Life Time –> End of Life Date

Product Alert Time –> Alert Date

To set the removal strategy on location, go to Configuration ‣ Locations and choose FEFO

6.9.6. What is a putaway strategy?

  • Overview

A good warehouse implementation takes care that products automatically move to their appropriate destination location. Putaway is the process of taking products off the receiving shipment and putting them into the most appropriate location.

If for instance a warehouse contains volatile substances, it is important to make sure that certain products are not stored close to each other because of a potential chemical reaction.

A putaway strategy follows the same principle as removal strategies but affects the destination location. Putaway strategies are defined at the location level (unlike removal strategies which are defined at the product level).

  • Configuration

Go to Inventory ‣ Configuration ‣ Settings and check option Manage several warehouses, each one composed by several stock locations & Advance routing of products using rules, then click on Apply.

  • Setting up a strategy

Let’s take as an example a retail shop where we store vegetables and fruits. We have to store this type of product in different locations to maintain product quality. Suppose there is one warehouse location WH/Stock and there is sub location WH/Stock/Vegetables & WH/Stock/Fruits.

You can create a putaway strategy from Inventory ‣ Configuration ‣ Locations. Open any location where you want to set a putaway strategy, click on Edit and locate the option Put Away Strategy.

Open the roll-down menu and click on Create and Edit. This will open a form view of put away strategy on which you have to set a name for the strategy, and set the method and fixed location for each category.

When you have entered all the necessary information, click on Save. Now, when you purchase products with those categories, they will automatically be transferred to the correct location. To check current inventory, Go to Inventory ‣ Report ‣ Inventory valuation. There you can see current inventory by location.

6.9.5. How to do inter-warehouses transfers?

If you own different warehouses you might want to transfer goods from one warehouse to the other. This is very easy thanks to the inventory module in Kiu BMP 

  • Configuration

First of all you have to select the multi locations option. Go to Inventory -> Configuration -> Settings. Then tick the Manage several warehouses, each one composed by several stock locations option. Please don’t forget to apply your changes.

  • Creating a new warehouse

The next step is to create your new warehouse. Go to Inventory -> Configuration -> Warehouse Management -> Warehouses. You are now able to create your warehouse by clicking on Create.

Fill in a Warehouse Name and a Short Name. The short name is 5 characters maximum

Note: Short name is very important as it will appear on your transfer order and other warehouse documents. It might be smart to use an understandable one

If you go back to your dashboard, new operations will automatically have been generated for your new warehouse.

  • Create an internal transfer

The final step is to create your internal transfer. If you want to transfer 2 units of a product from your first warehouse to another one in Ha Noi, proceed as follows:

From your dashboard, select an internal movement of one of the two warehouses. To do so, click on More ‣ Transfer

A new window will open where you will be able to select the source location zone (in this case our “old warehouse”) and the destination location zone (in this case our “new” warehouse located in Ha Noi).

Add the products you want to transfer by clicking on Add an Item and don’t forget to Validate or Mark as TODO once you are done.

If you select Validate, the system will process all quantities to transfer.

If you select Mark as TODO, the system will put the transfer in Waiting Availability status. Click on Reserve to reserve the amount of products in your source warehouse. Then click on Validate to complete internal transfer