3.4.1. Invoice based on delivered or ordered quantities

Depending on your business and what you sell, you have two options for invoicing:

  • Invoice on ordered quantity: invoice the full order as soon as the sales order is confirmed.
  • Invoice on delivered quantity: invoice on what you delivered even if it’s a partial delivery.

Invoice on ordered quantity is the default mode.

The benefits of using Invoice on delivered quantity depends on your type of business, when you sell material, liquids or food in large quantities the quantity might diverge a little bit and it is therefore better to invoice the actual delivered quantity.

Note

You also have the ability to invoice manually, letting you control every options: invoice ready to invoice lines, invoice a percentage (advance), invoice a fixed advance.

Decide the policy on a product page

From any products page, under the invoicing tab you will find the invoicing policy and select the one you want.

Send the invoice

Once you confirm the sale, you can see your delivered and invoiced quantities.

If you set it in ordered quantities, you can invoice as soon as the sale is confirmed. If however you selected delivered quantities, you will first have to validate the delivery.

Once the products are delivered, you can invoice your customer. KIU BMP will automatically add the quantities to invoiced based on how many you delivered if you did a partial delivery.


3.3.5. Deliver and invoice to different ad dresses

In KIU BMP you can configure different addresses for delivery and invoicing. This is key, not everyone will have the same delivery location as their invoice location.

Activate the feature

Go to SALES ‣ Configuration ‣ Settings and activate the Customer Addresses feature.

Add different addresses to a quotation or sales order

If you select a customer with an invoice and delivery address set, KIU BMP will automatically use those. If there’s only one, KIU BMP will use that one for both but you can, of course, change it instantly and create a new one right from the quotation or sales order.

3.3.3. Get paid to confirm an order

You can use online payments to get orders automatically confirmed. Saving the time of both your customers and yourself.

Activate online payment

Go to SALES ‣ Configuration ‣ Settings and activate the Online Signature & Online Payment feature.

Once in the Payment Acquirers menu you can select and configure your acquirers of choice.

You can find various documentation about how to be paid with payment acquirers such as PaypalAuthorize.Net (pay by credit card), and others under the eCommerce documentation.

Note

If you are using quotation templates, you can also pick a default setting for each template.

Register a payment

From the quotation email you sent, your customer will be able to pay online.

3.3.2. Increase your sales with suggested products

The use of suggested products is an attempt to offer related and useful products to your client. For instance, a client purchasing a cellphone could be shown accessories like a protective case, a screen cover, and headset.

Add suggested products to your quotation templates

Suggested products can be set on Quotation Templates.

Once on a template, you can see a Suggested Products tab where you can add related products or services.

You can also add or modify suggested products on the quotation.

Add suggested products to the quotation

When opening the quotation from the received email, the customer can add the suggested products to the order.

The product(s) will be instantly added to their quotation when clicking on any of the little carts.

Depending on your confirmation process, they can either digitally sign or pay to confirm the quotation.

Each move done by the customer to the quotation will be tracked in the sales order, letting the salesperson see it.

3.3.1. Use quotation templates

If you often sell the same products or services, you can save a lot of time by creating custom quotation templates. By using a template you can send a complete quotation in no time.

Configuration

For this feature to work, go to Sales ‣ Configuration ‣ Settings and activate Quotations Templates.

Create your first template

You will find the templates menu under Sales ‣ Configuration.

You can then create or edit an existing one. Once named, you will be able to select the product(s) and their quantity as well as the expiration time for the quotation.

On each template, you can also specify discounts if the option is activated in the Sales settings. The base price is set in the product configuration and can be alterated by customer pricelists.

Use a quotation template

When creating a quotation, you can select a template.

Each product in that template will be added to your quotation.

Tip

You can select a template to be suggested by default in the Sales settings.

Confirm the quotation

Templates also ease the confirmation process for customers with a digital signature or online payment. You can select that in the template itself.

Every quotation will now have this setting added to it.

Of course you can still change it and make it specific for each quotation.


4. CUSTOMER RELATIONSHIP MANAGEMENT

4.1. CRM overview

4.2. How to setup your teams, sales process and objectives

4.3. How to set up your sales pipeline
4.3.1. Organize the pipeline
4.3.2. Planning activities
4.3.3. Managing lost opportunities

4.4. Manage contact
4.4.1 How to create a contact
4.4.2 How to import contacts to the CRM

4.5. Acquire leads
4.5.1. Convert leads into opportunities
4.5.2. How to generate leads from incoming emails
4.5.3. How to generate leads from your website contact page
4.5.4. Send Quotations

4.6. Analyze performance
4.6.1. Check your Win/Loss ratio
4.6.2. Get an accurate probable turnover


4.3.2. Planning activities

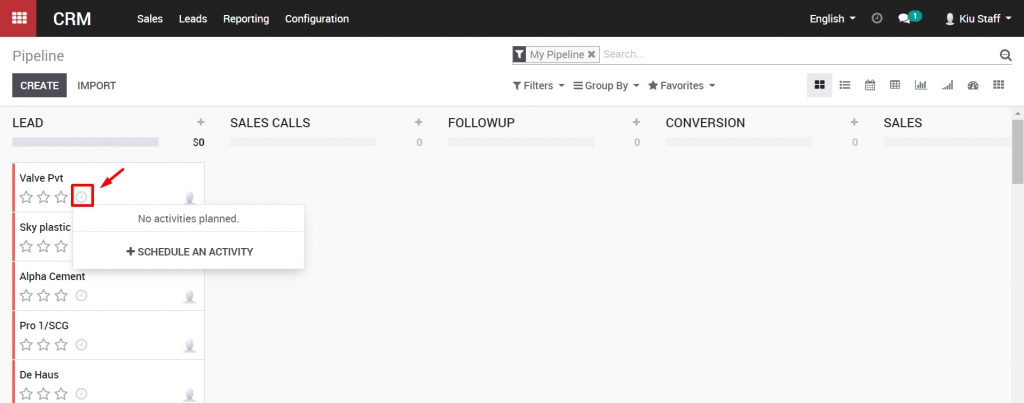
Planning activities is the ideal method to keep on track with your work. Get helped to remember what should be done and plan the following activities to attempt. Users can click on clock icon to check activities

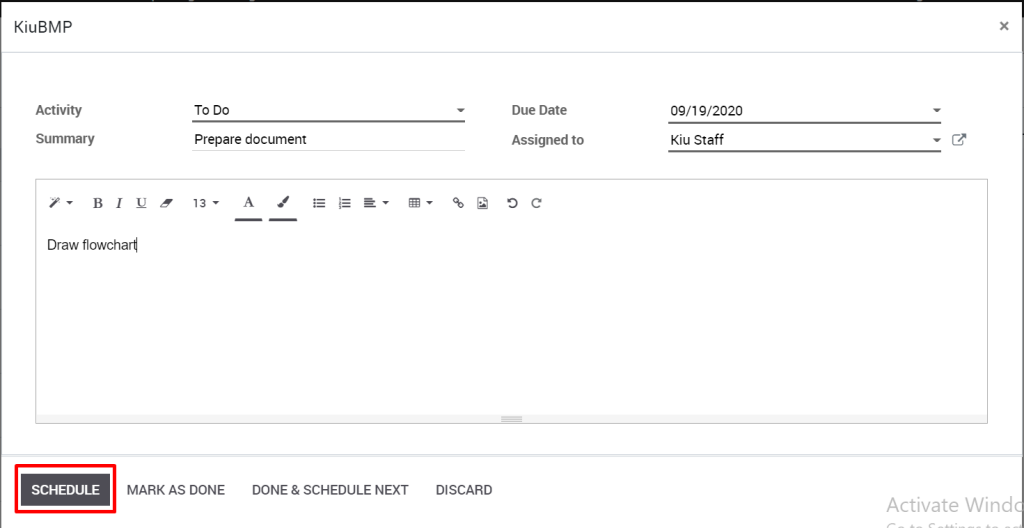
In order to create new activities, click to “Schedule an activity”. New pop up will be shown, choose activity, due date, PIC and click “Schedule” to confirm.

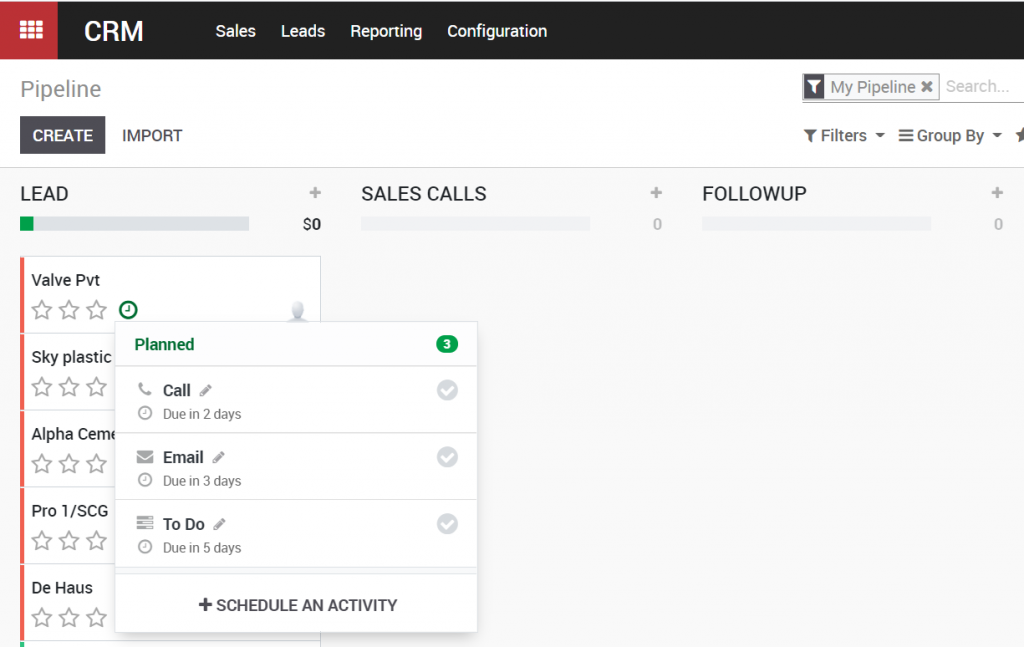
Kiu CRM enables you to track the activities in the least complex manner. Activities can be tracked on each and every archive. One can view the exercises like – activities in due, or activities to be performed today or in future.

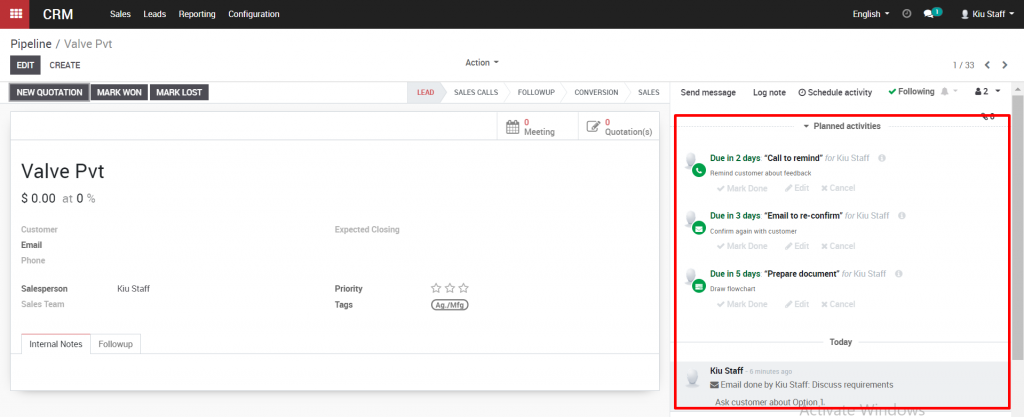
Activities can be followed from two spots i.e. from both Kanban card and from the form view.

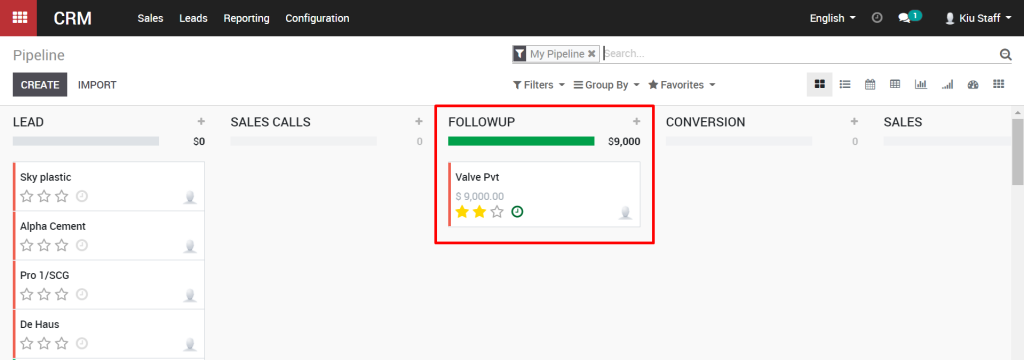
When an opportunity is advanced to the Follow up stage, you can instruct your sales team to create a new quotation for that opportunity.

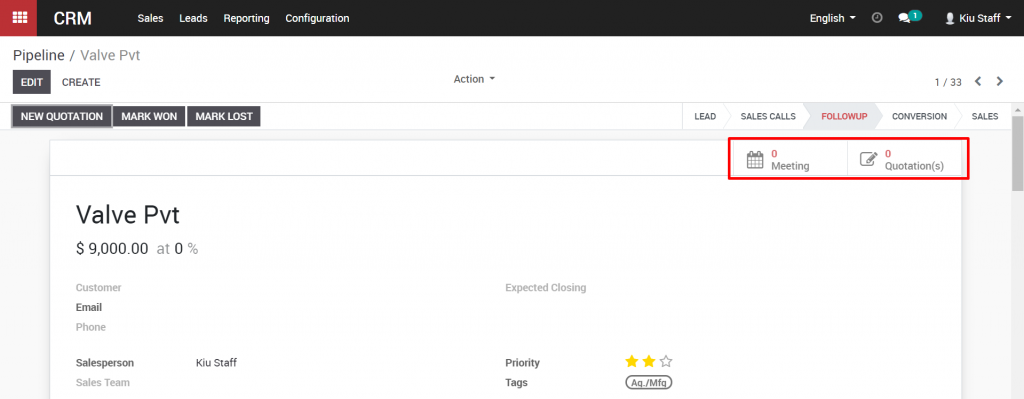
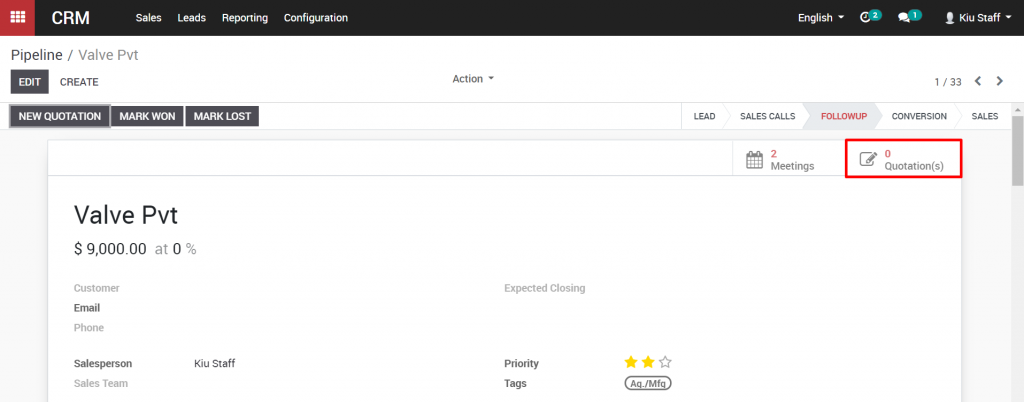
There are two options in the top right of the Opportunity view. One is for Meetings and the other is for Quotes. Let’s quickly look at the Meetings button, by clicking on the button.

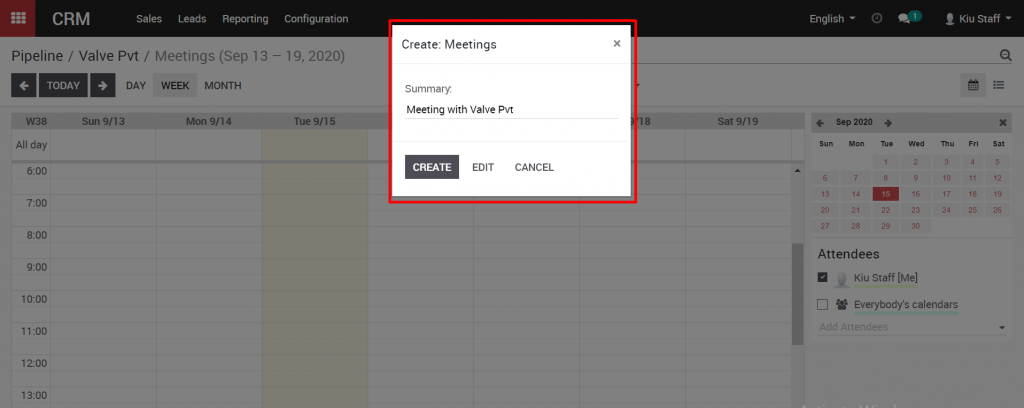
When the calendar view opens, you can create a meeting as with many other calendar programs, like Microsoft Outlook or Google Calendar. Click on the calendar to create an event, and give the event a Summary for a name, and click Create

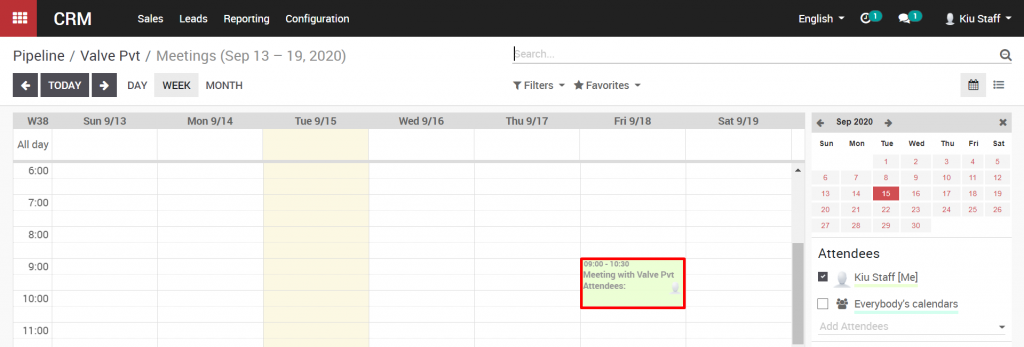
Click on the event in the calendar to view it, and click Edit to change the event details. 

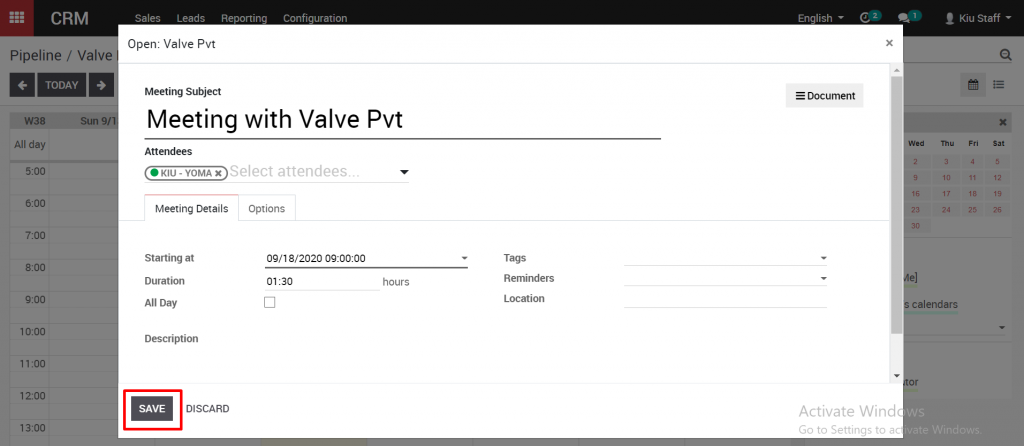
You can change the meeting subject, add attendees, and update the time and duration of the meeting. Click Save in the top right when you are finished.

Going back to the pipeline, We can now create a new quotation for this opportunity. To create a new quotation, we can also click on the Quote button in the top right of the Opportunity window. The detailed guidance about creating a quotation can be found here.

4.5.3. How to generate leads from your website contact page

Automating the lead/opportunity generation will considerably improve your efficiency. Any visitor using the contact form on your website will create a lead/opportunity in the pipeline.

Use the contact us on your website

You should first go to your website app then “Go to Website”

With the CRM app installed, you benefit from a ready-to-use contact form on your KIU BMP website that will generate leads/opportunities automatically.

To change to a specific sales channel, go to Website ‣ Configuration ‣ Settings under Communication you will find the Contact Form info and where to change the Sales Channel or Salesperson.

Create a custom contact form

You may want to know more from your visitor when they use the contact form to you will need to build a custom contact form on your website. These contact forms can generate multiple types of records in the system (emails, leads/opportunities, project tasks, helpdesk tickets, etc.)

Configuration

You will need to install the free Form Builder module, only available in KIU BMP Enterprise.

Create a custom contact form

First, go to the page where you want to put your contact form. In edit mode, drag the form builder onto the page, and you will be able to add all the fields you wish.

By default, any new contact form will send an email. You can switch to lead/opportunity generation in Change Form Parameters.

Note

If the same visitor uses the contact form twice, the second entry will be added to the first lead/opportunity in the chatter.

Generate leads instead of opportunities

When using a contact form, you should use a qualification step before assigning the form to the right sales people. To do so, activate Leads in CRM settings and refer to Convert leads into opportunities.


Manage multiple sales teams

In KIU BMP, you can manage several sales teams, departments or teams with specific sales processes. To do so, we use the concept of Sales Team.

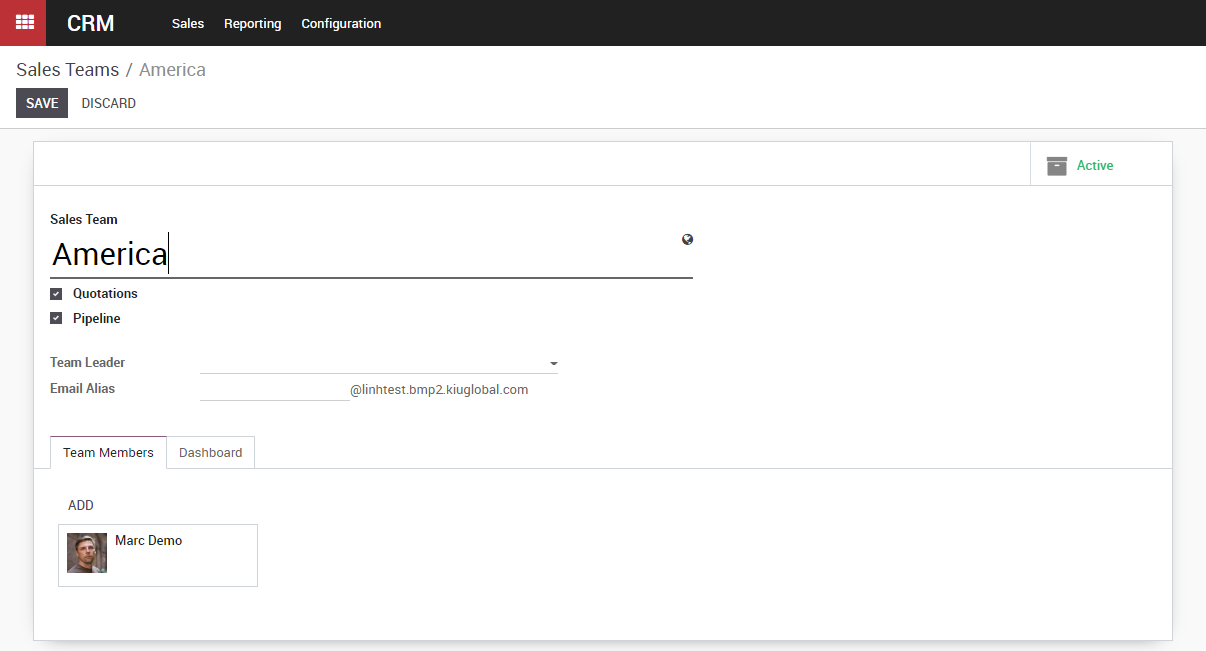
Create a new sales team

To create a new Sales Team, go to Configuration ‣ Sales Teams.

There you can set an email alias to it. Every message sent to that email address will create a lead/opportunity.

Add members to your sales team

You can add members to any team; that way those members will see the pipeline structure of the sales team when opening it. Any lead/opportunity assigned to them will link to the sales team+. Therefore, you can only be a member of one team.

This will ease the process review of the team manager.

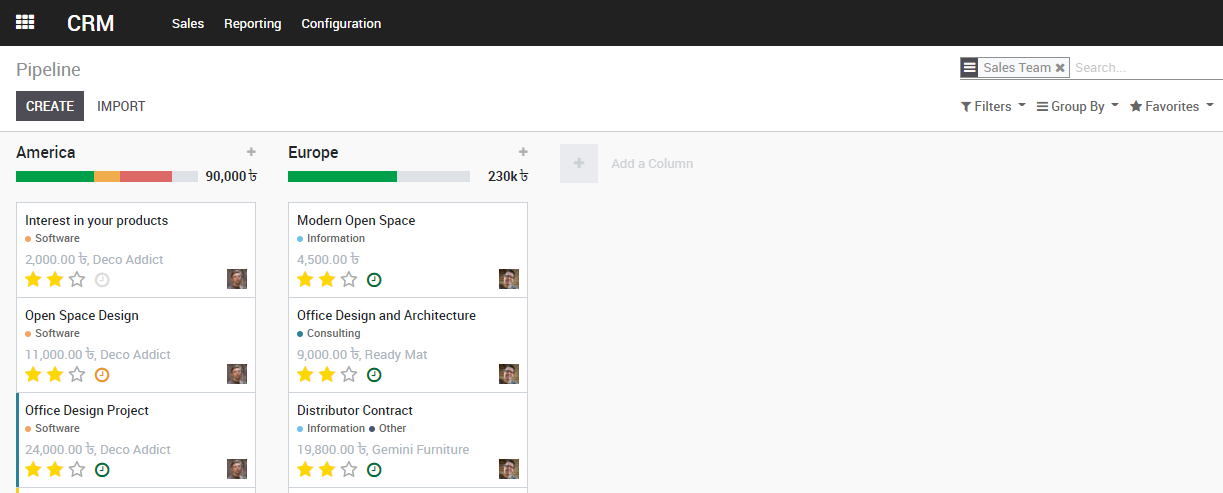
If you now filter on this specific team in your pipeline, you will find all of its opportunities.

4.6.2. Get An Accurate Probable Turnover

As you progress in your sales cycle, and move from one stage to another, you can expect to have more precise information about a given opportunity giving you an better idea of the probability of closing it, this is important to see your expected turnover in your various reports.

Configure your kanban stages

By default, KIU BMP Kanban view has four stages: New, Qualified, Proposition, Won. Respectively with a 10, 30, 70 and 100% probability of success. You can add stages as well as edit them. By refining default probability of success for your business on stages, you can make your probable turnover more and more accurate.

Every one of your opportunities will have the probability set by default but you can modify them manually of course.

Set your opportunity expected revenue & closing date

When you get information on a prospect, it is important to set an expected revenue and expected closing date. This will let you see your total expected revenue by stage as well as give a more accurate probable turnover.

See the overdue or closing soon opportunities

In your pipeline, you can filter opportunities by how soon they will be closing, letting you prioritize.

As a sales manager, this tool can also help you see potential ways to improve your sale process, for example a lot of opportunities in early stages but with near closing date might indicate an issue.

View your total expected revenue and probable turnover

While in your Kanban view you can see the expected revenue for each of your stages. This is based on each opportunity expected revenue that you set.

As a manager you can go to CRM ‣ Reporting ‣ Pipeline Analysis by default Probable Turnover is set as a measure. This report will take into account the revenue you set on each opportunity but also the probability they will close. This gives you a much better idea of your expected revenue allowing you to make plans and set targets.