6.1. How to create an order in POS

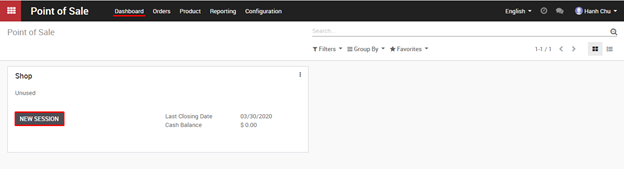
Step 1: Open new session at Point of Sale > Dashboard, click New Session

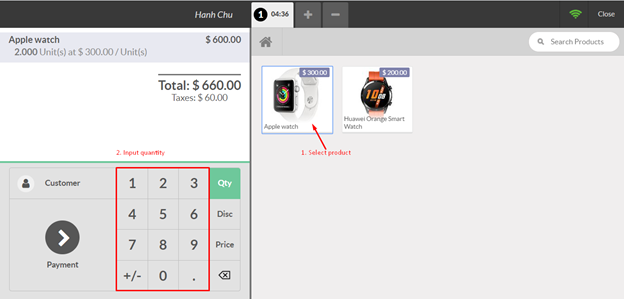
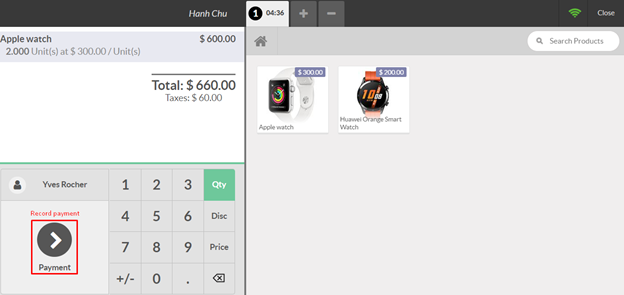
Step 2: Place order by selecting product and inputting the quantity of products.

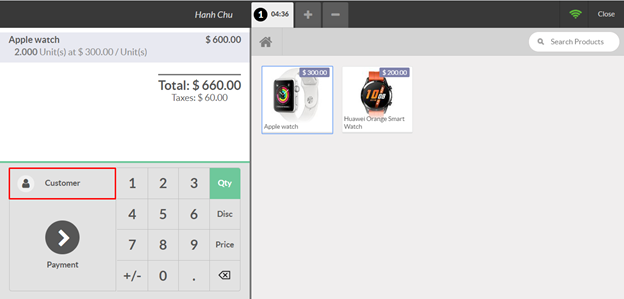
Step 3: Identify customer Seller needs to click on Customer

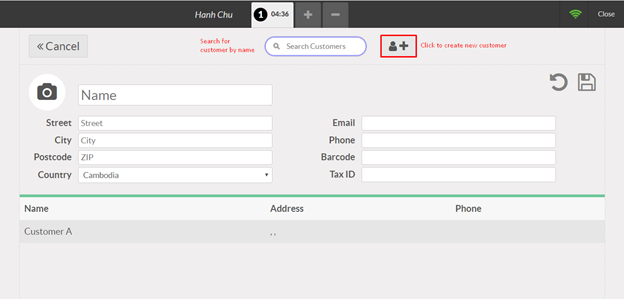
Sellers can either search for existing customers or create new customers by inputting customer’s information in the following form and clicking the symbol Save.

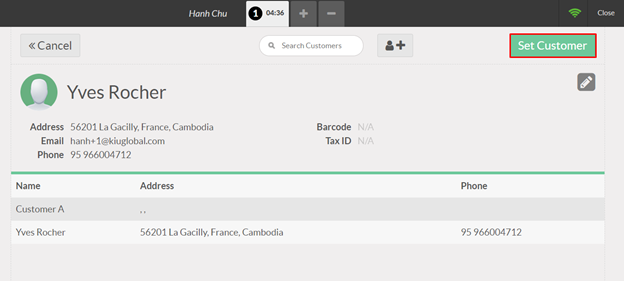
Click on Set Customer to choose the correct customer

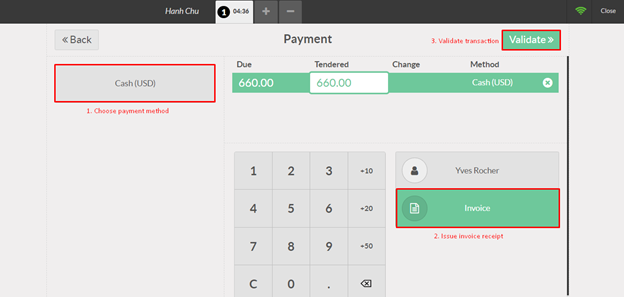
Step 4: Record payment by clicking Payment

In the payment screen, the seller chooses the payment method, issues an invoice to the customer and validates the transaction.

As the order is successfully recorded, click Next Order to place other orders.

5.6. Create deferred revenue

Go to Accounting module -> Accounting -> Management -> Deferred revenue. Review information if needed and click on Compute revenue-> Confirm

Click on the red circle to change it into yellow color and click on pencil icon on the right top to post journal entry

Deferred revenue journal entries for the next period will be automatically generated

This is one loop of Subscription. The loop will continue until the End Date of Subscription.

The Subscription will be sent to Subscription to Renew if To Renew is ticked. What you need to do is Create a renewal quotation -> A new quotation will be generated automatically and start the next loop.

5.5. Create invoice from sale order

On the sale order form, click on Create invoice button

Fill in invoice date and validate

A draft deferred revenue will be automatically generated after validating invoice

5.4. Create Sale order

Sale module-> Orders-> Quotations-> Confirm quotation. A draft subscription will be automatically generated once you confirm quotation

Go to Subscription module -> Subscriptions-> Subscriptions

Review all information (especially start date, end date, date of next invoice)

5.3. Create a subscription product

To create a subscription you need to go to Subscriptions module ->Subscriptions -> Subscription products -> Create

On the Sale tab, Subscription product must be ticked and select a suitable Subscription template for product

4.3.3. Managing lost opportunities

It is a typical scene that while working with any of your chances/opportunities, you may lose some of them. However, you need to monitor the reasons why you lost them. Kiu CRM can help you in recuperating them later on.

Mark a lead as lost

While in your pipeline, select any opportunity you need and you will see a Mark Lost button.

You would then be able to choose a current Lost Reason or make another one in that spot.

Retrieving Lost Opportunities

In order to retrieve your lost opportunities and conduct certain actions on them (send an email, make a feedback call, etc.), go to the Lost filter in the search bar.

There you can see all the lost opportunities. Add a filter on the Lost Reason to refine them.

4.5.2. How to generate leads from incoming emails

There are several ways for your company to generate leads with KIU CRM. One of them is using your company’s generic email address as a trigger to create a new lead in the system. In KIU, each one of your sales teams is linked to its own email address from which prospects can reach them. For example, if the personal email address of your Direct team is direct@mycompany.example.com, every sent email will automatically create a new opportunity into the sales team.

For set up team alias, Go on the CRM module > Configurations > Sales Teams. You will see that the activation of your domain alias has generated a default email alias for your existing sales teams.

You can easily personalize your sales teams aliases. Into the Email Alias field, enter your email alias and click on Save. Make sure to allow receiving emails from everyone. From there, each email sent to this email address will generate a new lead into the related sales team.

4.4.2. How to import contacts to the CRM

After active the lead stage as mentioned in How to create a contact, On the new submenu Leads, click on Import: 

Select your Excel file to import from the Load File button

Make sure its extension is .csv and don’t forget to set up the correct File format options (Encoding and Separator) to match your local settings and display your columns properly. KIU will automatically map the column headers from your CSV file to the corresponding fields if you tick The first row of the file containing the label of the column option. This makes imports easier especially when the file has many columns. Of course, you can remap the column headers to fit the importing data