4.4.1 How to create a contact

KIU CRM allows you to manually add contacts into your pipeline. It can be either a lead or an opportunity.  In Kiu BMP any business contact that might be interested in your product or services is called a “Lead”. Leads should undergo a process of qualification to determine their value to the organization, and after qualification will be changed to “Opportunities”. Maybe you met someone at a business conference, and they showed interest in your product. You can add them as a “Lead”, then use the Kiu BMP system to track them through the sales process.

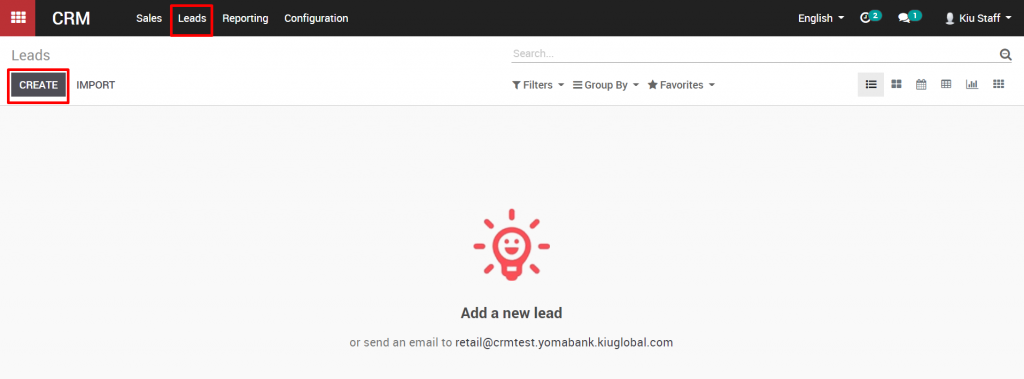
Go to Sales ‣ Leads and click the Create button.

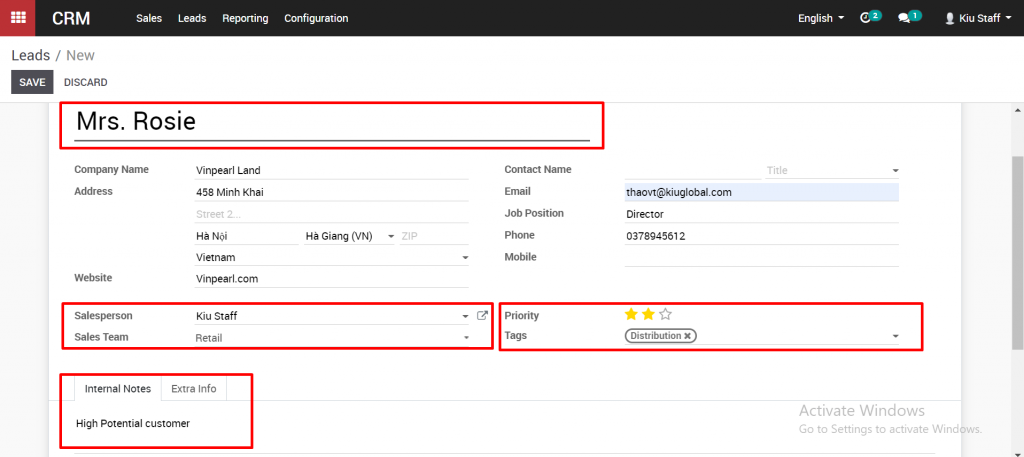
The Lead page requires only a short description, but you can also add some information about the contact, or assign a Salesperson, or a Sales Team. You can also choose to assign a rating for tracking, either LowHigh, or Very High, and to include Tags to classify and analyze the opportunity. You can choose one or more existing tags, or create a new one. Lastly, you can enter notes in the Internal Notes section at the bottom. When you have finished entering the information for the lead you can click Save at the top.

After you have created the lead, you should contact them for qualification. If they DO pass your qualification process, you can move them into your sales pipeline by pressing the Convert to Opportunity button.

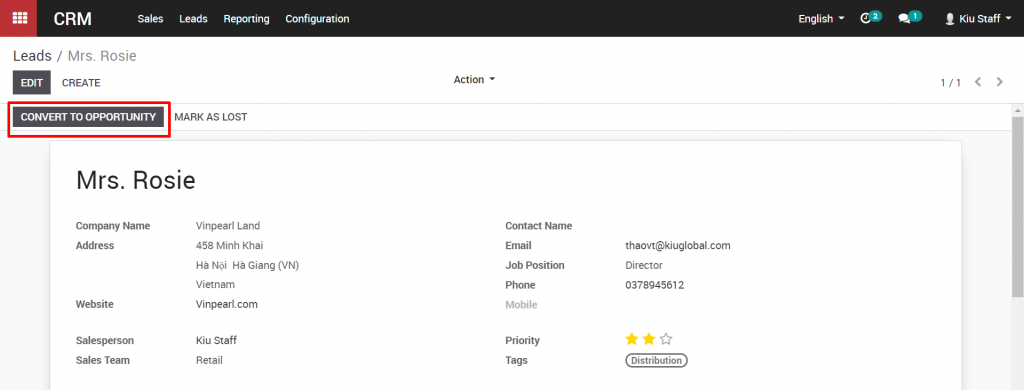
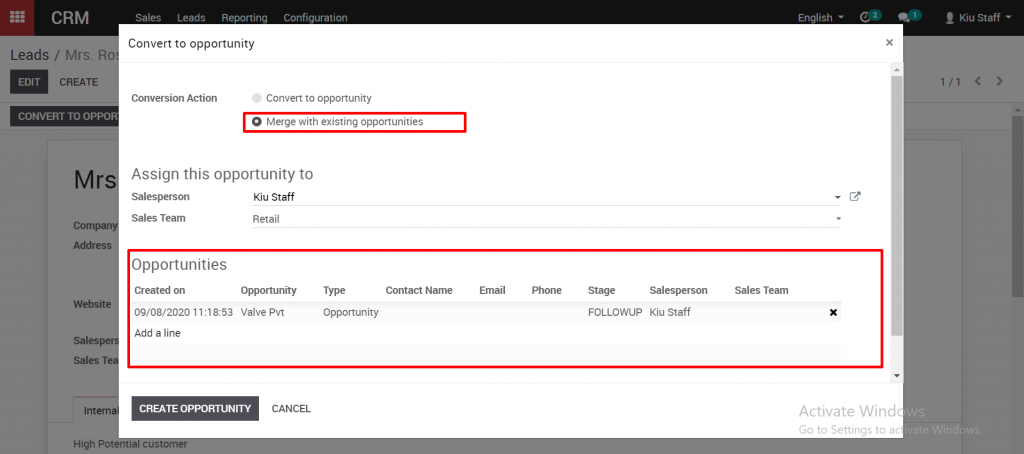
When you press the Convert to Opportunity button, a dialogue box will appear.

If you have not already assigned the lead to a Salesperson or Sales Team, you can do that now, or you can change the previous selection, in the Assign this opportunity to section.

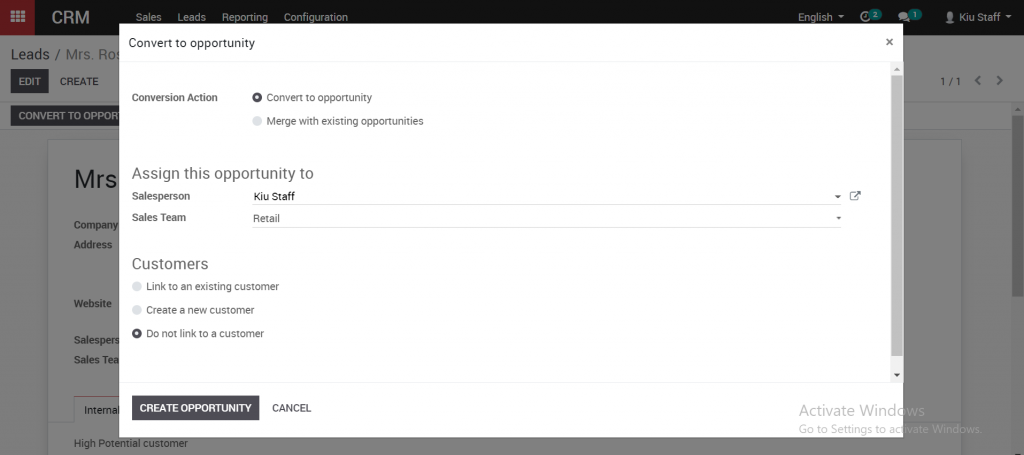
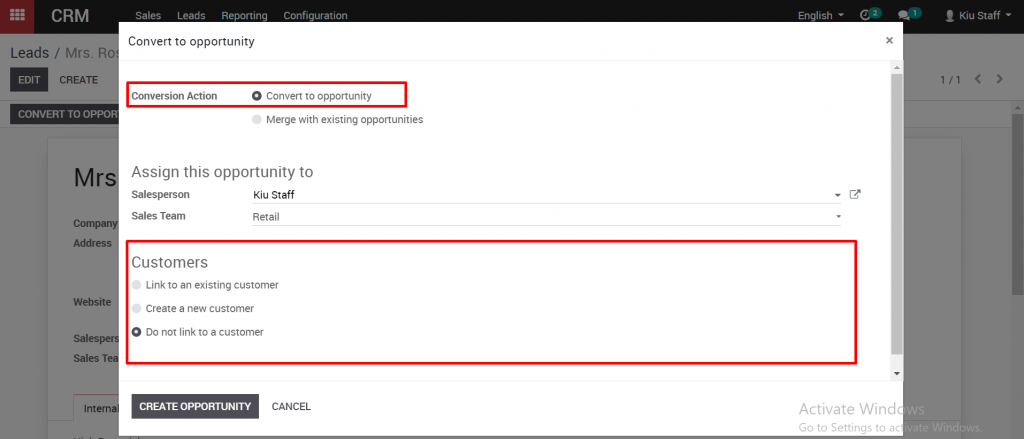
In the Conversion Action section you can either convert the lead to an opportunity directly, or merge with an existing opportunity. If you are converting to an opportunity, in the Customers section at the bottom, you will need to select if the opportunity will link to an existing customer, if you will “Create a new customer”, or if you will not link to a customer.

If you are merging with an existing opportunity, you will have to select one or more opportunities using the Add an item button in the Opportunities table at the bottom. When you have completed the Convert to Opportunity dialogue box, click the Create opportunity button at the bottom.

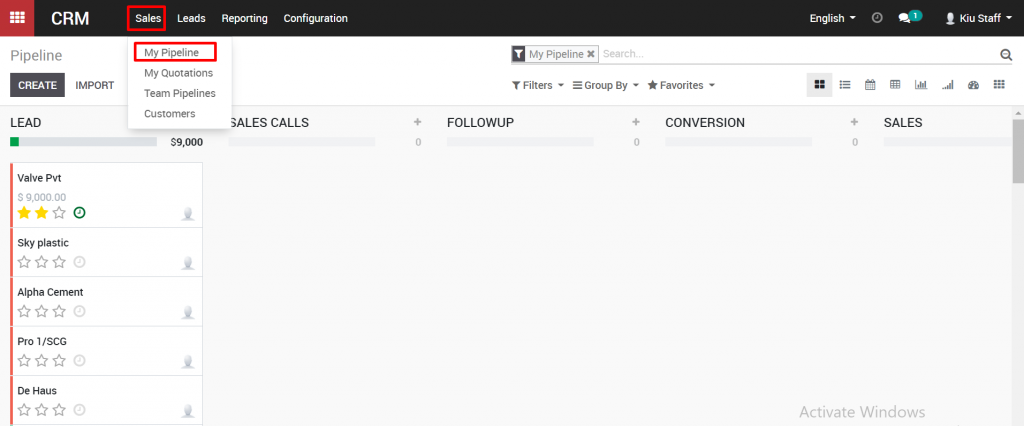
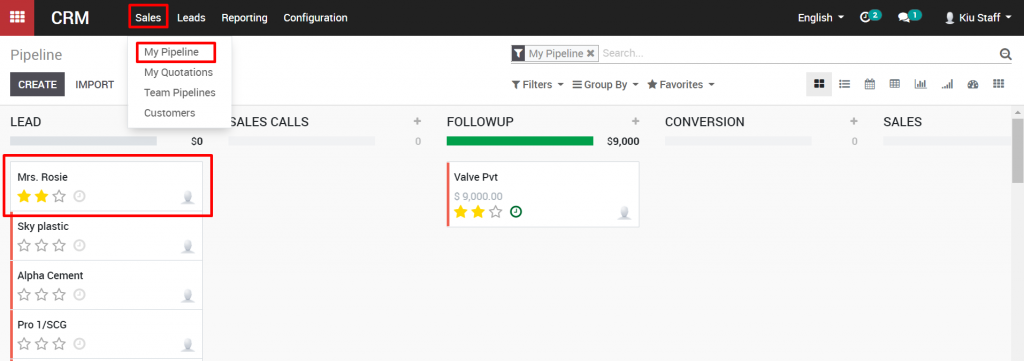
Let’s navigate to our Pipeline now by clicking the Sales drop down menu, and selecting My Pipeline.

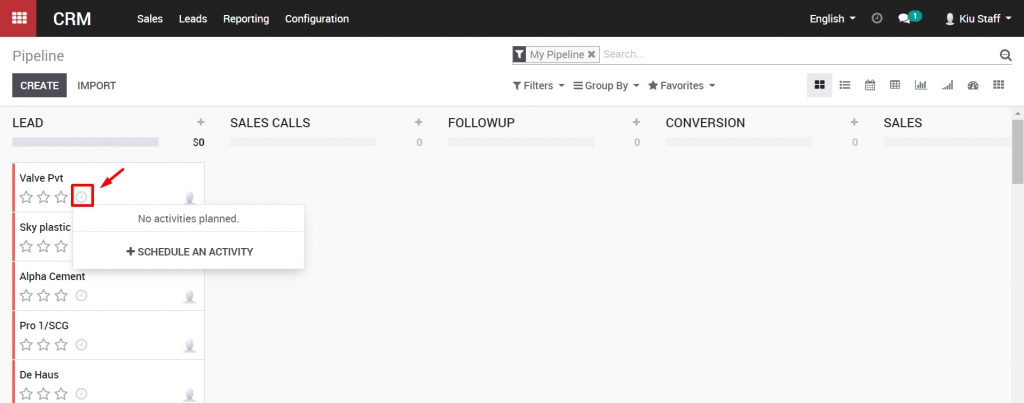
You can see that the Lead has been converted into an Opportunity and is in the New section of the pipeline. Leads in Kiu BMP must be converted to Opportunities before you can log activities on them.

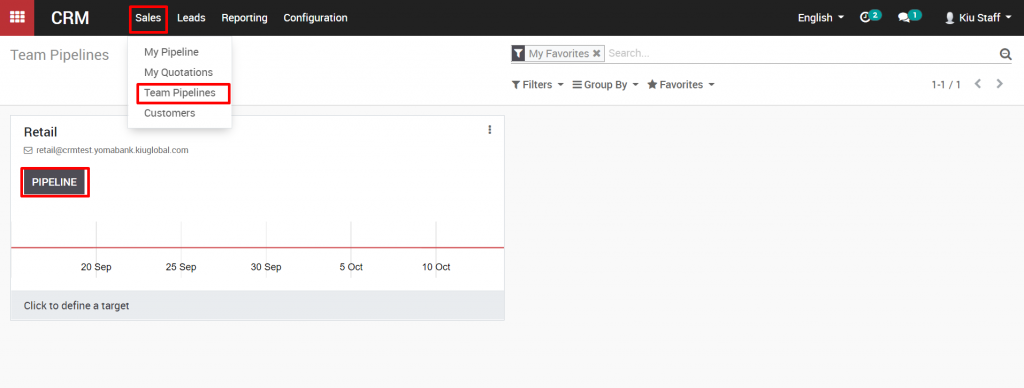
Secondly, You can also directly add a contact into a specific sales team without having to convert the lead first. On the CRM module, go to Sales tab/ Team pipelines and click on the Pipeline button of the desired sales team

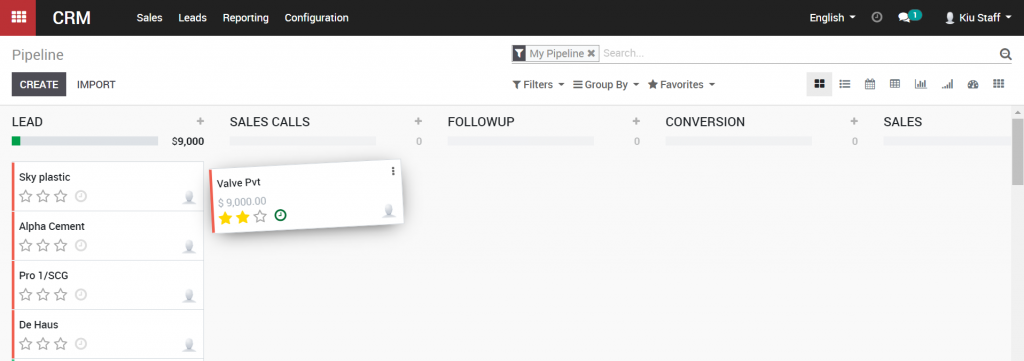
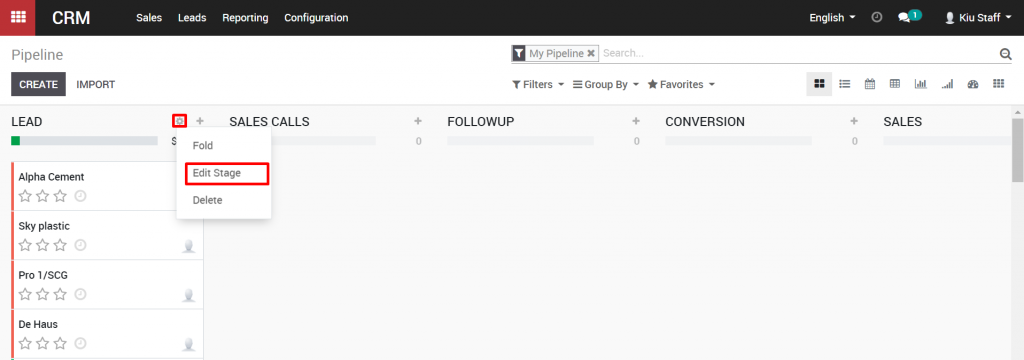
To create new opportunities, click on the “+” icon next to the stage’s name and click Add

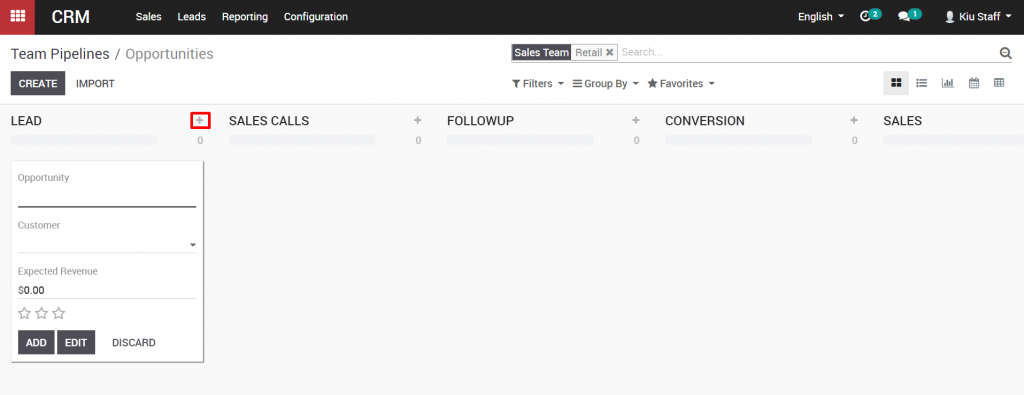
Or you can click Create in the top left

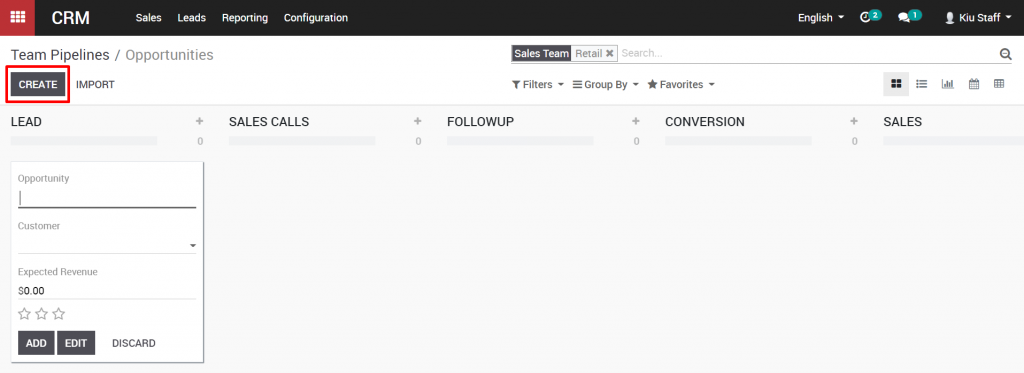
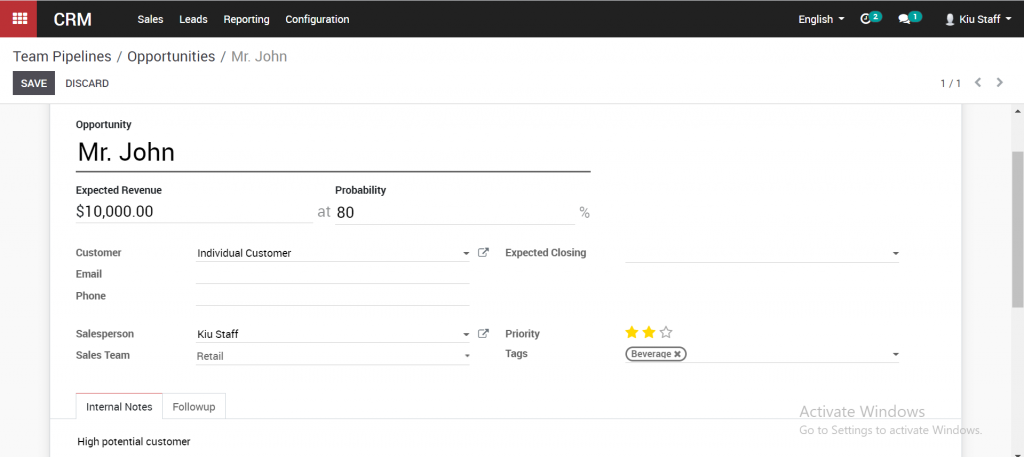
The Create an Opportunity window will open. I’ll enter the basic information for creating the opportunity, like the OpportunityCustomer, and Expected Revenue, and click Add at the bottom when complete.

Provide all the details in your possession (contact name, email, phone, address, etc.) as well as some additional information in the Internal notes field. You can also link the lead to an existing company by editing the Customer field. Select “Save” and the contact will be visible as a lead in your pipeline

4.3.1. Organize the pipeline

A well structured sales pipeline is crucial in order to keep control of your sales process and to have an overview of your leads, opportunities and customers. The pipeline is a visual representation of the sales process. You can track all of your sales opportunities, from the beginning to the end of their life cycle, either as a win, or as a loss. Go to the pipeline by clicking on the Sales drop down menu at the top, then clicking on My Pipeline.

The sales pipeline is a visual representation of your sales process, from the first contact to the final sale. It refers to the process by which you generate, qualify and close leads through your sales cycle. 

Each stage refers to a specific step in the sales cycle and specifically the sale-readiness of your potential customer. The number of stages in the sales funnel varies from one company to another. An example of a sales funnel will contain the following stages: Lead, Sales calls, follow-up, Conversion, Sales. You can choose to use these steps, or customize them to fit your business by click on “Add the column”

Each stage can be moved around the sales pipeline simply by clicking on them and dragging them to a new stage in the pipeline. Stages are typically oriented from left to right, with the lowest probability of a successful sale on the left, and the highest probability on the right.

You can also customize each stage by moving over its title, and when the hidden gear icon appears, clicking on it. You can “Fold” the stage, to hide its contents from view, or “Delete” it entirely. Let’s click “Edit” to see a few other options for a stage.

We can change the stage name, change the sales team for that stage, choose if the stage will be folded, with its contents hidden by default, and change the probability of a successful sale for opportunities within that stage. We can also add notes within the Requirements section, where we can describe the opportunities that belong in this stage.

Planning activities is the ideal method to keep on track with your work. Get helped to remember what should be done and plan the following activities to attempt. Users can click on clock icon to check activities

In order to create new activities, click to “Schedule an activity”. New pop up will be shown, choose activity, due date, PIC and click “Schedule” to confirm.

Kiu CRM enables you to track the activities in the least complex manner. Activities can be tracked on each and every archive. One can view the exercises like – activities in due, or activities to be performed today or in future.

Activities can be followed from two spots i.e. from both Kanban card and from the form view.

When an opportunity is advanced to the Follow up stage, you can instruct your sales team to create a new quotation for that opportunity.

There are two options in the top right of the Opportunity view. One is for Meetings and the other is for Quotes. Let’s quickly look at the Meetings button, by clicking on the button.

When the calendar view opens, you can create a meeting as with many other calendar programs, like Microsoft Outlook or Google Calendar. Click on the calendar to create an event, and give the event a Summary for a name, and click Create

Click on the event in the calendar to view it, and click Edit to change the event details. 

You can change the meeting subject, add attendees, and update the time and duration of the meeting. Click Save in the top right when you are finished.

Going back to the pipeline, We can now create a new quotation for this opportunity. To create a new quotation, we can also click on the Quote button in the top right of the Opportunity window. The detailed guidance about creating a quotation can be found here.


4.2. How to setup your teams, sales process and objectives

Step 1: Creating sales team

Go to Sales/ Configuration/ Sales team/ Click Create

Enter your team name such as retail sale, choose team leader and team member.

You can tick to Quotation/ Pineline/ Leads if you want to control the quotation/ Pineline/ Leads created by this sales team

In Kiu CRM, each sales team can have their own email alias so that when customers send emails to the email alias of the sales team, this will automatically create a new lead in the sales process.

After click on Add, You can choose the existed team member or create new team member by click Create

Upon filtering the specific channel in the pipeline, one can view all of his opportunities.

Step 2: Creating sales process and objectives

Now that your sales team is created and your sales-people are included in the sales team, you will need to set up your pipeline or create the process by which your team will generate, qualify and close opportunities through your sales cycle. Refer to point 2 How to set up and organize your sales pipeline.

For setting objectives for the team, set Invoicing target in the Sales team in the Dashboard tab

4.1. CRM Overview

CRM (Client Relationship Management) is the most significant piece of a business. It helps the business to become a customer-centric organization by providing all the proper support to customers. 

Some of the useful features of Kiu CRM includes:
  • Priorities activities: Priorities the subsequent activities in the pipeline and meet your objectives proficiently.
  • Track your sales activities: Track the business organization all the more effectively through deals pipeline Kanban sees.
  • Schedule Meetings: Schedule meetings straightforwardly from the customer opportunity.
  • Dashboards: Collect all pivotal details with regard to ongoing and done business activities from Dashboard.
  • Get in touch with customers: Keep up Communication with clients by means of email, telephone, visit, and internet based life from inside your Kiu CRM.
  • Leads Promotion: Begin campaign by sending auto produced emails to customers in Leads. Appoint a sales rep to pursue the lead and promote it.
  • Opportunities Analysis: Dissect your chances pipeline with cutting edge channels, gathering, drill down, and so forth.
  • Lead Scoring: Score your leads dependent on unequivocal and verifiable criteria and choose which lead fulfills the benchmark to progress toward becoming chance.
  • Customized Alerts: Set custom alarms for circumstances dependent on certain exercises
  • Analyze Opportunity lost: Analyze the reasons behind the loss of opportunities and improve your sales efficiency.
  •  
Kiu CRM general workflow

CRM in Kiu can be clarified as a progression of occasions that begin with distinguishing a Lead (a future deal probability) and goes through various stages like Opportunity, Quotation, Sale Order and genuine deal (receipt age and installment). Kiu coordinates the Customer Management module alongside these procedures to achieve compelling Customer Relationship Management. The fundamental advances engaged with following a deal can be recorded as beneath.

Lead:  A conceivable future deal, it might be made in light of the fact that a client enquired an item

Opportunity:  More plausibility of offer. Here onwards the association may name an individual to catch up the client.

Pipeline: It is an advantageous instrument given by Kiu to follow Opportunity. You can make numerous stages dependent on the likelihood of the Sale and track all the more adequately.

Quotation:  When opportunity wons, then the next action triggered is sending a quotation to the customer.

Followed the Quotation changes to Sale Order, later to Invoice Generation and Payment.

3.2. Sales Reports

To check the Sale report, users go to Sale >> Reporting >> Sale. Users can view report with multiple variants by selecting the variants in the measures and using filter or group by

3.1.4. Create an invoice and register payment

Let’s go back to the Sales Order and Create invoice. When you create an invoice, in the product form you can select one of two options for invoicing policies, either on ordered quantity or on delivered quantity.

If you choose invoicing on an ordered quantity, you can create an invoice before the delivery step and the pre-filled quantity will be the entire shipment that the customer ordered. Otherwise, if you choose invoicing on delivered quantity, you can only create draft invoices, to be validated by your accountant after completing delivery. You can create invoices for partial deliveries.

Now click on the Create invoice button, which should be visible in the top left corner. A new dialogue will open, allowing you to select one of four options.

First, you can create a full invoice for everything in the order.

Second, you can create a full invoice for everything in the order, minus any down payment which has already been paid.

Third, you can create an invoice for a down payment, as a fixed percentage of the invoice value.

And fourth, you can create a down payment with a fixed value.

Let’s select the first option, to create a full invoice for everything in our order, and then click Create and View Invoices. You’re able to view the invoice now, however the functions after this will be completed by your accounting department.

The accounting department will be able to complete the invoice, and register the payment

Check the payment amount, select appropriate journal to record the payment (bank or cash) then click Validate

Then status of the invoice will change to Paid in the top right

This is the last step of the regular sales process.

3.1.3. Confirm delivery order

Let’s click the Delivery icon. We will confirm that the shipment was delivered. While this step would normally be done by inventory staff, however in several cases the sales members can also deliver goods, so we can perform it using one account.

Using the Edit button at the top, update the Done line with the number of items that were delivered.

Input the actual goods receive in the deliver

When the number of items in the Done column matches the number of items in the To Do column, you can click Validate in the top left to confirm that your shipment arrived

The status of the order will change to Done in the top right

3.1.2. Create a sale order

To create a new Sales Order, click the Sales dropdown menu at the top, then select Sales Order.

Click on the Create button at the top of the screen to create a new Sales Order.

The Sales Order is essentially the same as the Quotation that we just finished working with. You can add Customer information at the top, and Product information in the tabs at the bottom.

When you have filled in all of the fields, you can click “Confirm” at the top of the screen. 

The status in the top right of the screen will change to Sales Order and now products will be sent out from your warehouse.

You will also see the Delivery box appearing in the top right of the screen now, and the Create Invoice button will appear in the top left corner.

3.1.1. Create a quotation

To create a new quotation, you can select the Orders drop down menu at the top, then click on

Click on Create on the top left corner to create a new quotation

The basic elements to add to any quotation are the Customer and the Products you want to sell. Select a Customer from the first drop down menu. Their “Invoice Address” and Delivery Address will automatically populate, if those were included when the Contact was created.

On the Order Lines tab, you can include the products or services you will sell by clicking Add a product.

This will bring up the Create Order Lines window. Select the product you plan to quote from the Products drop down menu or type a few letters to see suggestions appear.

When you’ve finished entering all of the information for this product, you may click Save and Close or if you want to add another product to the quotation you can click “Save and New”.

Once you’ve completed the Quotation, click Save at the top. You may also click Send by Email to send the quote to your customer, Print if you will deliver a paper copy, or Preview if you want to see how the quote will appear to your customer.

The status of the quotation will change to Quotation Sent in the top right of the screen.

If the customer accept the conditions in the quotations, you can select Confirm Sale

And this quotation will be transferred to Sales Order

You don’t have to start every order with a formal quotation. If you have an existing customer who is aware of your pricing, or who contacts you directly to sell them one of your products, you can create a Sales Order to start a new sales process.

2.2. Purchase Reports

To check the Purchase report, users go to Purchase >> Reporting >> Purchase Analysis. Users can view report with multiple variants by selecting the variants in the measures and using filter.