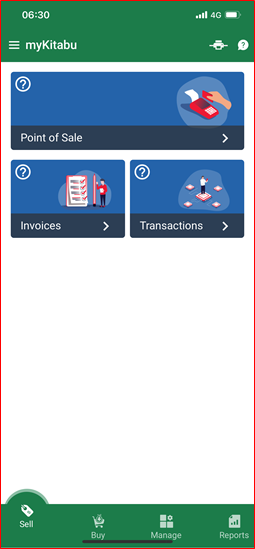
6. ‘Menu’ Screen

‘Edit Profile’

Edit profile allows the following functionality:

  • Adding user’s picture.
  • Changing first and last name.
  • Changing date of birth.
  • Changing gender.
  • Changing contact phone (be careful, this is phone used for subscription and update purposes).
  • Changing physical address.
  • Changing email address.
‘Update Password’ Allows the user to change user password for myKitabu app.
‘Configuration’

Allows user to customize the app by:

  • Adding more advanced features
  • Adding the unit of measure when buying or selling a product.
‘Logout’ Allows the user to logout from the app. App will require password on next login.
‘Subscribe Now’ Allows the user to go through MPESA-based subscription service.
‘Expiration’ Shows the user current subscription expiry date.
‘User Manual’ Location where this manual and all its updated versions is available for download in a PDF format.
‘AKL T&Cs’ Afri Kash Limited terms and conditions related to myKitabu applications use.

5. ‘Reports’ Screen

‘Sales Report’

The report that summarizes all sales completed by your business as follows:

  • Daily – between 00:00 and 23:59 of the current day;
  • Weekly
  • Monthly – between first and last day of the current month.
  • Quarterly – summarizing current three months.
‘Expenses Report’

The expense report summarizes all the expenses incurred by your business as follows:

  • Daily – between 00:00 and 23:59 of the current day;
  • Weekly
  • Monthly – between first and last day of the current month.
  • Quarterly – summarizing current three months.

4. ‘Manage’ Screen

‘Customers’

Allows users to register customers. This is important for statistical purposes and when registering returning customers. The process is as follows:

  • STEP1 – press ‘+’ button in lower-right corner.
  • STEP2 – take a picture of the customer (not mandatory), enter name (mandatory), phone number, address and email and press ‘ADD CUSTOMER’.
‘Vendors’

This feature allows the user to register a vendor where the business frequently gets goods or services from. It works as follows:

  • STEP1 – press ‘+’ button in lower-right corner.
  • STEP2 – take a picture of the customer (not mandatory), enter name (mandatory), phone number, address and email and press ‘ADD VENDOR’.
‘Products’

This process allows to register any products or services business either buys or sells. The process if as follows:

  • STEP1 – press ‘+’ button in lower-right corner.
  • STEP2 – take a photo of the product.
  • STEP3 – enter product name.
  • STEP4 – is the product ‘Sellable’ by your business (this is any product your business can sell).
  • STEP5 – is the product ‘Purchasable by your business (this would be any product you are reselling after having purchased it. This will not include products manufactured by your business, services, or products you but to be used by your business).
  • STEP6 – is the product expendable
  • STEP7 – ‘Product Type’ is either ‘Storable’ for physical product or ‘Service’ for service you provide or buy.
  • STEP8 – enter unit price (this is for product that is ‘Sellable’ by your business.
  • STEP9 – ‘Cost’ what has this product cost your business. This is important for products that are ‘Purchasable’.
  • STEP10 – press ‘ADD PRODUCT’.

3. ‘Buy’ Screen

‘Buy Supplies’

A place where you can purchase supplied for your business as follows:

  • STEP1 – press ‘+’ button in lower-right corner.
  • STEP2 – select ‘Vendor’ you are purchasing from (you can register the vendor on ‘Manage’ page).
  • STEP3 – select ‘Product you are purchasing (you can add the product on ‘Manage’ page).
  • STEP4 – adjust quantity, price-per-unit, discount and press ‘CONFIRM’.
  • STEP5 – press ‘NEXT (1 SELECTED)’
  • STEP6 – press ‘REVIEW’
  • STEP7 – edit ‘Vendor’, ‘Order Date’, ‘Products’, and upload invoice image. Press ‘Save’.
  • STEP8 – Select ‘Pay Later’ or ‘Pay’.
  • STEP9 – enter ‘Paid Amount’, ‘Mode of Payment’, and press ‘RECORD PAYMENT’.
‘Expenses’

A place where you record any business-related expenses as follows:

  • STEP1 – press ‘+’ button in lower-right corner.
  • STEP2 – Pick ‘Expense Category in the pull-down menu, record ‘Expense Date’, ‘Amount’ and ‘Description’ and press ‘LOG EXPENSE’.

2. ‘Sell’ Screen

‘Point of Sale’
  • The Point of Sale is like your digital cash regiser.
  • ‘Cash in Drawer’ as shift start – opens cash register in the morning by registering how much cash was left in the drawer. This can be any registered cash/change business will use to start the day. Enter value and press ‘+’.
  • By pressing on any of the defined items, a person selling can start sales transaction by:
    • Adjusting quantity sold.
    • Adjusting price unit(s).
    • Adjusting discount (if any).
    • Pressing ‘Checkout’ button.
    • Confirming ‘Cash Received’.
‘Invoices’
  • STEP1 – selection of customer. Any customer that has already been registered under ‘Manage’ > ‘Customers’ would automatically appear on the list of customers. Select existing customer or select ‘Individual Customer’ and click ‘Next’.
  • STEP2 – add any registered product or service to your invoice.
  • STEP3 – add quantity sold, price per unit, and discount and press ‘Confirm’.
  • STEP4 – press ‘Next’
  • STEP5 – select “Payment Term’ and ‘Due Date’ and press ‘Next’
  • STEP6 – edit ‘Customer’ and ‘Order Total’ fields if necessary and press ‘Save’
  • STEP7 – press ‘Register Payment’
  • STEP8 – “Enter Paid Amount’, select ‘Mode of Payment’ (Bank, MPESA, Cash) and press ‘Record Payment’.
‘Transactions’
  • ‘PoS’ – record of all transactions created with point-of-sale,
  • ‘Invoice’ – record of all invoices generated.

1. MyKitabu

‘Sell’ screen

The ‘sell’ screen is used for any sales. You can sell both goods (physical products) or services. ‘Sell’ screen has the following functionality:

  • ‘Point of Sale’ – where you sell products or services to your customers.
  • ‘Invoices’ – where you register the customer payment.
  • ‘Transactions’ – where you review the history of all sales and purchases
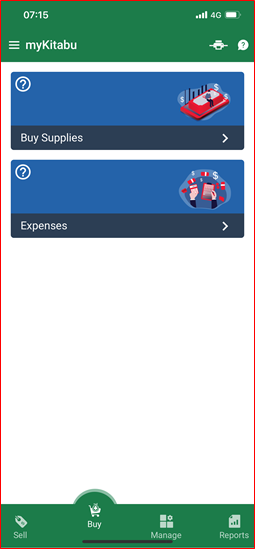
‘Buy’ screen

The ‘buy’ screen is used for any purchase. You can purchase both goods (physical products) or services (such as telephone credit). Goods you buy can be sold at a profit or used in your company. ‘Buy’ screen has the following functionality:

  • ‘Buy Supplies’ – where you purchase supplies for your business.
  • ‘Expenses’ – where you record any business-related expense.
‘Manage’ screen

The ‘manage’ screen is used for registration of your customers, vendors, and products. The ‘manage’ screen has the following functionality:

  • ‘Customers’ – where you register customers (people or businesses you sell too).
  • ‘Vendors’ – vendors (people or businesses you buy from).
  • ‘Products’ – products (any goods or services you buy or sell).
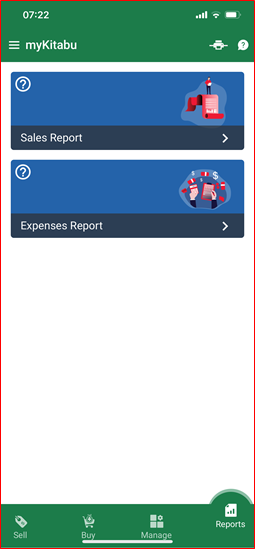
‘Reports’ screen

‘Reports’ screen is used to have detailed reports of sales and expenses. The ‘reports’ screen contains the following functionality:

  • ‘Sales Report’ – detailed record of sales based on daily, weekly, monthly, and quarterly activity.
  • ‘Expenses Report’ – detailed record of entered expenses based on daily, weekly, monthly, and quarterly activity.
Menu button Where you can update password, login/logout, purchase subscription, and download this manual in PDF format.