1.1. Overview about Kiu BMP

Kiu BMP helps companies manage and simplify their business processes.

Only 3% of the business owners we spoke to use accounting software or enterprise resource planning (BMP) systems. They needed it but existing options were too complicated and expensive. We have developed Kiu BMP which is simple, flexible, and affordable for all business.

Enterprise resource planning (BMP) systems help companies manage and simplify their business processes by tying everything together under a single database and interface. When every department or location has its own software and data sources, efficiency suffers. Complicated processes drain time and money. Multiple databases create confusion and duplication. Lack of visibility makes it hard to find and fix problems. An BMP system connects employees with the information they need to support customers, processes, and projects more effectively.

9.7.5. How to reinvoice expenses to your customers

If you track expenses on customer projects, you can charge them back to your customers automatically.

→ Setup

  • Go to Accounting ‣ Configuration ‣ Settings and mark as using Analytic Accounting (at the check box).
  • Go to Sales ‣ Sales ‣ Products and set the invoicing method on all your Expense product types:
    • At cost: will invoice expenses at their real cost.
    • At sales price: will invoice based on a fixed sales price defined in the product form.

→ Create an order

  • As a salesman, create and confirm a Sales Order for the services delivered to your customer. Don’t put any expense in the order. They will be added automatically once posted by the accountant.
  • Link this order to an analytic account dedicated to the customer project. You can create it on the fly.

→ Tip

If you track Timesheets on customer projects, Kiu BMP can create an analytic account automatically once the order confirmed. It’s useful if your employees must record timesheets on customer-specific projects. To do so, open your order product (service item) and make sure Track Service is set on Timesheets on project.

→ Submit, validate and post expenses

  • As a manager, make sure the analytic account is set on every expense line on approving expenses reports. Click the line to add one if missing. Employees are already able to set one when submitting.

  • As an accountant, post journal entries.

→ Invoice expenses

Now you can invoice the order. It shows up in Sales ‣ Invoicing ‣ Sales to Invoice. The expenses have been added automatically in the order lines. Such items show up in blue (i.e. to invoice).

9.7.4. How to post expenses & reimbursement in accounting

Once expense reports approved by managers, the accounting department goes to Expenses ‣ Accountant ‣ Expense Reports To Post to check accounts, products and taxes. They can click Post Journal Entries to post related journal entries into your books. To do so, the user must have following access rights:

  • Accounting: Accountant or Adviser
  • Expenses: Manager

Note

To post an expense, a Related User must be set on the Employee form. If you get a related blocking message when posting, click to open Employee form, go to Personal Information tab and select/create the contact of your employee in the address book. A contact has been automatically created if this person is using Kiu BMP.

→ Reimburse employees

You can now see all the expense reports to reimburse in Expenses ‣ Accountant ‣ Expense Reports To Pay. To record the payment or pay by check, click Register a Payment.

9.7.3. How to approve expenses

HR and team managers get an overview of all expense reports to validate from the top menu To Approve ‣ Expense Reports to Approve. Such users must have at least Officers access rights for Expenses.

They can review expense reports, approve or reject them, as well as providing feedback thanks to the integrated communication tool.

As a team manager you can easily find the expense reports of your team members. You need to be set as manager in the detail form of those employees.

9.7.2. How to record expenses

→ Manually

As an employee (Employee in user access rights), you can record expenses from My Expenses ‣ Expenses to Submit.

  1. Select the related product and enter either the total amount you paid (with Quantity = 1) or the unit price if Quantity is countable (e.g. number of hotel nights).
  2. Enter the expense date.
  3. Choose if you paid the bill on your own (and expect to be reimbursed) or if the company paid directly (e.g. if you used a company’s credit card).
  4. Set the bill reference, add some notes if requested and attach a photo/scan of the receipt from the discussion thread. That will help the manager and the accountant validate it.

→ In one click from emails

Let your employees record their expenses from a simple email. Make a snapshot of the receipt and send it by email, or simply forward a bill!

The only thing to do is setting up an email alias in Expenses ‣ Configuration ‣ Settings (e.g. expenses@mycompany.erp2.kiuglobal.com). For security purposes, only authenticated employee emails (cfr. Work Email in employee detail form) are accepted.

→ Submit expenses to managers

When you are ready to submit your expenses to your manager (e.g. at the end of a business trip, or once a month), go to the menu My Expenses ‣ Expenses to Submit. Select all expenses from the list view and click on Action ‣ Submit to Manager. Save the newly created expense report (i.e. set of expenses), and wait for your manager to approve it.

9.7.1. How to set expense types

The first step to track expenses is to configure the expense types (managed as products in Kiu BMP) that your company allows, from the Configuration menu. When a specific expense is reimbursed at a fixed price, set a cost on the product. Otherwise keep the cost at 0.0 and employees will report the real cost per expense.

Here are some examples to configure:

  • Restaurant:
    • Cost: 0.00 (the cost of the ticket will be recorded on every expense)
  • Travel with Personal Car:
    • Cost: 0.30 (the price per mile reimbursed by the company is fixed)
  • Hotel:
    • Cost: 0.00 (the cost of the ticket will be recorded on every expense)
  • Others:
    • Cost: 0.0

Don’t forget to set an expense tax on each expense type.

9.6.2. Employee Advance Process

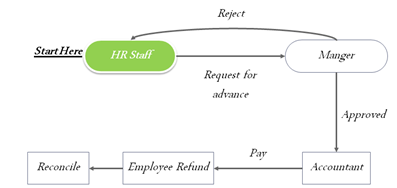
In order to have a advance, employee can use the Employee Advance module

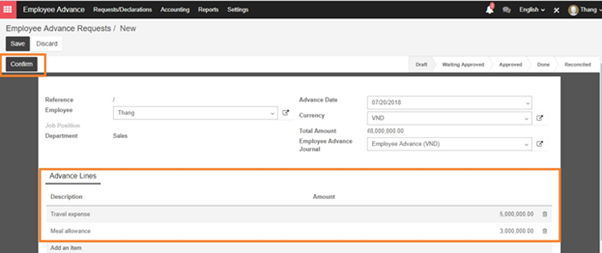
From the main menu, employee can choose “Create” to create a request for advance

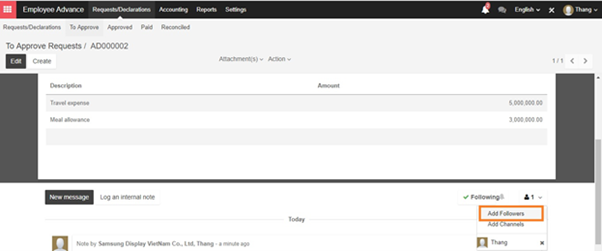
In the request form, the employee can input the description and amount of advance. After that, click on “Confirm” button to verify that advance

After confirming the request, employee can add the related person to this approval by adding followers function in the request form

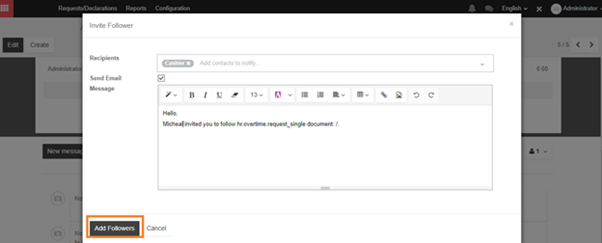
A pop-up will appear when clicking on Add Followers button, this pop-up help to send email to related person to this request. Just fill in the Recipients box and content of message and Click on Add Followers button to send the mail.

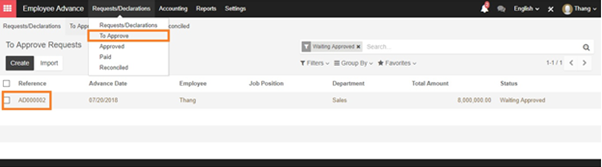
After finishing requests for advance, employee will have to wait for manager to approve it.

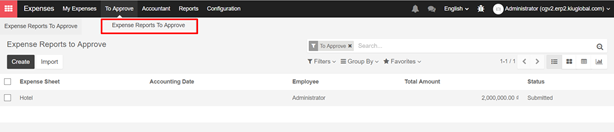
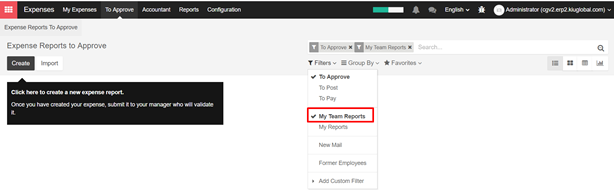
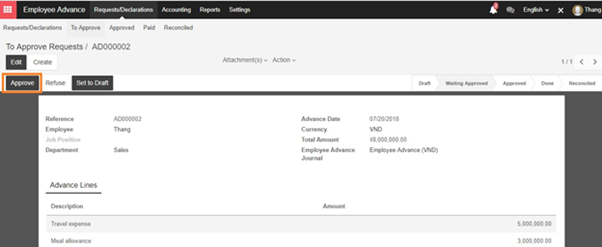
Manager can access the Employee Advance module and access to Request –‣ To Approve to see the approvals in pending state and click on each request to see the detail

Note: Before approving for employee advance request, manager has to re-set up the accounting entries of employee.
First, choose the employee module then click on employee to see the detail

In the Employee form, Edit the form then click on the personal information tab and click on the name of employee besides the related contact field

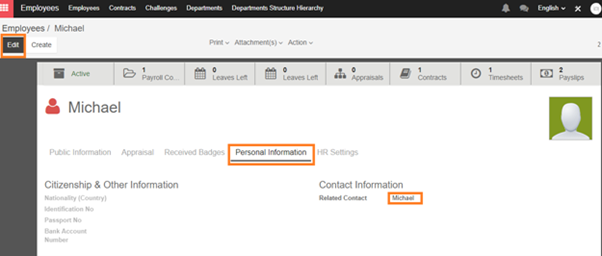
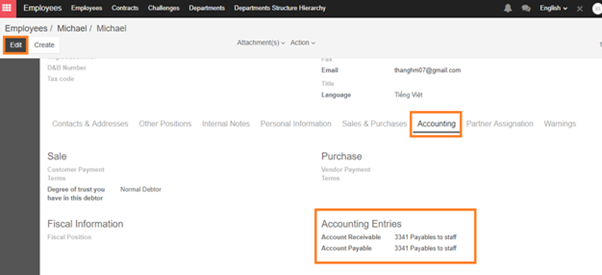
A pop-up detail of employee appear, click on the Accounting tab to revise the Accounting Entries match with the employee advance

After payment for the advance finished, manager has to go back and re-setting accounting entries of employee 

In the form view of request for advance, manager can Refuse or Approve employee’s request.

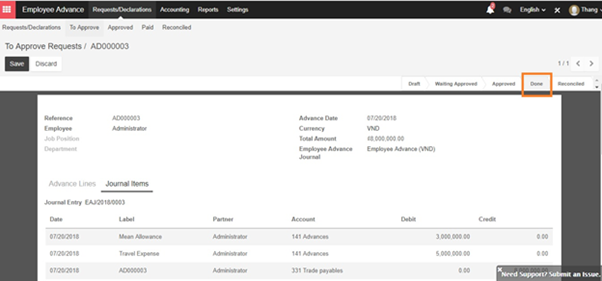
After manager approve the request, accountant can Pay that money to employee as advance.

When completing paying, the state of request form turn into “Done” means payment was successfully received by employee.

Employee need to return all the invoices/ receipt related to the advance they used in order for accountant to well-recognize them and make journal entries.

Note for settings:

In order to allow who will pay the Advance, set-up for user is mandatory.

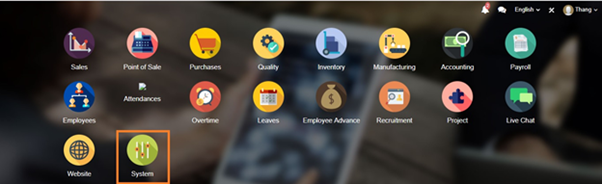
First, access the System setting:

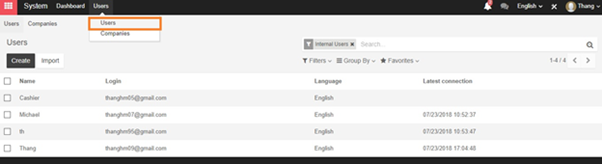
Then, click on Users -‣ users to setup specify user

Go next to config Employee advance and Accounting

For below settings for user, user can only approve for employee request but cannot pay.

Employee Advance Accounting & Finance
Approver Billing

Only user with below setting can be allowed to pay the advance

  Employee Advance Accounting & Finance
Option 1 Approver Accountant
Option 2 Manager Billing
Option 3 Manager Accountant