7.10.1. How To Set up a Delivery Method?

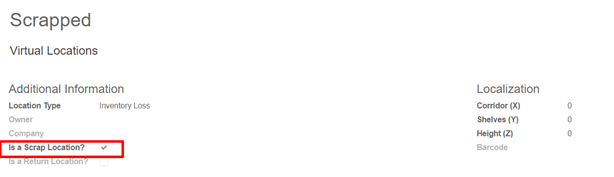
Kiu BMP can handle various delivery methods, but it is not activated by default. Delivery methods can be used for your sale orders, your deliveries but also on your e-commerce. Delivery methods allow you to manage the transport company, the price and the destination. You can even integrate Kiu BMP with external shippers to compute the real price and the packaging.

  • Configuration:

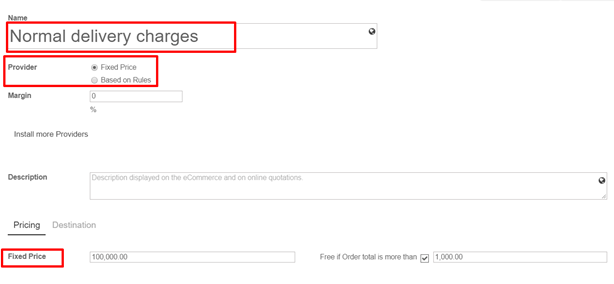
Go to Inventory -> Configuration -> Delivery methods. Enter the name and set the price, it can be fixed or based on rules

  • If the price is fixed, tick Fixed price. You’ll just have to define the price. If you want the delivery to be free above a certain amount, tick the option Free if Order total is more than and set a price.
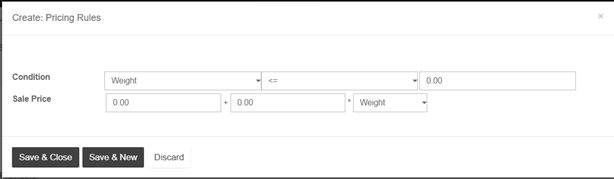
  • If the price varies according to rules, tick Based on Rules. Click on add an item to a pricing rule. Choose a condition based on either the weight, the volume, the price or the quantity.

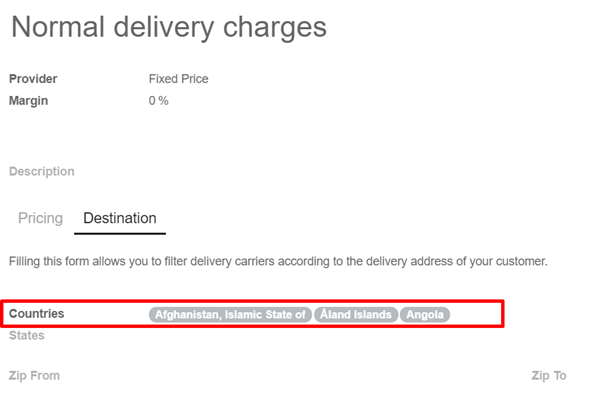
Finally you can limit the delivery method to a few destinations. The limit can be applied to some countries, states or even zip codes. This feature limits the list of countries on your e-commerce.

  • Delivery Process:

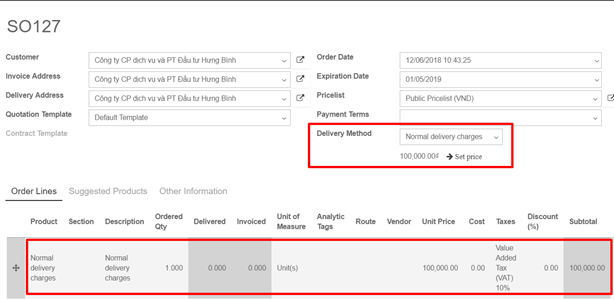
Go to Sales -> Sales -> Sale order. You can now choose the Delivery Method on your sale order. If you want to invoice the price of the delivery charge on the sale order, click on Set price, it will add a line with the name of the delivery method as a product.

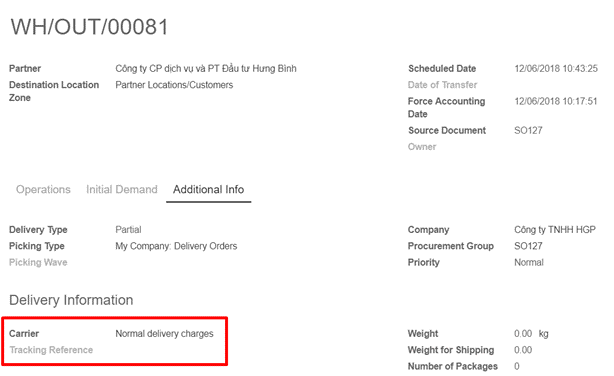
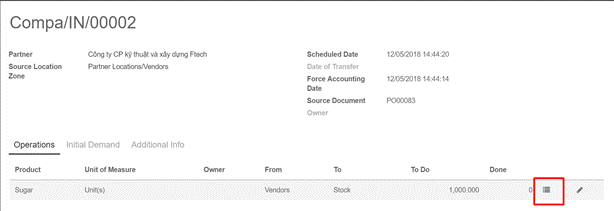
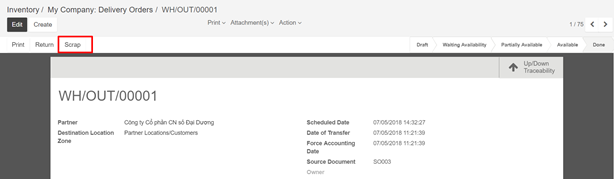
Go to Inventory -> Dashboard -> Delivery orders

You can add or change the delivery method on the delivery itself. On the delivery, check the Carrier Information. The carrier is the chosen delivery method.

7.9.3. How To Do An Inventory Valuation?(Anglo-Saxon Accounting)

  • Periodic Inventory Valuation

In a periodic inventory valuation, goods reception and outgoing shipments have no direct impact in the accounting. At the end of the month or year, the accountant posts one journal entry representing the value of the physical inventory.

At the end of the month/year, your company does a physical inventory or just relies on the inventory in Kiu BMP to value the stock into your books. Then you need to break down the purchase balance into both the inventory and the cost of goods sold using the following formula:

Cost of goods sold (COGS) = Starting inventory value + Purchases – Closing inventory value

  • Perpetual Inventory Valuation.

In a perpetual inventory valuation, goods receptions and outgoing shipments are posted in your books in real time. The books are therefore always up-to-date. This mode is dedicated to expert accountants and advanced users only. As opposed to periodic valuation, it requires some extra configuration & testing

Configuration:

  • Accounts Receivable/Payable: defined on the partner (Accounting tab)
  • Deferred Tax Assets/Liabilities: defined on the tax used on the invoice line
  • Revenues: defined on the product category as a default, or specifically to a specific product.
  • Expenses: this is where you should set the “Cost of Goods Sold” account. Defined on the product category as a default value, or specifically on the product form.
  • Goods Received Not Purchased: to set as Stock Input Account in product’s internal category
  • Goods Issued Not Invoiced: to set as Stock Output Account in product’s internal category
  • Inventory: to set as Stock Valuation Account in product’s internal category
  • Price Difference: to set in product’s internal category or in product form as a specific replacement value

7.9.2. How to do an inventory valuation? (Continental Accounting)

–          Periodic Inventory Valuation

In a periodic inventory valuation, goods reception and outgoing shipments have no direct impact in the accounting. At the end of the month or year, the accountant posts one journal entry representing the value of the physical inventory.

–          Perpetual Inventory Valuation

In a perpetual inventory valuation, goods receptions and outgoing shipments are posted in your books in real time. The books are therefore always up-to-date. This mode is dedicated to expert accountants and advanced users only. As opposed to periodic valuation, it requires some extra configuration & testing.

Configuration:

  • Accounts Receivable/Payable: defined on the partner (Accounting tab)
  • Deferred Tax Assets/Liabilities: defined on the tax used on the invoice line
  • Revenues/Expenses: defined by default on product’s internal category; can be also set in product form (Accounting tab) as a replacement value.
  • Inventory Variations: to set as Stock Input/ Output Account in product’s internal category
  • Inventory: to set as Stock Valuation Account in product’s internal category

7.9.1. Overview

Every year your inventory valuation has to be recorded in your balance sheet. This implies two main choices:

  • The way you compute the cost of your stored items (Standard vs. Average vs. Real Price);
  • The way you record the inventory value into your books (periodic vs. Perpetual).

Standard Price means you estimate the cost price based on direct materials, direct labor and manufacturing overhead at the end of a specific period (usually once a year). You enter this cost price in the product form.

The Average Price method recompute the cost price as a receipt order has been processed, based on prices defined in tied purchase orders. The average cost does not change when products leave the warehouse.

From an accounting point of view, this method is mainly justified in case of huge purchase price variations and is quite unusual due to its operational complexity. Your actually need a software like Kiu BMP to easily keep this cost up-to-date.

This method is dedicated to advanced users. It requires well established business processes because the order in which you process receipt orders matters in the cost computation.

For Real Price (FIFO, FEFO, etc), the costing is further refined by the removal strategy set on the warehouse location or product’s internal category. The default strategy is FIFO. With such method, your inventory value is computed from the real cost of your stored products and not from the cost price shown in the product form. Whenever you ship items, the cost price is reset to the cost of the last items shipped. This cost price is used to value any product not received from a purchase order

FIFO is advised if you manage all your workflow into Kiu BMP (Sales, Purchases, Inventory). It suits any kind of users.

Kiu BMP  allows any method. To change it, check Use a ‘Fixed’, ‘Real’ or ‘Average’ price costing method in Purchase settings. Then set the costing method from products’ internal categories. Categories show up in the Inventory tab of the product form.

Whatever the method is, Kiu BMP provides a full inventory valuation in Inventory ‣ Reports ‣ Inventory Valuation .

7.8.3. How to manage lots of identical products?

Lots are useful for products you receive in great quantity and for which a lot number can help in reporting, quality controls, or any other info. Lots will help identify a number of pieces having for instance a production fault. It can be useful for a batch production of clothes or food.

Kiu BMP  has the capacity to manage lots ensuring compliance with the traceability requirements imposed by the majority of industries.

  • Configuration:

You need activate the tracking of lots in the settings. Go to Inventory -> Configuration ‣ Settings, select Track lots or serial numbers

In order to have an advanced management of the lots, you should also select Manage several warehouses, each one composed by several stock locations. Then click on Apply

  • Operation types configuration:

You also need to set up how you will manage lots for each operations. Go to Inventory -> Configuration -> Operation types

For each type (receipts, internal transfers, deliveries,…), you can set if you can create new lot numbers or only use existing lot numbers.

  • Product configuration:

Go into Inventory Control ‣ Products, and open the product of your choice. Click on Edit, and in the Inventory tab, select Tracking by Lots, then click on Save.

  • Manage lots:
  • Transfer:

In order to process a transfer of a product tracked by lot, you have to input the lot number(s).

Click on the lot icon :

A window will pop-up. Click on Add an item and fill in the lot number and the quantity.

Depending on your operation type configuration, you will be able to fill in new lot numbers, or only use existing ones.

  • Inventory adjustment

Inventory of a product tracked by lot can be done in 2 ways:

  • Classic inventory by products
  • Inventory of a lot

When doing a classic inventory, there is a Serial Number column. If the product has already been assigned with a number, it is already pre-filled.

Click on Add an item if the product has not been inventoried yet. You can easily create lots, just type in a new lot number in the column.

You can also just do the inventory of a lot. In this case, you will have to fill in the Lot number. You can also create a new lot from here. Just type in the number, a window will pop out to link the number to a product.

  • Lots traceability:

You can check the lot traceability from Inventory ‣ Inventory Control ‣ Lots/Serial Numbers

7.8.2. How to work with serial numbers?

Serial Number Tracking is used to track products with serial numbers on every transactions. You can track the current location of the product with serial numbers. When the products are moved from one location to another location, the system will automatically identify the current location of the product based on last movement of the product. So you can get the last location where the products are moved.

–          Configuration:

You need activate the tracking of serial numbers in the settings. Go to Inventory -> Configuration ‣ Settings, select Track lots or serial numbers. Then click on Apply.

–          Product Configuration:

Go into Inventory Control ‣ Products, and open the product of your choice. Click on Edit, and in the Inventory tab, select By Unique Serial Number, then click on Save.

–          Manager serial numbers:

  • Transfer

In order to process a transfer of a product tracked by serial number, you have to input the number(s). In order to be able to assign serial numbers to products with tracking features enabled you will first need to mark your transfer as to do. Click on the Mark as TODO button to display the Lot Split icon.

Click on the serial number icon :

A window will pop-up. Click on Add an item and fill in the serial numbers.

  • Inventory adjustment:

Inventory of a product tracked by serial numbers can be done in 2 ways:

  • Classic inventory by products
  • Inventory of a serial number

When doing a classic inventory, there is a Serial Number column. If the product has already been assigned with a number, it is already pre-filled.

Click on Add an item if the product has not been inventoried yet. You can easily create serial numbers, just type in a new number in the column.

The quantity should be 1 for each line. You can also just do the inventory of a serial number. In this case, you will have to fill in the serial number. You can also create a new one from here. Just type in the number, a window will pop out to link it to a product.

  • Serial number traceability:

The serial number given to these items allow you to keep track of where they were received, put in stock, to whom they were sold and where they were shipped to.

To track an item, open the Inventory module, and in Inventory Control ‣ Serial Numbers/lots, click on the serial number corresponding to your search.

7.8.1. What’s the difference between lots and serial numbers?

Lots correspond to a certain number of products you received and store altogether in one single pack.

Serial numbers are identification numbers given to one product in particular, to allow to track the history of the item from reception to delivery and after-sales.

  • When to use:

Lots are interesting for products you receive in great quantity and for which a lot number can help in reportings, quality controls, or any other info. Lots will help identify a number of pieces having for instance a production fault. It can be useful for a batch production of clothes or food.

Serial numbers are interesting for items that could require after-sales service, such as smartphones, laptops, fridges, and any electronic devices. You could use the manufacturer’s serial number or your own, depending on the way you manage these products

  • When not to use:

Storing consumable products such as kitchen roll, toilet paper, pens and paper blocks in lots would make no sense at all, as there are very few chances that you can return them for production fault.

On the other hand, giving a serial number to every product is a time-consuming task that will have a purpose only in the case of items that have a warranty and/or after-sales services. Putting a serial number on bread, for instance, makes no sense at all.

7.7.3. How to configure and run schedulers?

Scheduling only validates procurements that are confirmed but not yet started. These procurement reservations will themselves start production, tasks or purchases depending on the configuration of the requested product.

You take into account the priority of operations when starting reservations and procurements. Urgent requests, those with a date in the past, or requests with a date earlier than the others will be started first. In case there are not enough products in stock to satisfy all the requests, you can be sure that the most urgent requests will be produced first.

→ Run the scheduler manually

You can also start the scheduler manually from the menu Inventory ‣ Schedulers ‣ Run Schedulers. The scheduler uses all the relevant parameters defined for products, suppliers and the company to determine the priorities between the different production orders, deliveries and supplier purchases.

→ Configure and run the scheduler (only for advanced users)

You can set the starting time of the scheduler by modifying the corresponding action in the menu Settings ‣ Technical ‣ Automation ‣ Scheduled Actions. Modify the Run mrp Scheduler configuration.

7.7.2. How to manage stock that you don’t own?

Some suppliers can sometimes offer you to store and sell products without having to buy those items: this technique is called consignee stock. Consignee stock is a great way for manufacturers and suppliers to launch new products. As resellers may be reluctant to buying a product that they are not sure to be able to sell, consignee stock will allow them to propose an item to check its market without having to pay for it in the first place. Kiu BMP has the ability to manage consignee stocks through the advanced settings.

Go to Inventory -> Configuration -> Settings and in the Product Owners section, select Manage consignee stocks (advanced), then click on Apply.

In the Inventory’s Dashboard, open the Receipts and create a new reception. You can see that in the right side of the page, a new Owner line has appeared. You can specify the partner which owns the stock or leave it blank if you are the owner.

7.7.1. How to scrap products?

Scrap means waste that either has no economic value or only the value of its basic material content recoverable through recycling. In your warehouse you sometimes find products that are damaged or that are unusable due to expiry or for some other reason. You often notice this during picking or physical inventory. Since you cannot normally sell or store these products, you have to scrap product. When goods are scrapped they are not reflected in the system as a part of the inventory. The scrapped material will be physically moved to scrap area.

  • Configuration

When you install inventory management, the system automatically creates one default scrap location, namely Virtual location/Scrapped.

To create an extra scrap location, Go to Inventory ‣ Configuration ‣ Settings and check Manage several warehouse, each one composed by several stock locations, then click on Apply.

Then you can create a new scrap location in Configuration ‣ Warehouse Management ‣ Locations. To define a scrap location, you have to check Is a scrap location? on location form view.

  • Different ways to scrap product
  • Scrap from Receipt : To scrap product from incoming shipment , go to Inventory -> Dashboard -> Receipts

Open the incoming shipment and click on the Scrap button

Scrap from delivery order : To scrap product from outgoing shipment, go to Inventory -> Dashboard -> Delivery orders

Open the outgoing shipment and click on the Scarp button

Scrap from internal transfer : Go to Inventory -> Dashboard -> Internal transfer

Open the internal transfer and click on the Scarp button