Purchase – table of content

2.1. Regular Purchase process
2.1.1. Request for Quotation
2.1.2. Confirm Purchase Order
2.1.3. Confirm Receipt
2.1.4. Create a vendor bill
2.1.5. Bill Control
2.1.6. Lock a purchase order
2.1.7. Cancel a purchase order
2.1.8. Request managers approval for expensive orders
2.1.9. Analyze the performance of my vendors
2.1.10. Determine when to pay a vendor bill with 3-way matching
2.1.11. Raise warnings on purchase orders
2.1.12. Dropship products

2.2. Master Data
2.2.1. Set multiple vendors on a product
2.2.2. Import vendors pricelists

2.3. Purchase Agreements
2.3.1. Manage Blanket Orders
2.3.2. Manage Call for Tender

2.4. Replenishment Flows
2.4.1. Don’t run out of stock thanks to Reordering Rules
2.4.2. Trigger purchase of products based on sales (Make to Order)
2.4.3. Schedule your receipts and deliveries


2.4.3. Schedule your receipts and deliveries

To manage your supply chain scheduling, you will need to use KiuBMP Lead Times.

Lead Times are the expected times needed to receive, deliver or manufacture products.

Configure Lead Times
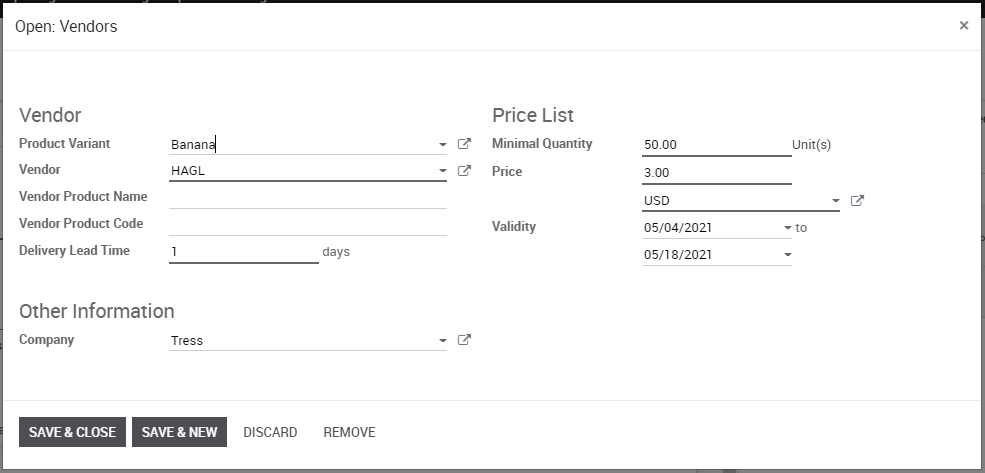
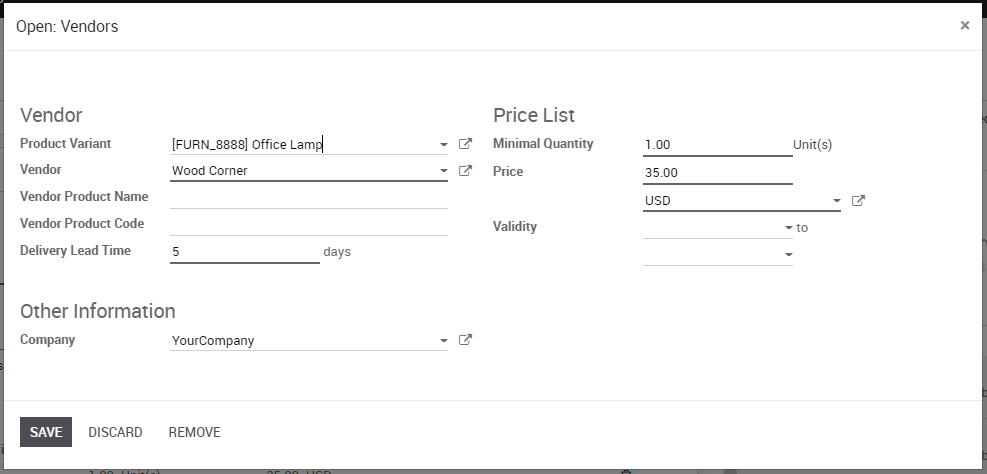
Vendor Lead Time

The vendor lead time is the time needed by your vendor to deliver the product to you.

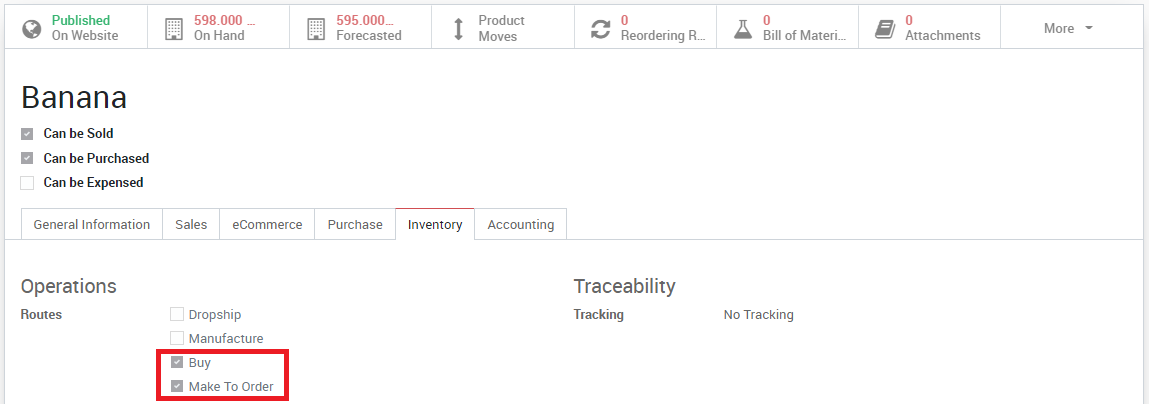
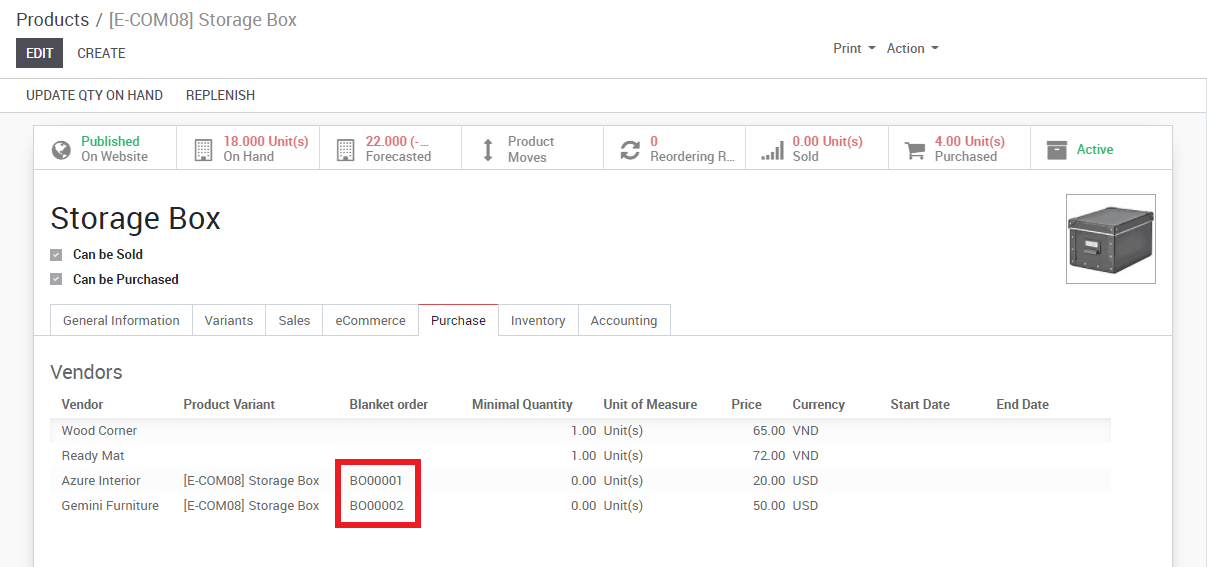
To configure your vendor lead times, go to a product page, under the purchase tab, click on a Vendor once there you can change the delivery lead time for that Vendor & Product.

Customer Lead Time

The customer lead time, on the other hand, is the time you need to deliver the product to your customer.

To configure your customer lead time open a product and go under the Inventory tab. You can then add how many days you need.

Manufacturing lead time

The manufacturing lead time is the time you need to manufacture the product.

To configure your manufacturing lead time open a product and go under the Inventory tab. You can then add how many days you need.

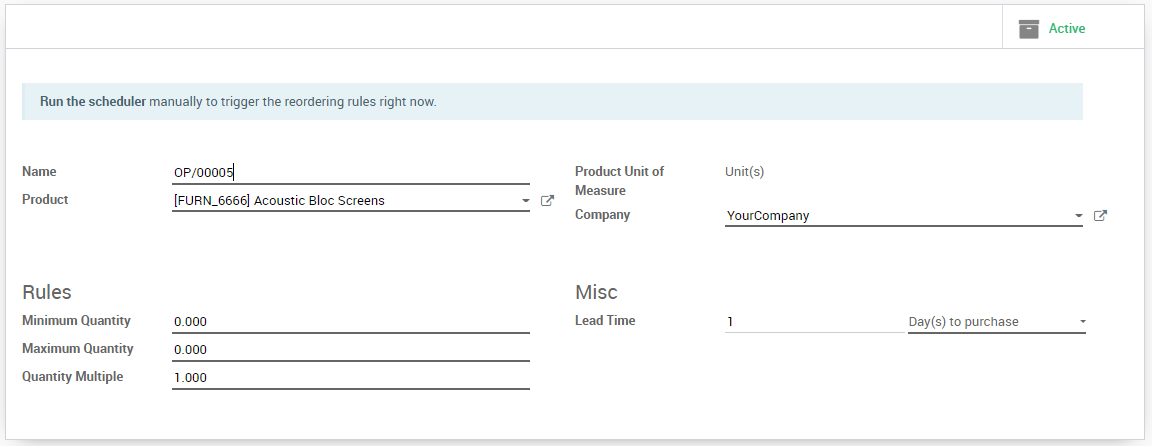
Configure Security Lead Times

KiuBMP also lets you configure Security Days allowing you to cope with potential delays along the supply chain and make sure you meet your engagements.

The easiest way is to go to Settings from any module and type Lead Time in the search bar. From there, tick each box and configure your various Security Lead Time for your needs.

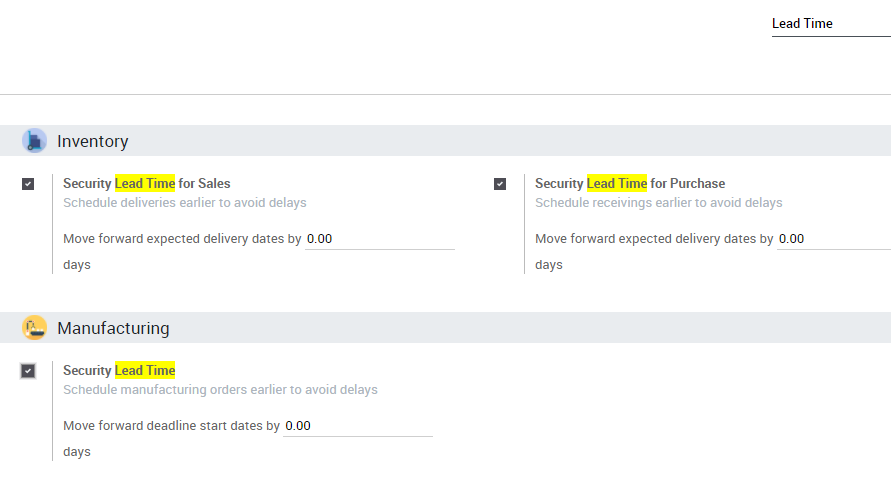
Alternatively, you can go in the settings of the Inventory module and Manufacturing module to configure those settings.

Lead & security times in a use case

For example you sell a car today (January 1st), that is purchased on order, and you promise to deliver your customer within 20 days (January 20). Here is your product’s configuration:

  • Security lead time for sales : 1 day
  • Security lead time for purchase : 1 day
  • Vendor delivery lead time : 9 days

In such a scenario, the scheduler will trigger the following events based on your configuration.

  • January 19: scheduled delivery date (20th January – 1 day of security lead time for Sales)
  • January 18: scheduled receipt date (19th January – 1 day of security lead time for Purchase)
  • January 10: order date = deadline to order from your vendor (19th January – 9 days of vendor lead time)


2.4.2. Trigger purchase of products based on sales (Make to Order)

If you don’t keep stock of your products, you may need to trigger purchase orders on each sale you make.

Thanks to being a fully integrated solution, KiuBMP lets you do that easily in just one step.

Configure the product

Open a product form and, under the inventory tab, tick the routes Buy and Make To Order.

Don’t forget to also set a vendor under the Purchase tab.

Note

The InventorySales and Purchases modules have to be installed in KiuBMP for this feature to work.

Create a sales order using Buy & MTO

Create a new sales order with your product. When you confirm the order, a delivery order is created with the status Waiting for another operation.

A new RfQ will automatically be created in your Purchases module. Note that you can see for which SO this RfQ has been created thanks to the Source Document field, visible on the RfQ.

When you confirm the RfQ into a purchase order, a receipt is automatically created and directly accessible from your purchase order with the use of the Shipment button.

You can validate the receipt of your products. When you will go back to the delivery order, you will see that the products are now ready to be shipped.

Tip

As long as your RfQ is not confirmed, KiuBMP will keep adding PO Lines automatically under it.


2.4.1. Don’t run out of stock thanks to Reordering Rules

To make sure you never run out of stock, you might want to define Reordering Rules on products. Thanks to reordering rules, KiuBMP will help you to replenish your stock when it reaches a minimum stock level.

Set a reordering rule

Open a stockable product, you’ll find the Reordering Rules tab.

Note

You can also access all your reordering rules from Inventory ‣ Master Data ‣ Reordering Rules.

Once in the next menu, you can create the reordering rules linked to your product. From now on, every time this product reaches the minimum quantity it will replenish your stock to your maximum quantity.

Tip

The replenishments will take place when the scheduler in the Inventory module runs. By default in KiuBMP, the schedulers will run every night at 12:00PM.

See also: How to configure and run schedulers?

From now on, every time a product with a reordering rule reaches the minimum stock, the system will automatically see how to fulfill that need based on the product configuration (e.g create an RfQ, create an MO, etc.).

Troubleshooting

For your reordering rules to work, your product needs to be correctly configured. If you are using Buy route, you need a vendor on the product. If you are using Manufacturing route you will been a BoM on the product. If the product is not fully configured or there is a mistake in your routes, a next activity will be logged on the product informing you there is an issue with the configuration.


2.3.2. Manage Call for Tender

A Call for Tender is a special procedure to request offers from multiple vendors to obtain the most interesting price.

Configuration

For this feature to work, go to Purchases ‣ Configuration ‣ Settings and activate the Purchase Agreements feature.

Create a Call for Tender

To use this feature, go to Purchases ‣ Purchase Agreements.

Create a new purchase agreement, access the Agreement Type drop down menu and select Call for Tender.

When you are satisfied with your purchase agreement, confirm it will move from Draft to Confirmed and a new RFQs/Orders appeared in the top right corner of the document.

Request new quotations from the Call for Tender

From the Call for Tender, KiuBMP will auto-fill the RFQ with the product(s) from your Call for Tender.

Select the best offer

The various RFQs and orders linked to the Call for Tenders will be under the RFQs/Orders button where you can select and confirm the best offer.

Close the Call for Tender

Once you’re done with your Call for Tender don’t forget to close it.

2.3.1. Manage Blanket Orders

A Blanket Order is a purchase order which a customer places with its supplier to allow multiple delivery dates over a period of time, often negotiated to take advantage of predetermined pricing.

Configuration

For this feature to work, go to Purchases ‣ Configuration ‣ Settings and activate the Purchase Agreements feature

Start a Blanket Order

To use this feature, go to Purchases ‣ Purchase Agreements.

Once you are creating the purchase agreement, access the Agreement Type drop down menu and select Blanket Order.

You can then create your new blanket order, select your vendor, the product(s), agreement deadline, ordering date and delivery date.

When you are satisfied with your purchase agreement, confirm it. Its status will change from*Draft* to Ongoing and a new RFQs/Orders will appear in the top right corner of the document.

RFQ from the Blanket Order

From your blanket order you can create a new quotation, KiuBMP will auto-fill the document with the product(s) from your blanket order, you only have to choose the quantity and confirm the order.

When you will go back on the blanket order, you will see how many quantities you have already ordered from your blanket order.

Vendors prices on your product

When a blanket order is validated, a new vendor line is added in your product. You can see which one are linked to a blanket order and give priority to the ones you want with the arrows on the left of the vendor name.

Thanks to this, a blanket order can be used for automated replenishment (using reordering rules or made to order configuration).

Tip

You can also create a Request for Quotation from the classic RFQ Menu and link them with an existing Blanket Order


2.2.2. Import vendors price lists

It is key for companies to be able to import vendors pricelists to stay up to date on products pricing.

Configuration

For this feature to work, go to Purchases ‣ Configuration ‣ Settings and tick the box in front of “Vendor Pricelists”.

Don’t forget to save your settings in the top left corner.

Import a pricelist

To import go to Purchase ‣ Vendor Pricelists

Load your file, then you can check if everything is correct before clicking import.

See below a template of the columns used.


7.4.7. How to cancel a delivery order?

Kiu BMP gives you the possibility to cancel a delivery method whether it has been validated to fast, it needs to be modified or for any other reason. Some carriers are more flexible than others, so make sure to cancel your delivery order as fast as possible if it needs to be done so you don’t have any bad surprise.

Go to Sales -> Sales -> Sales order. Then click on the sale order you want to cancel. Click on the Delivery button, in the upper right corner of the sale order.

Click “Cancel” button to cancel delivery

To make sure that your delivery is cancelled, check in the history, you will receive the confirmation of the cancellation.

7.4.6. How to change the packaging type for your sale order?

Kiu BMP gives you the possibility to change the default packaging type and adapt the packaging the way you want it, depending on the weight of the order.

Go to Inventory -> Configuration -> Setting -> Traceability -> Packages. Choose Record packages used on packing

In the Sales module, go to Sales and click on Sale Order. Create your new Sale Order, and Confirm the Sale.

Once you’ve confirmed the Sale, you need to click on Delivery, to be redirected to the Delivery order. Click on Edit, and you can now change the packaging.

In the Operations tab, in the last column, change the 0 and put the number of products that you want to pack together. Then click on Put in Pack.

Choose the type of packaging that you want. You can also see that the weight has been adapted to your package, and you can change it manually if you want it to be more precise. Then click on Save. Repeat the operation until all the products are put in pack.

Finally, click on Validate to confirm the delivery.

2.2.1. Set multiple vendors on a product

If you find yourself with the need to buy from multiple vendors for one product, KiuBMP can let you directly link them with a single product.

Add vendors in a product

To use this feature, go to Purchases ‣ Products, then select a product.

From there you can add existing vendors to your product or create a new one on the fly.

Note that every first time the product is purchased from a new vendor, KiuBMP will automatically link the contact and price with the product.

Add price & quantity as well as a validity period

When you’re adding a vendor to a product, you’re able to add the vendor product name & code as well as set the minimal quantity, price and validity period.

Tip

This feature also works with variants of your products, such as one t-shirt in different sizes!