Going to Point of Sale ‣ Configuration ‣ Point of Sale to create a POS access point on waiter’s device.
| No | Field | Description |
| Header | ||
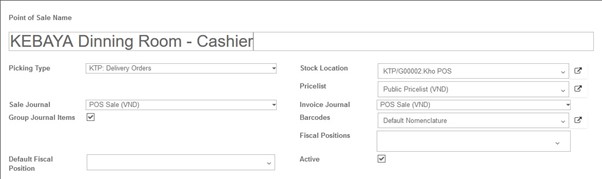
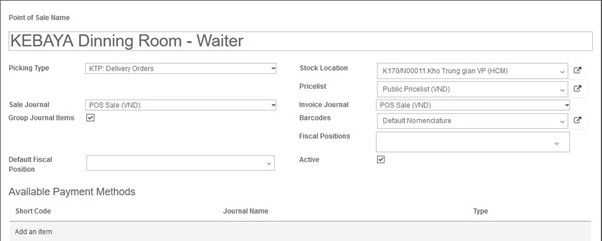
| 1. | Point of Sale Name | An internal identification of the point of sale |
| 2. | Sale Journal | Accounting journal used to post sales entries, usually POS Sales, which can be created in Accounting ‣ Configuration ‣ Journals. |
| 3. | Group Journal Items | Check this if you want to group the Journal Items by Product while closing a Session |
| 4. | Stock Location |
The location where goods are taken from. |
| 5. | Price list | The pricing strategy, which can be created in Sales ‣ Configuration ‣ Price list |
| 6. | Invoice Journal | Accounting journal used to create invoices |
| 7. | Active |
Status of the POS |
| 8. | (Line) Available Payment Methods | Leave empty. The waiter is not involved in payment or invoicing process |
| (Line) Features | ||
| 1. | Virtual Keyboard |
Don’t turn this option on if you take orders on smartphones or tablets. Such devices already benefit from a native keyboard |
| 2. | Invoicing | Leave empty. The waiter is not involved in payment or invoicing process |
| 3. | Prefill Cash Payment | Leave empty. The waiter is not involved in payment or invoicing process. |
| 4. | Start Category | The point of sale will display this product category by default. If no category is specified, all available products will be shown |
| 5. | Tip Product | Leave empty. The waiter is not involved in payment or invoicing process |
| 6. | Include Taxes in Prices | Optional. The displayed prices will always include all taxes, even if the taxes have been set up differently |
| 7. | Large Scrollbars | Used for imprecise industrial touchscreens |
| 8. | Automatic Receipt Printing | Leave empty. The waiter is not involved in payment or invoicing process |
| 9. | Display Category Picture | The product categories will be displayed with pictures |
| (Line) Multi-session | ||
| 1. | Multi-session |
Set this field the same value for POSes where orders should be synced. Leave it empty if this POS should not use syncing. To update this field you need to close running session. The value of this field is created at Point of Sale ‣ Configuration ‣ Multi-session Settings |
| 2. | Accept incoming orders | Yes |
| 3. | Replace empty order | Yes |
| (Line) Cash Control | ||
| 1. | Cash Control | Check the amount of the cashbox at opening and closing |
| (Line) Receipt | ||
| 1. | Header | A short text that will be inserted as a header in the printed receipt |
| 2. | Footer | A short text that will be inserted as a footer in the printed receipt |
| 3. | Reprinting | Leave empty. The waiter is not involved in payment or invoicing process |
| (Line) Loyalty Program | ||
| 1. | Loyalty Program | The loyalty program used by this point of sales, can be created at Point of Sale ‣ Configuration ‣ Loyalty Programs |
| (Line) Discounts | ||
| 1. | Order Discounts | Allow the cashier to give discounts on the whole order |
| 2. | Discount Product | The product used to model the discount |
| 3. | Discount Percentage | The default percentage when a discount is given in cashier’s screen |
| (Line) Bar & Restaurant | ||
| 1. | Bill Splitting | Yes |
| 2. | Bill Printing | Yes |
| 3. | Orderline Note | Allow custom notes on order lines |
| 4. | Restaurant Floors | Add the floor(s) served by this point of sales |