9.1.2. Recruitment Request

For a recruitment, employee need to create a recruitment request and submit to their manager for approval. In BMP, after accessing Recruitment:

HR will fill in all necessary information for their request and submit to their Manager.

After getting manager’s approval, HR will connect with all available sources to bring qualified applicants. Depending on each company, recruitment process would be different. In Kiu BMP,  user can design the process follow by their most updated process at their company.

On the Job Description dashboard, you will see the recruitment request you just created available

Click on Application, Kanban view with add new columns will help HR design their own interview process.

HR will add each potential applicant in the list view

After interviewee pass each stage of interview process, HR will move them to next stage by drag and drop in Kiu BMP

With each interviewee, HR can add interviewee info, expected salary as well as attach their CV and other documents related to them.

If interviewee finally become employee, HR can click “Create Employee” button to create employee.


9. HUMAN RESOURCES

9.1. Recruitment
9.1.1. Recruitment Workflows
9.1.2. Recruitment Request

9.2. Employee
9.2.1. Create Employee
9.2.2. Create Employee Contract

9.3. Leaves
9.3.1. Leaves Workflows
9.3.2. Leave Registration
9.3.3. Leave Allocation

9.4. Overtime
9.4.1. Overtime Workflow
9.4.2. Overtime process

9.5. Payroll
9.5.1. Payroll workflow
9.5.2. Payslip process
9.5.3. Payslip batch process

9.6. Employee Advance
9.6.1. Employee Advance Workflow
9.6.2. Employee Advance Process

9.7. Expense
9.7.1. How to set expense types
9.7.2. How to record expenses
9.7.3. How to approve expenses
9.7.4. How to post expenses & reimbursement in accounting
9.7.5. How to reinvoice expenses to your customers


8.7. Complete the manufacturing process

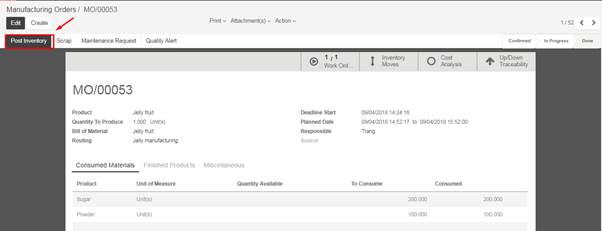
  • Go to Manufacturing ‣ Operations ‣ Manufacturing orders. Select the manufacturing order you want to complete
  • Complete the manufacturing process in the end by clicking on the Post inventory button. This will also update the quantity of finished products in the inventory

  • Look at the inventory valuation after completing the manufacturing order

8.6.2. How to create general cost

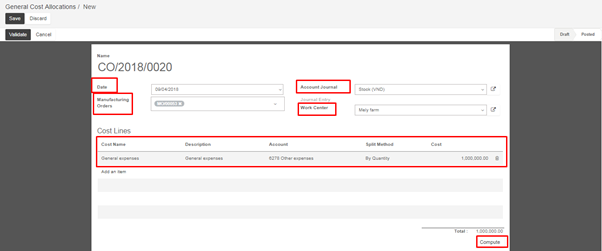
  • Go to Manufacturing -‣ Cost allocations  -‣ General costs -‣ Create
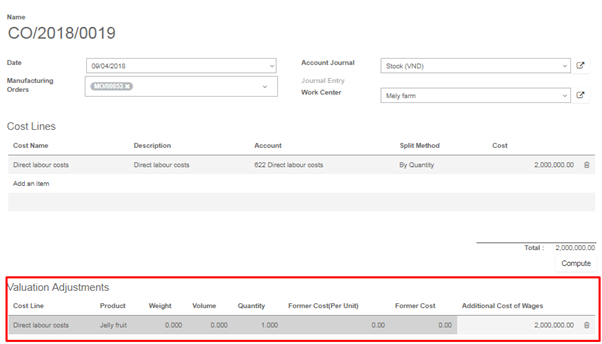
  • Fill in date, select manufacturing orders, account journal, work center, cost lines and then click Compute button

There are split methods: manual input, by quantity. 

  • Manually input: allows user to manually allocate cost at will
  • By quantity: automatically allocates the cost based on the quantity of finished product

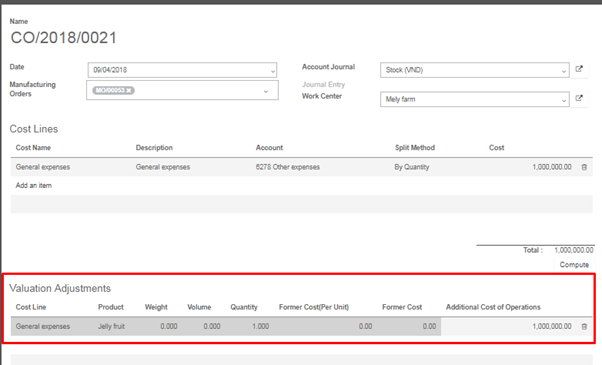
After click on the compute button, the system will automatically calculate cost allocation

Click on the Validate button 

8.6.1. How to create wage cost allocations 

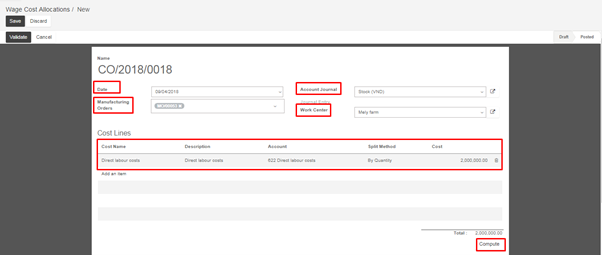
  • Go to Manufacturing -‣ Cost allocations -‣ Wages -‣ Create
  • Fill in date, select manufacturing orders, account journal, work center, cost lines and click Compute button

There are split methods: manual input and by quantity. 

  • Manually input: allows user to manually allocate cost at will
  • By quantity: automatically allocates the cost based on the quantity of finished product

After click on the compute button, the system will automatically calculate cost allocation.

8.5. How to create a manufacturing order

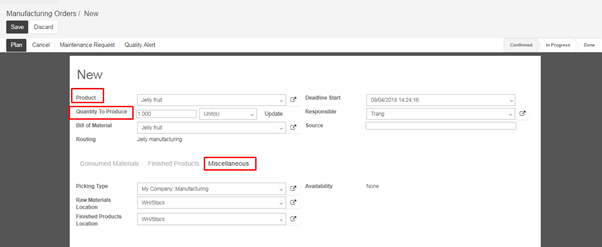
  • Go to Manufacturing ‣ Operations ‣ Manufacturing orders ‣ Create
  • Select finished product, quantity to produce, picking type for this manufacturing order and then click Save

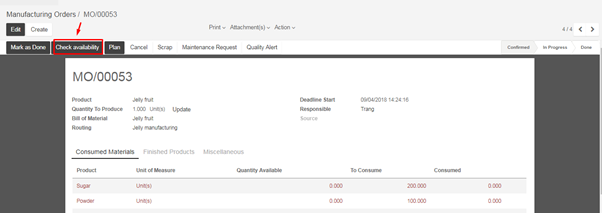
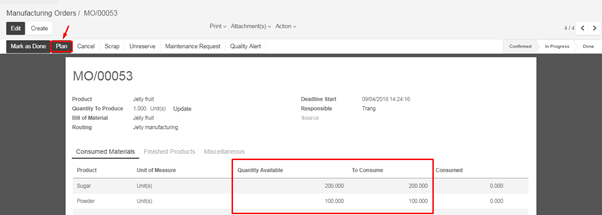
Click on the Check availability button on the manufacturing order, as we have already purchased and received the raw material. The manufacturing order now goes to the Confirmed stage and it will be ready to be produced

  • Click on the Plan button to schedule the order. 

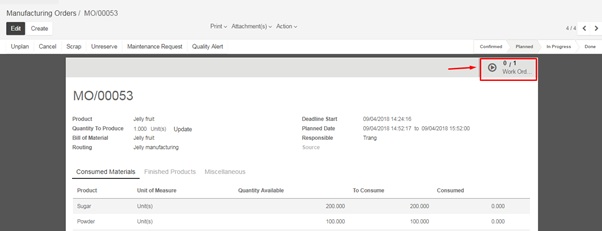
  • The work order has been created for the manufacturing order. Click on the work order to open the work order to ready to work on

  • Open the form view and click on the Start working button. 

As soon as the worker starts working on the work order, the timer starts to record the time and it is tracked under the Time tracking tab. However, we can record the time manually without using time tracking

  • Click on the Done button as soon as the operation has completed

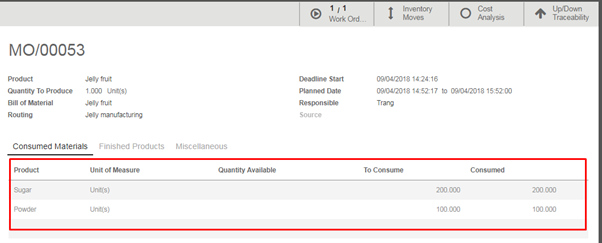
Go to manufacturing order to check raw material and finished product. The raw material will be marked as consumed on the Consumed materials tab

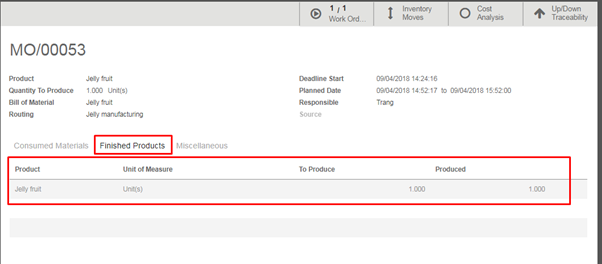
  • The quantity of finished product is displayed in tab Finished Products upon the completion of manufacturing process.

  • Click on Mark as done button to mark the status of raw material consumption as completed.

8.4. How to create a bill of materials

  • A bill of materials is a document that describes the component the products, the quantity of each component and the process required to manufacture a product, including a routing and individual steps. 
  • If you choose to manage your operations using work orders, you will define bill of materials with routings. A routing may be added to multiple bill of materials, but a bill of may only have one routing.
  • Go to Manufacturing ‣ Master data ‣ Bill of materials ‣ Create
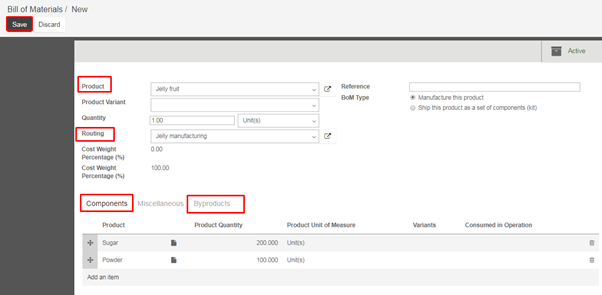
  • Select product and attach the routing on the bill of material. Fill in raw material in the components tab for this finished product. Those components will be used to manufacture the finished product and by-products.

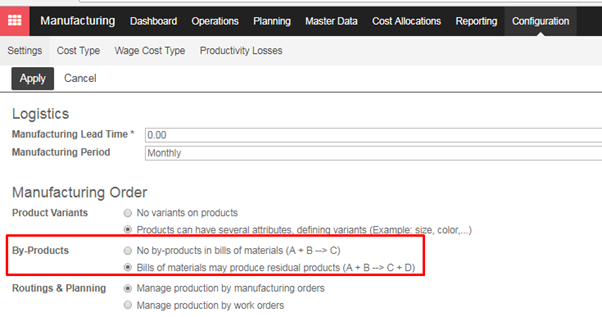
A by-products is any product produced by a bill of material in addition to the primary product. To add by-products to a bill of material, we will first need to enable them from Manufacturing ‣ Configuration ‣ Settings

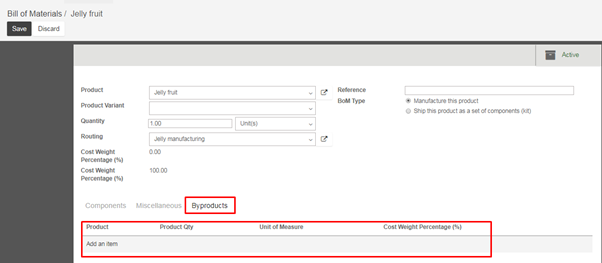
  • Once by-products are enabled, you can add them to your bill of materials under the Byproducts tab of the bill of materials. Cost Weight Percentage will define the proportion of raw materials to manufacture finished product and by-product. You can add any product as by-products and select product qty, cost weight percentage. By-products are produced  in the same step of the routing as the primary product of the bill of materials

8.3.2. Manage manufacturing by work orders

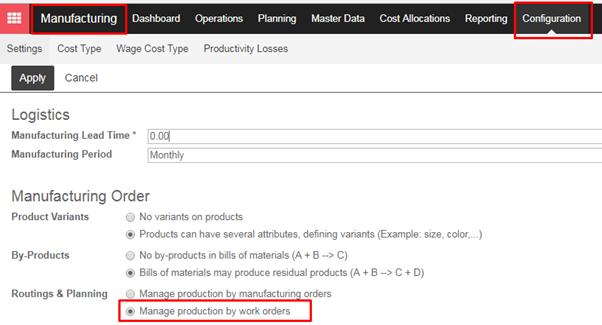
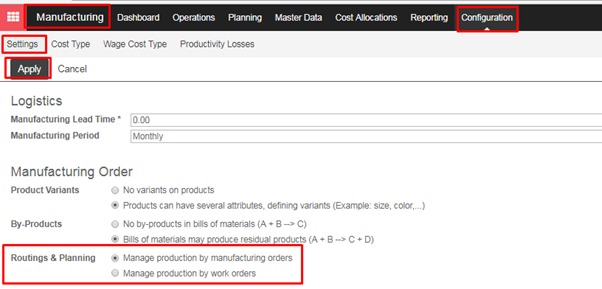
To use work center and routings, you will need to enable Manage production by work orders from Manufacturing -‣ Configuration -‣ Settings

  • When manufacturing with work centers and routings, each work order is scheduled individually. Manufacturing using routings can be broken down into several steps. When configuring you bill of material, you will need to add a routing defining the component work orders

→  How to create a work center

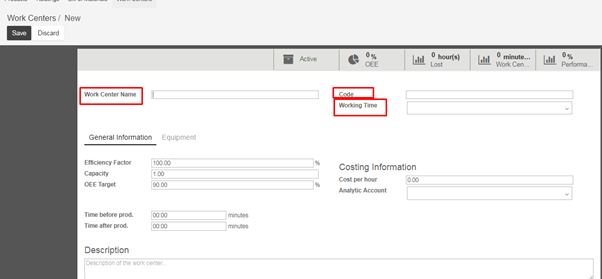
  • Go to  Manufacturing module-‣ Master data -‣ Work centers then click on Create button  to establish a work center

A work center can be a set of workers or machines which are used for task assignment as well as capacity and planning forecast. Fill in the work center name, code and select working time of the work centers -‣ then click Save

  • Work center will be available on the Manufacturing dashboard

→  How to create a routing

  • A routings defines a series of operations required to manufacture a product and the work center at which each operation is performed
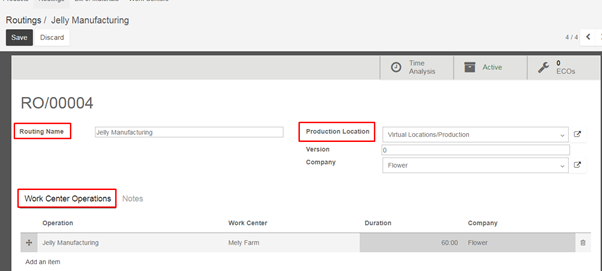
  • Go to Manufacturing ‣ Master data ‣ Routings ‣ Select Create for new routings
  • Fill in Routing name, select Production location

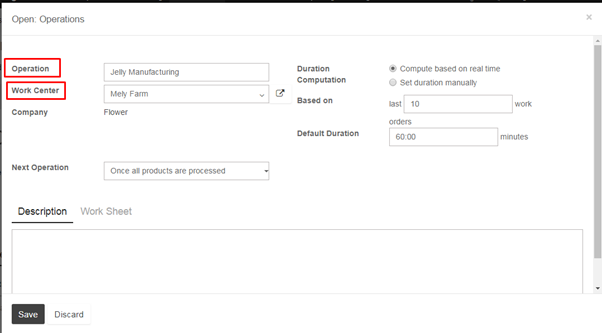
  • In the Work center operations tab, click on Add an item to add the new operation on the assembly line. Each operation is linked to the center. Enter the name in the operation field, select the work center for this operation -‣ then click Save

8.3.1. Manage production by manufacturing orders

  • You will most likely use manufacturing orders without routing if all the work to produce your product is performed in one place, by one person, in one step or you don’t need to the level of granular control afforded by work orders and routings
  • Managing your operation in this way you need to go to Manufacturing -‣ Configuration -‣ Settings

  • The workflow is thus divided into two basic phases, as follows:
  1. Create manufacturing orders
  2. Record production